Deploying Cisco CSR 1000v to Google Cloud Platform
Installation procedure for deploying a Cisco CSR 1000v virtual router to Google Cloud Platform (GCP).

I recently spent some time trying to stand up and deploy a Cisco Cloud Services Router (CSR 1000v) to Google Cloud Platform (GCP), and this blog post aims to share some of the learnings from that exercise.
CSR 1000v Background
The Cisco Cloud Services Router 1000v ("CSR 1000v") is a virtual form-factor router running Cisco IOS-XE software, with the same feature set as the ASR 1000 Series of physical routers. The CSR 1000v is supported across multiple hypervisors, including: VMware vSphere, Microsoft Hyper-V, Citrix XEN, RHEL KVM and Ubuntu KVM. Most importantly, the CSR 1000v is supported on the big 3 public clouds, namely Amazon AWS, Microsoft Azure and Google Cloud Platform.
The Cisco CSR 1000v router is available as a Solution Template on GCP Marketplace. It is available as a BYOL (Bring Your Own License) solution whereby CSR 1000v licenses are procured directly from Cisco (or a Cisco Partner).
The IOS-XE image of the CSR 1000v is licensed based on three things:
- Feature Set
- Throughput
- Subscription Term
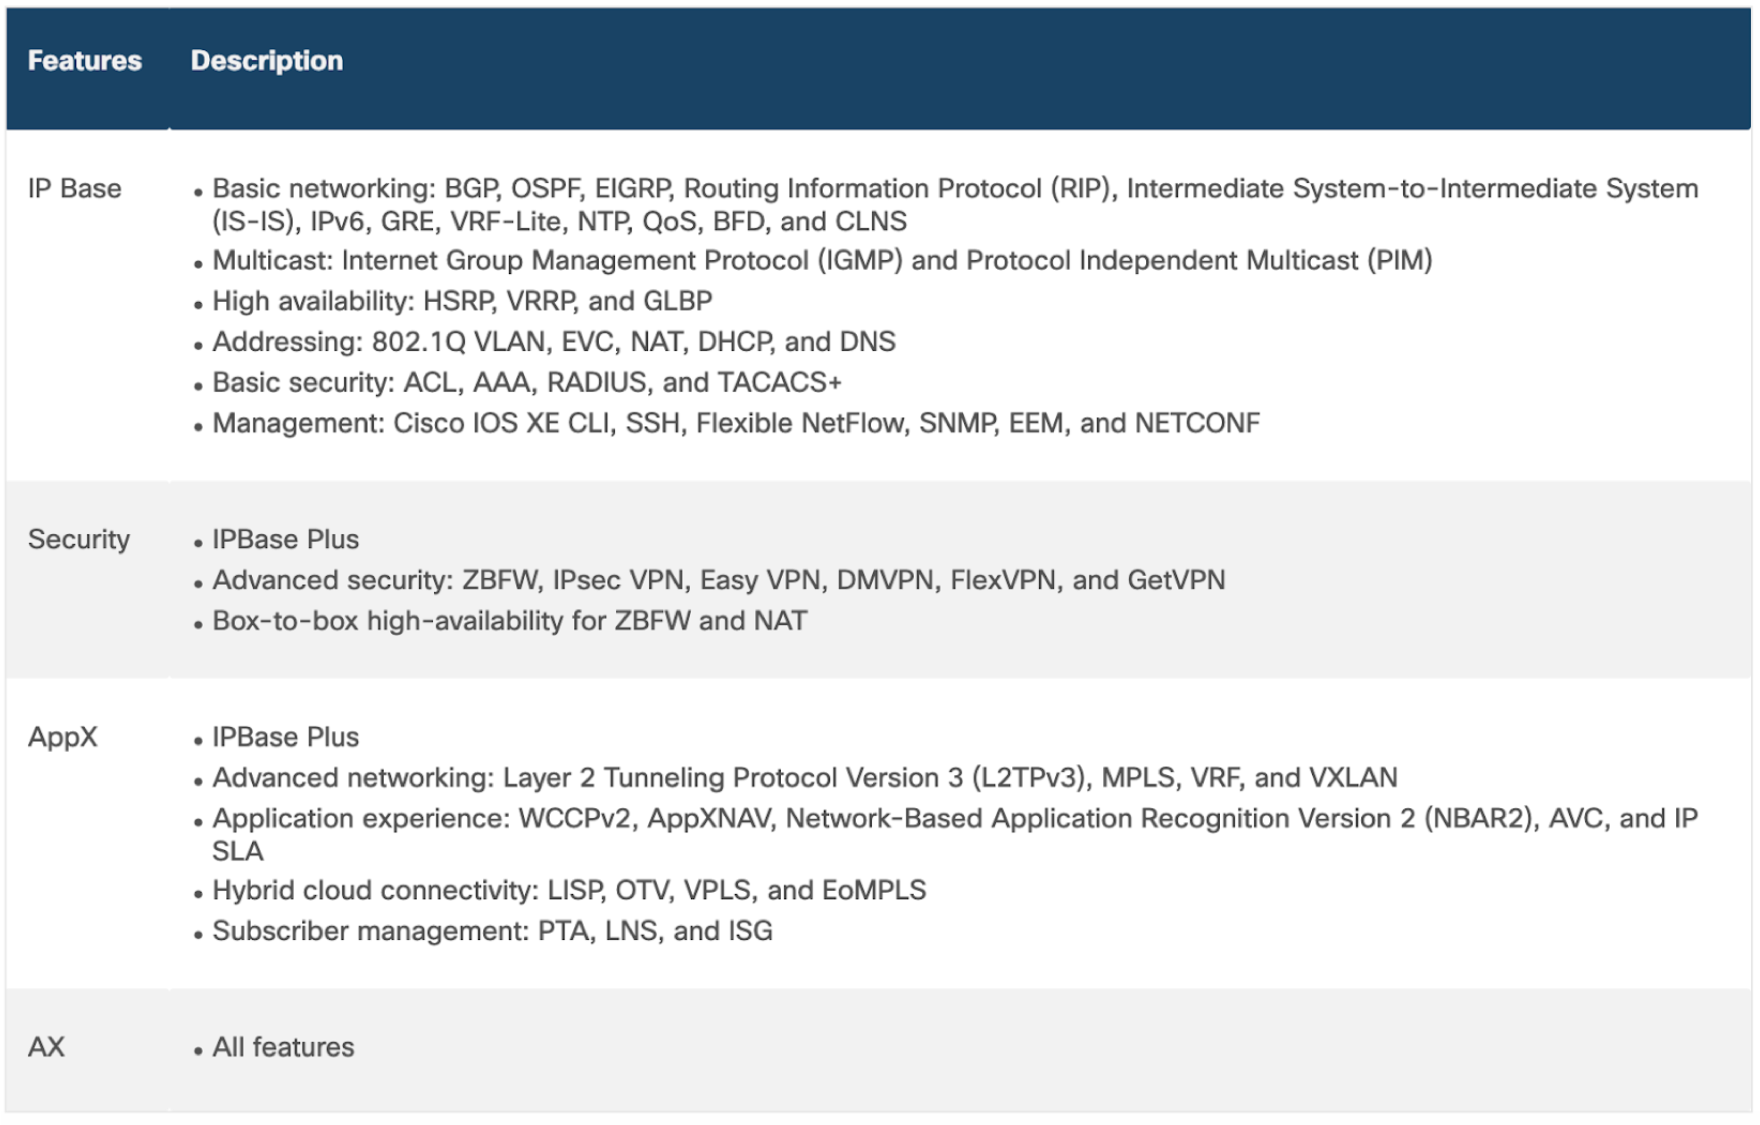
In terms of Feature Set, the figure below summarizes the available options, along with the capabilities included in each (source).
In terms of throughput, Cisco offers various options (10 Mbps, 50 Mbps, 100 Mbps, 250 Mbps, 500 Mbps, 1 Gbps, 2.5 Gbps, 5 Gbps and 10 Gbps). Upon selecting a particular option (eg. "100Mbps"), the CSR 1000v limits the aggregate bandwidth (bidirectional) to that specific value.
Finally, in terms of subscription term, Cisco offers a 1-year and a 3-year option.
Create an SSH Key
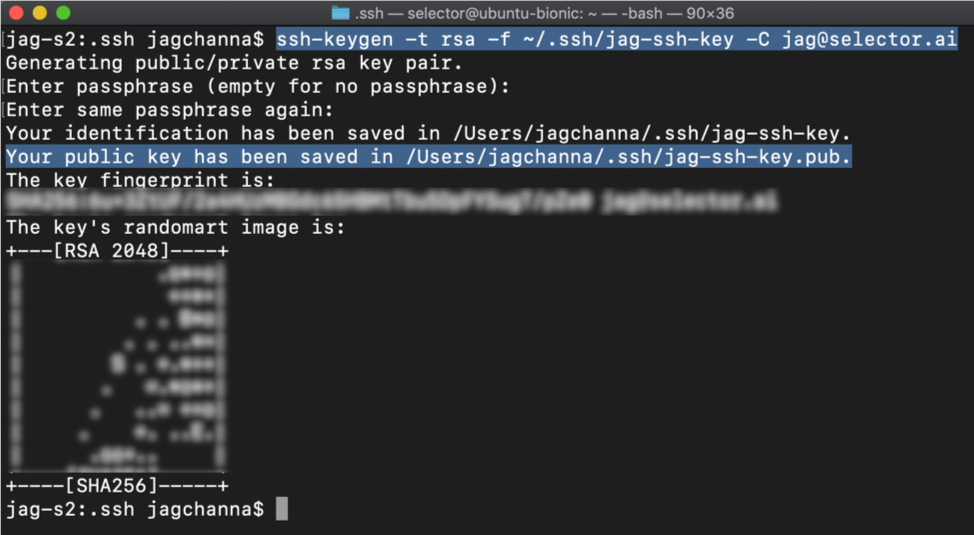
The first step is to create an SSH key which we will use to access the router CLI once it's deployed. To do this, open a terminal on your workstation and use the ssh-keygen command to generate a new key, as shown in the figure below:
Next, as shown in the figure below, we restrict access to our private key using chmod 400 so that only we can read it and nobody else:

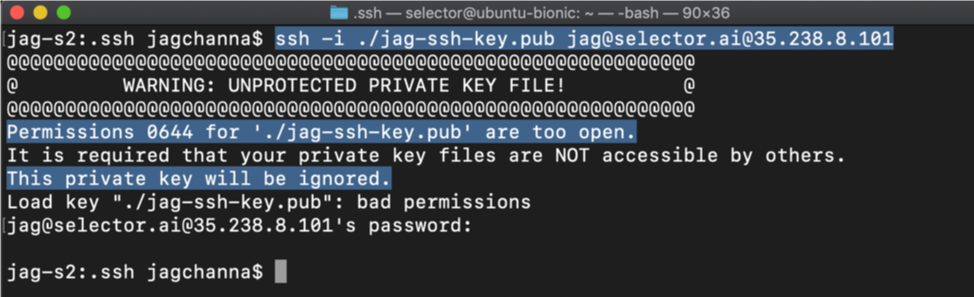
NOTE: If we neglect to restrict access to the SSH key as shown above, then we will be unable to login to the device. The screenshot below shows the error you will see if you try logging in to a device with an SSH key whose access has not been restricted:
Create A VPC Network
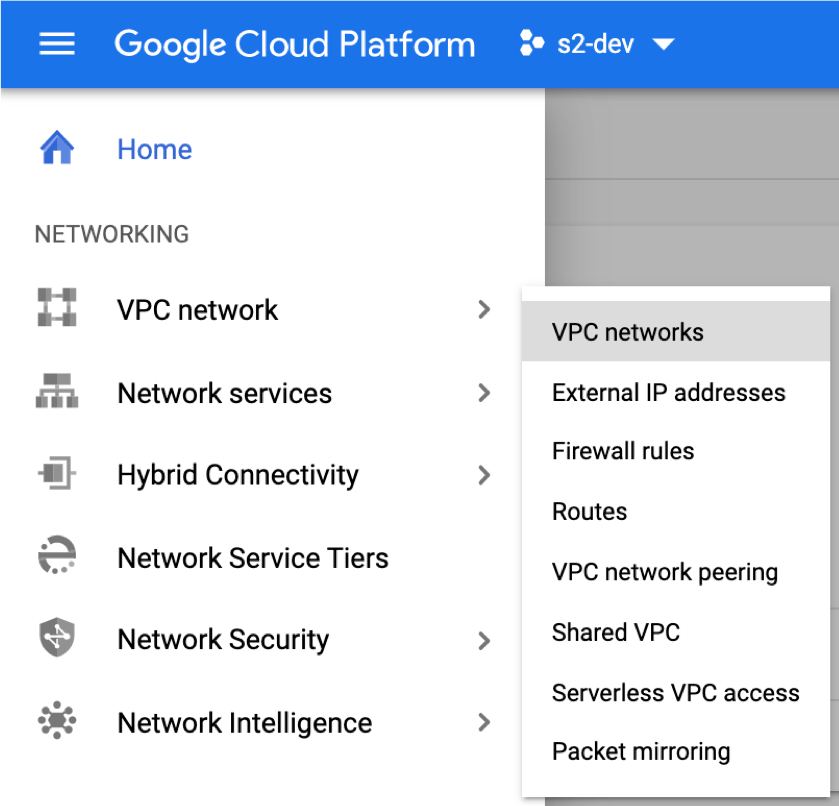
When we create a VM on GCP, by default it contains only a single interface. A router with a single interface isn't all that useful, so let's add another interface and assign a new subnet to that interface. From the left-hand-side navigation pane in GCP console, select "VPC Network -> VPC Networks", as shown in the figure below:
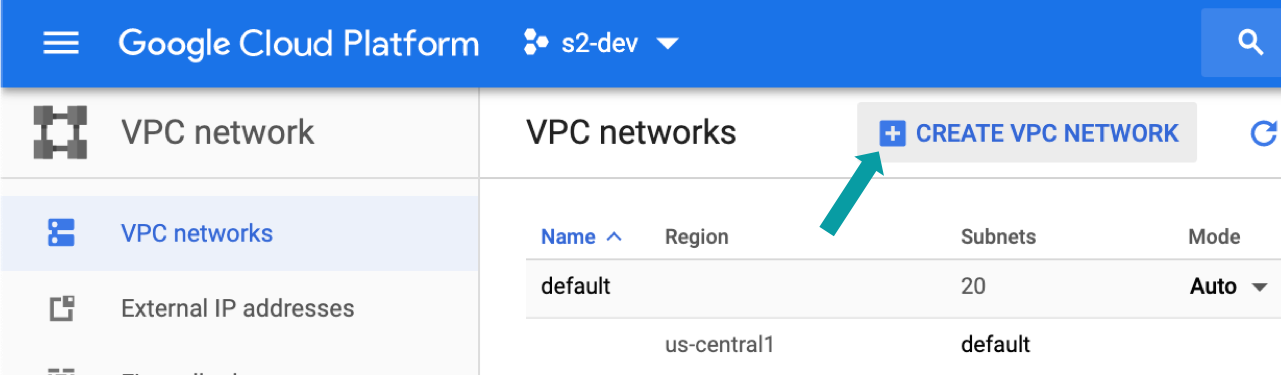
In the "VPC network" console that appears, click on the "+ Create VPC Network" button, as shown in the figure below:
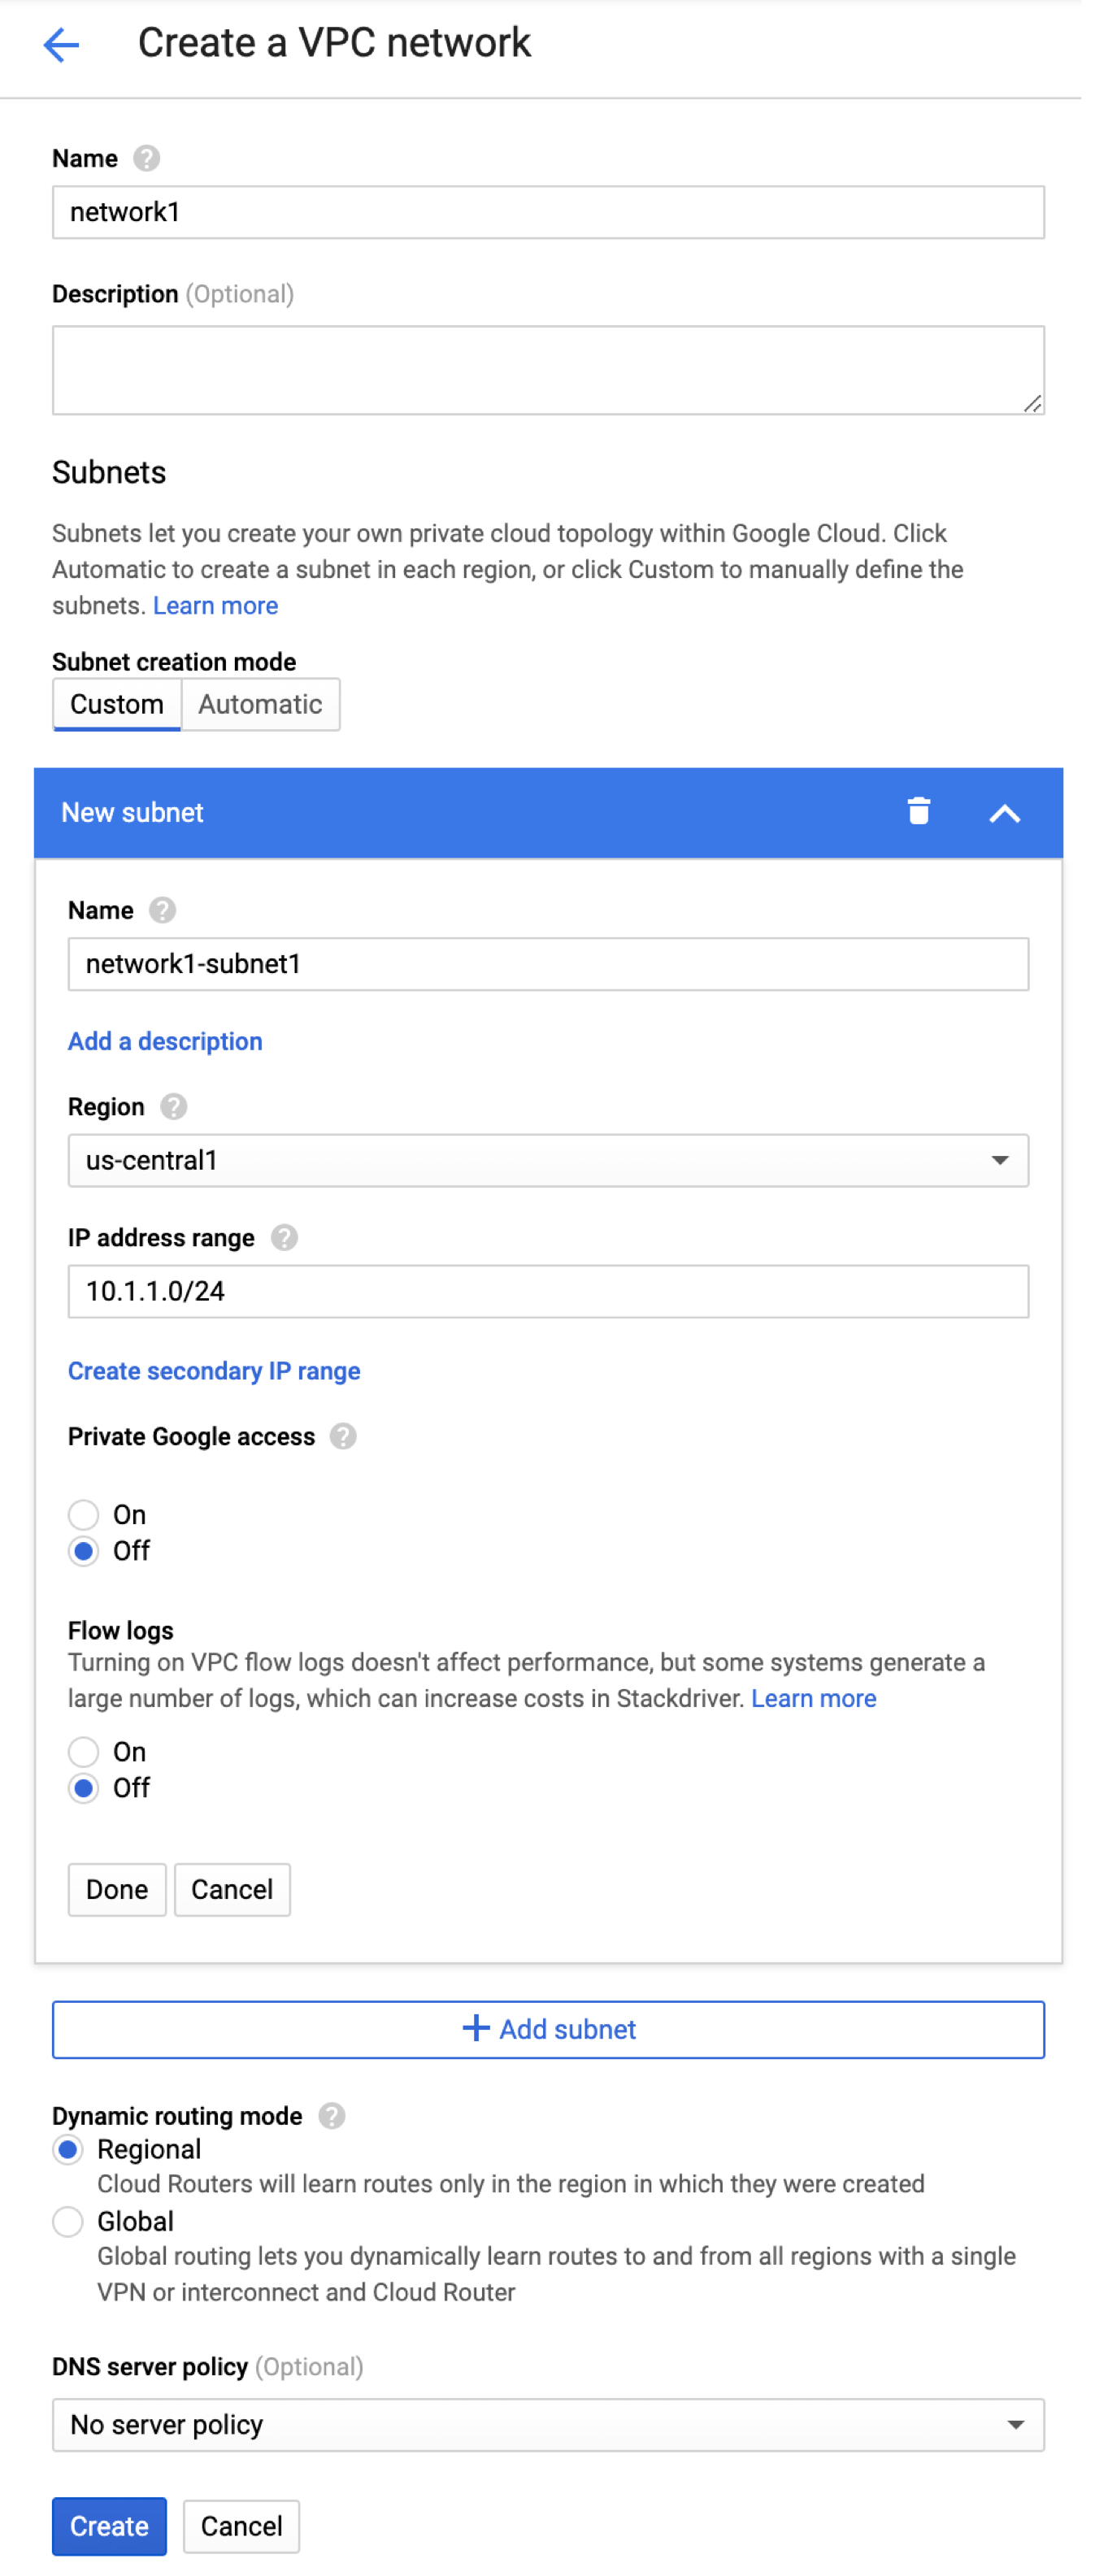
This takes the user to the "Create a VPC network" landing page, as shown in the figure below. Enter a name for the network (eg. "network1") and the new subnet (eg. "network1-subnet1"). Select the region or geographical area where the router will be hosted (eg. "us-central1"). Finally, enter the IP address range for the subnet, using dotted-decimal notation for the IP address and CIDR notation for the subnet mask (eg. "10.1.1.0/24"). The remaining fields can be left at their default values. If it's desired to create additional interfaces, click on the "+ Add subnet" shown in the figure below, and repeat the steps above. When done, click on "Create" to create the VPC network.
Deploy The CSR 1000v Using a GCP Solution Template
There are a couple of ways in which the CSR 1000v router can be deployed to GCP:
- Using a VM instance using custom data.
- Using a GCP Solution Template.
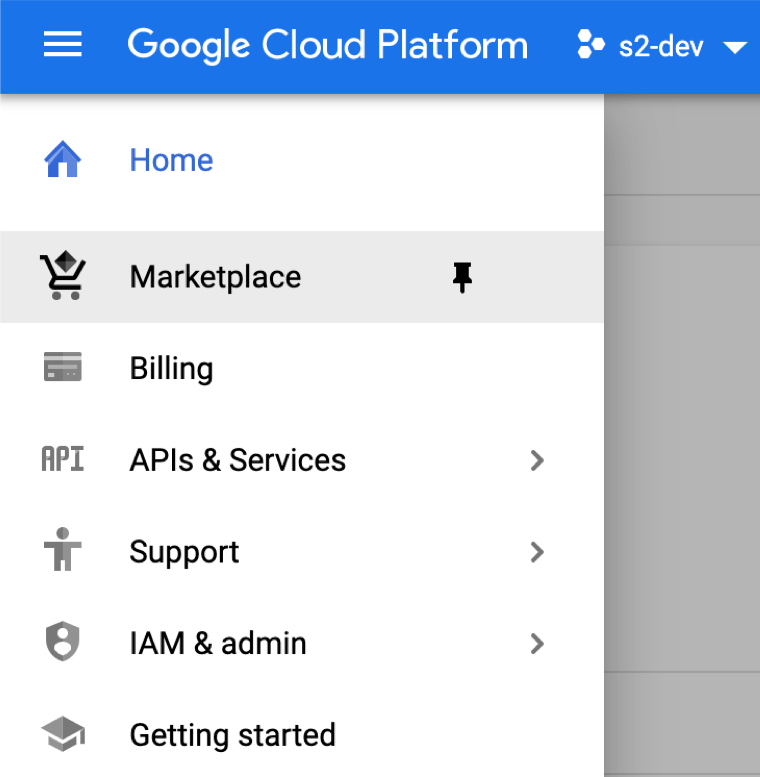
Opting for a quick-and-simple approach, this blog post focuses on the second option, namely to use a GCP Solution Template. From the left-hand-side navigation pane in the GCP console, select "Marketplace", as shown in the figure below:
In the Marketplace landing page, search for the CSR Solution Template by entering "cisco cloud services router 1000v" in the search bar, as shown in the figure below. Note that the first search result shown in the figure below is for an IOS-XE 16.9 deployment. We'll choose the 16.9 version over the second result, which is for an IOS-XE 16.12 version of the CSR 1000v. The IOS-XE 16.9 version still supports traditional licensing, whereas the IOS-XE 16.12 version only supports the newer Cisco Smart Software licensing model.
The "Cisco Cloud Services Router 1000V" landing page appears as shown in the figure below. Click on the "Launch On Compute Engine" button to continue.
In the "New Cisco Cloud Services Router 1000V" landing page, enter the following details as shown in the figure below:
- Deployment name: this field is auto-filled by default with a value of "cisco-csr-1000v-" followed by an integer.
- Instance name: the name of the CSR 1000v router instance (eg. "cisco-csr1000v-r1").
- Username: the username (created in the first step above) that will be used to access the CSR 1000v CLI via SSH.
- Instance SSH key: the public key (created in the first step above) that will be used to access the CSR 1000v.
- Zone: from the drop-down list, select the GCP zone where the router will be deployed (eg. "us-central1-f").
- Machine type: from the drop-down list, select the GCP machine type for deploying the CSR 1000v (eg. "n1-standard-4", which contains 4 vCPUs and 15GB of memory). It is important to note that the number of interfaces allowed in a GCP instance is dependent on that instance's machine type and the number of vCPUs (source):
- 2 network interfaces for VM <= 2vCPU
- 1 network interface per vCPU for VM > 2vCPUs, with a cap of max 8 network interfaces per VM
- Boot disk type: by default, the "SSD Persistent Disk" option is pre-selected. Cisco recommends to use this setting.
- Boot disk size in GB: the default value for this setting is 10GB. Cisco recommends to use this default value.
- Network: select the network in the region where the CSR 1000v instance will be deployed (eg. "default"). Note that this network will be associated with the first interface ("nic0") of the router.
- Subnetwork: select the subnet (eg. "default (10.128.0.0/20)") that is associated with the network selected above. Note that this subnet will be associated with the first interface ("nic0") of the router.
- External IP: this is the external-facing public IP address that we will use to SSH into the CLI of the CSR. From the dropdown list, select one of the following options:
- Static: select this option if your CSR router requires an external IP address that must never change.
- Ephemeral: select this option if your CSR deployment can tolerate a dynamic external IP address.
- None: select this option if your CSR deployment is not supposed to be accessible from the Internet (ie. internal GCP use only).
- Firewall: select the firewall rule(s) to be associated with the VPC network. As of this writing, there are three options available to select: TCP ports 21 (FTP), 22 (SSH) and 80 (HTTP).
- Number of additional network interfaces: from the dropdown list, select the number of additional network interfaces to add, from 0 to 7 (NOTE: the absolute maximum number of interfaces on the CSR 1000v router is 8). For each additional interface, be sure to specify the network and associated subnetwork, as created in the "Create A VPC Network" section above.
Click on the "Deploy" button at the bottom of the page to deploy the CSR 1000v.
Upon clicking the "Deploy" button from the screenshot above, the user is taken to the "Deployment Manager" landing page, as shown in the figure below, while the CSR 1000v deploys. The deployment takes about a couple of minutes to complete. Take note of the External IP Address shown in the right-hand-side pane.
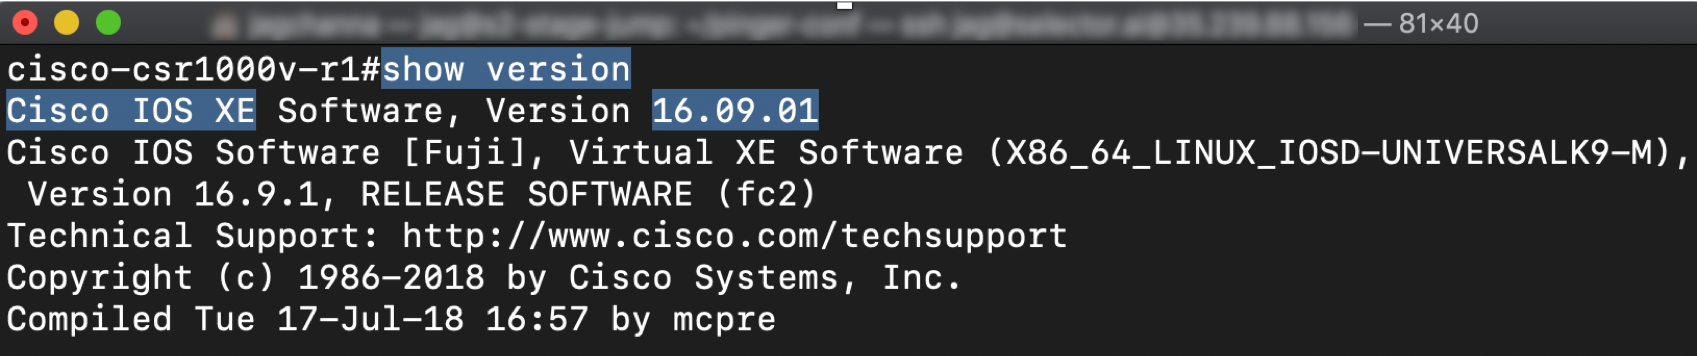
At this point we can test out our access to the router by opening an SSH session with the CSR 1000v using the External IP Address noted from above. Upon logging in, let's issue a "show version" command, as shown in the figure below:
Installing An Evaluation License
Now that our CSR 1000v is up and running, we still need to install a license in order to leverage the full feature set and throughput capabilities of the device. Without installing a license, the CSR is limited to 2.5 Mbps throughput and runs a restricted (limited) standard license feature set. Cisco offers a free 60-day evaluation license that you can use to get started right away.
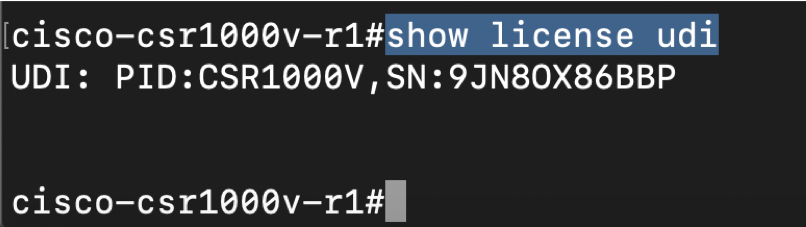
The first step is to login to the router CLI and run the show license udi command, as shown in the figure below. Take note of the serial number string that appears after the "SN:" as highlighted in the figure below.
Next, we log on to the Cisco Software Licensing portal in order to request an evaluation license: http://www.cisco.com/go/license. This takes us to the Product License Registration page. As shown in the figure below, click on the "Get Licenses" tab and select "Demo and evaluation".

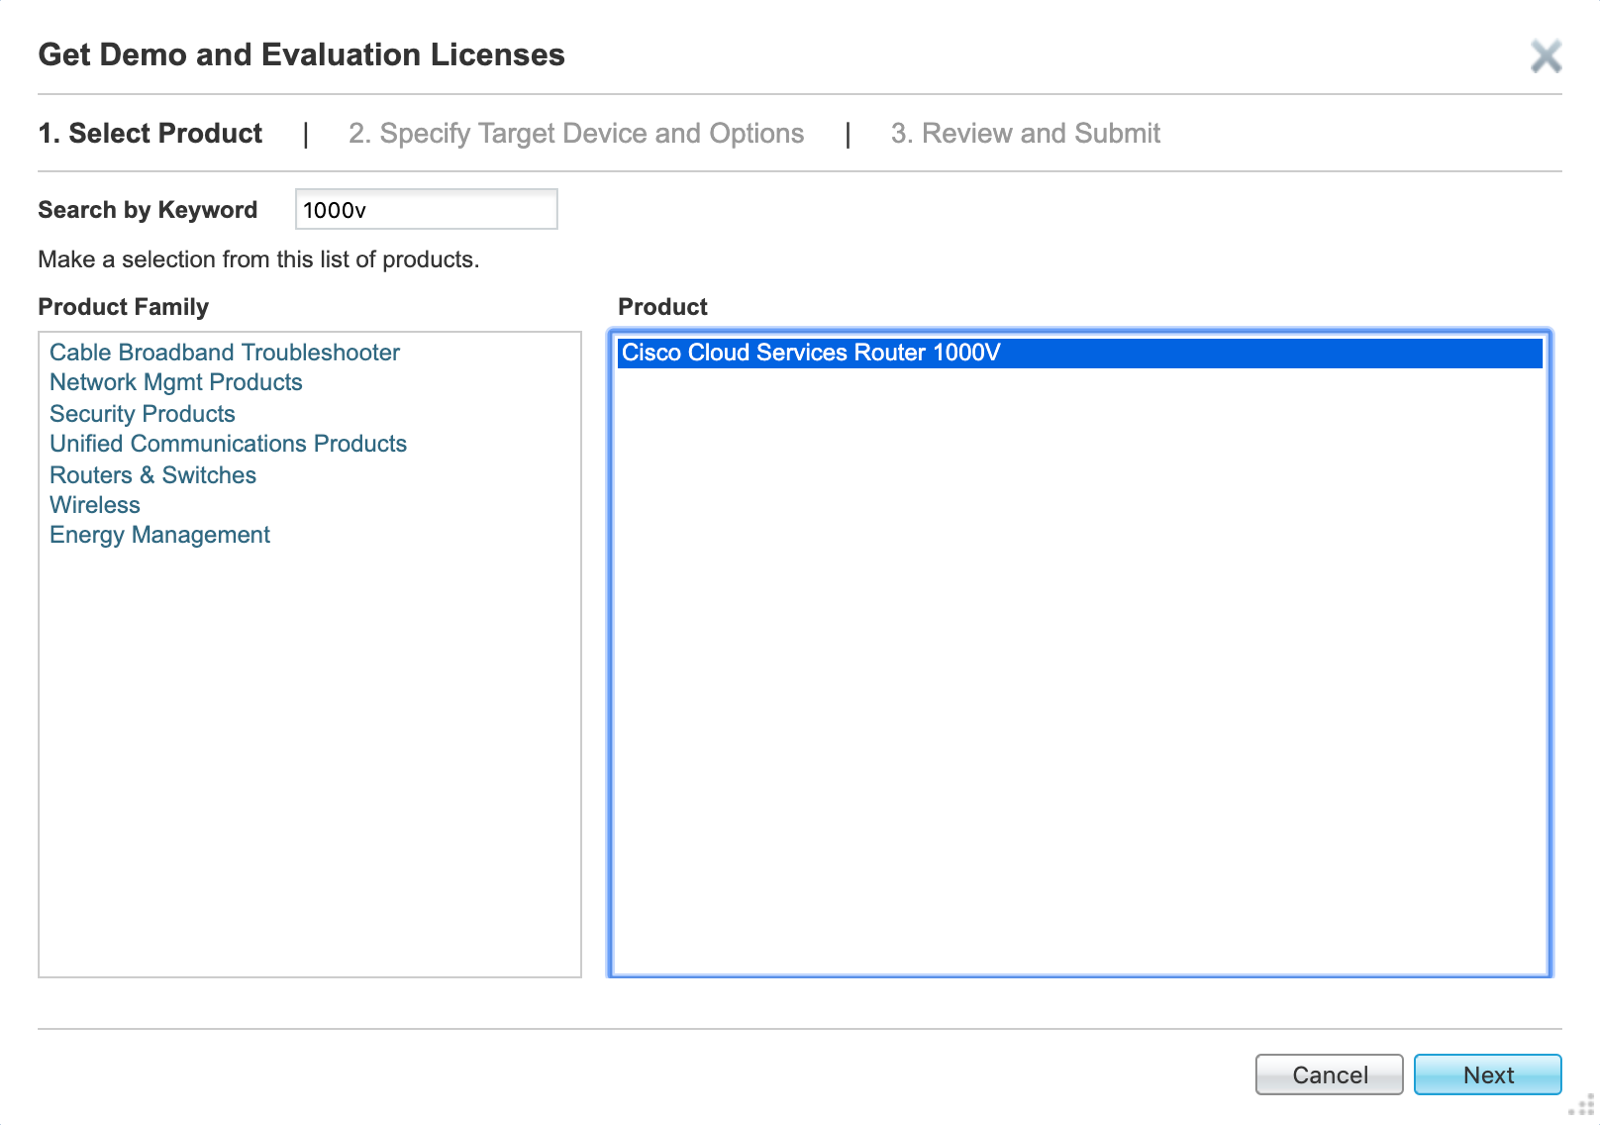
This launches a wizard titled "Get Demo and Evaluation Licenses", shown in the figure below. In the "Search by Keyword" search field, type in "1000v" to narrow down the search results. In the "Product" panel, select "Cisco Cloud Services Router 1000v", and click "Next" to continue.
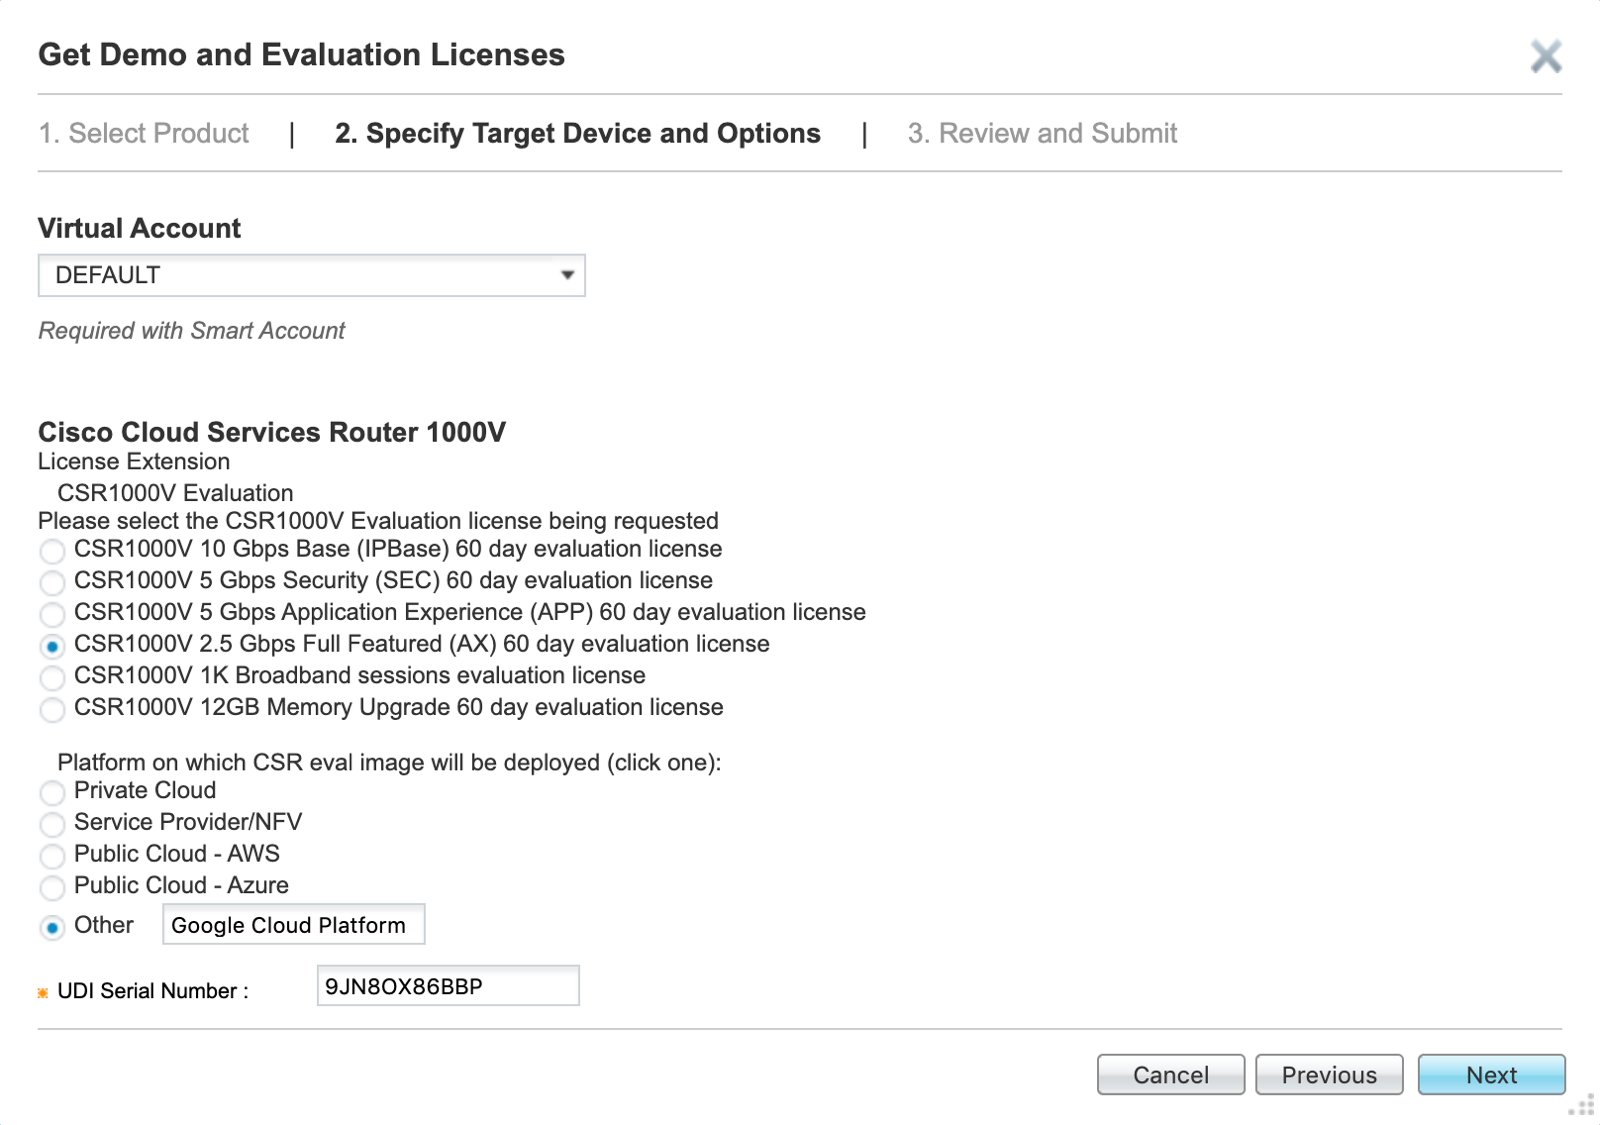
In the next pane within the wizard, select the desired Feature Set (eg. "CSR1000V 2.5Gbps Full Featured (AX) 60 day evaluation license", and the platform on which the CSR evaluation image will be deployed (eg. "Other - Google Cloud Platform"). In the "UDI Serial Number" field, enter the serial number string obtained from the "show license udi" command that was executed above. Click "Next" to continue.
In the final pane of the wizard (shown in the figure below), enter your email address(es) and end user name(s) for all the end users who will need a copy of the evaluation license, and click "Submit" to continue. The evaluation license key should be available immediately for download.
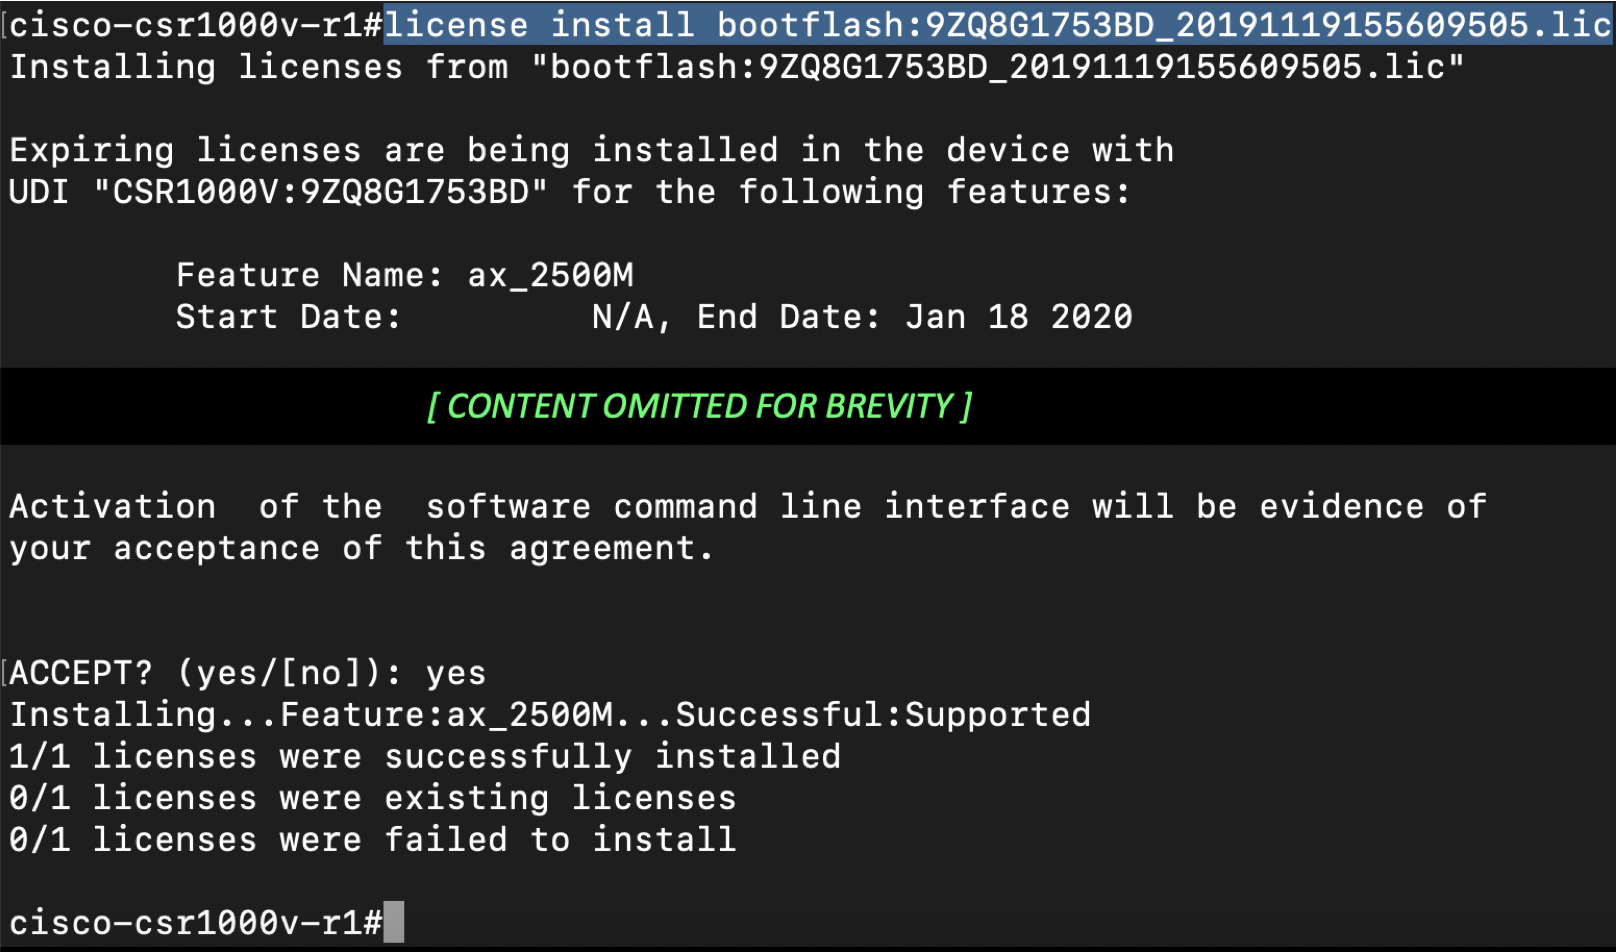
In order to install the license, we must first save the license file somewhere in the router's filesystem, such as in "bootflash:". We can use TFTP to do this quickly as shown in the figure below. In this example, we have already copied our license file (named "9I3RL2ZM65A_20191119122723602.lic") onto the /tftpboot directory on an Ubuntu VM that's running a TFTP server. The figure below shows the command to run on the CSR1000v CLI in order to copy the license file from the TFTP server into the router's "bootflash:" directory.

Next, it's a simple single command to install the license via the license install bootflash:<license_file_name> command, as shown in the figure below:
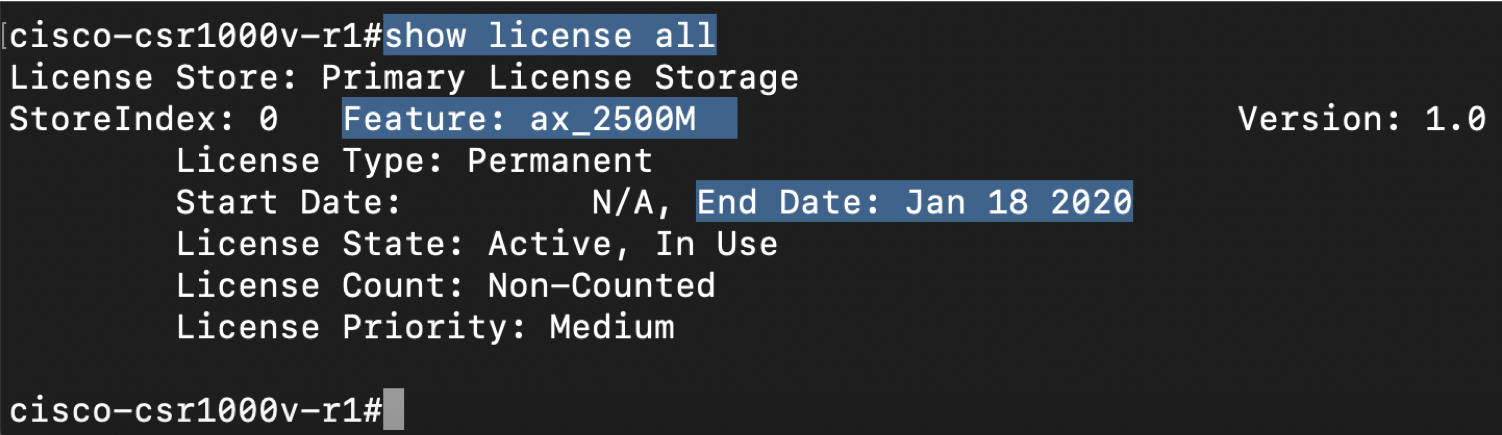
Finally, let's quickly verify that the license has indeed been successfully installed by issuing the show license all command, as shown below:
And that's it! Your newly deployed Cisco CSR 1000v is now ready to configure and use on Google Cloud Platform.
-- Jag --