Deploying EVE-NG On Google Cloud Platform: Part 1
Installation procedure for deploying EVE-NG to Google Cloud Platform (GCP).

EVE-NG is a network emulation tool for building and configuring virtual network topologies (eve-ng.net). It is typically used for building networking labs for certification study purposes or for proof-of-concept testing.
For a current project I am working on, I need to be able to spin up a multivendor network topology (e.g. Juniper vMX, Arista vEOS, Cisco Nexus 9000v) on Google Cloud Platform (GCP) in order to simulate different customer environments. As a secondary objective, I would like to pursue some networking certifications and need to be able to spin up some basic testbeds to facilitate studying. This blog post (Part 1 of a four-part series) aims to share my learnings on getting EVE-NG installed in GCP.
Prerequisites
In the interest of brevity, it is assumed that you have a GCP Account setup and already have a GCP Project selected or created, in which to launch your VMs. If not, you can go to the Getting Started landing page in GCP Console: https://console.cloud.google.com/getting-started. From here you can create a brand new project by clicking on "Select a project" from the top header bar.
Creating A Custom Nested Ubuntu Image
Google Compute Engine supports nested virtualization, which basically allows you to run one or more virtual machines inside of a Compute Engine Linux VM (in our case, an Ubuntu VM). In a nutshell, nested virtualization lets you run "VMs inside of VMs". There are a couple of caveats here:
- Nested virtualization is supported on any Linux VM running on an Intel Haswell CPU or newer.
- The VM instance you want to enable nested virtualization on has to use a custom “nested” image with a special license key that enables VMX (Virtual Machine Extensions).
Let’s go ahead and first create a custom nested image that is build from a base Ubuntu 18.04 image. To do this, we need to first activate and launch Cloud Shell by clicking on the "Activate Cloud Shell" icon in the top header bar of the "Compute Engine" landing page, as shown in the screenshot below.

This will open up the Cloud Shell Terminal pane at the bottom of the landing page, as depicted below.

We then issue the following "gcloud" command to create our nested image:
gcloud compute images create nested-ubuntu-bionic
--source-image-family=ubuntu-1804-lts
--source-image-project=ubuntu-os-cloud
--licenses=https://compute.googleapis.com/compute/v1/projects/vm-options/global/licenses/enable-vmx
Once the image has been created, the following output will be shown, with a "READY" status:

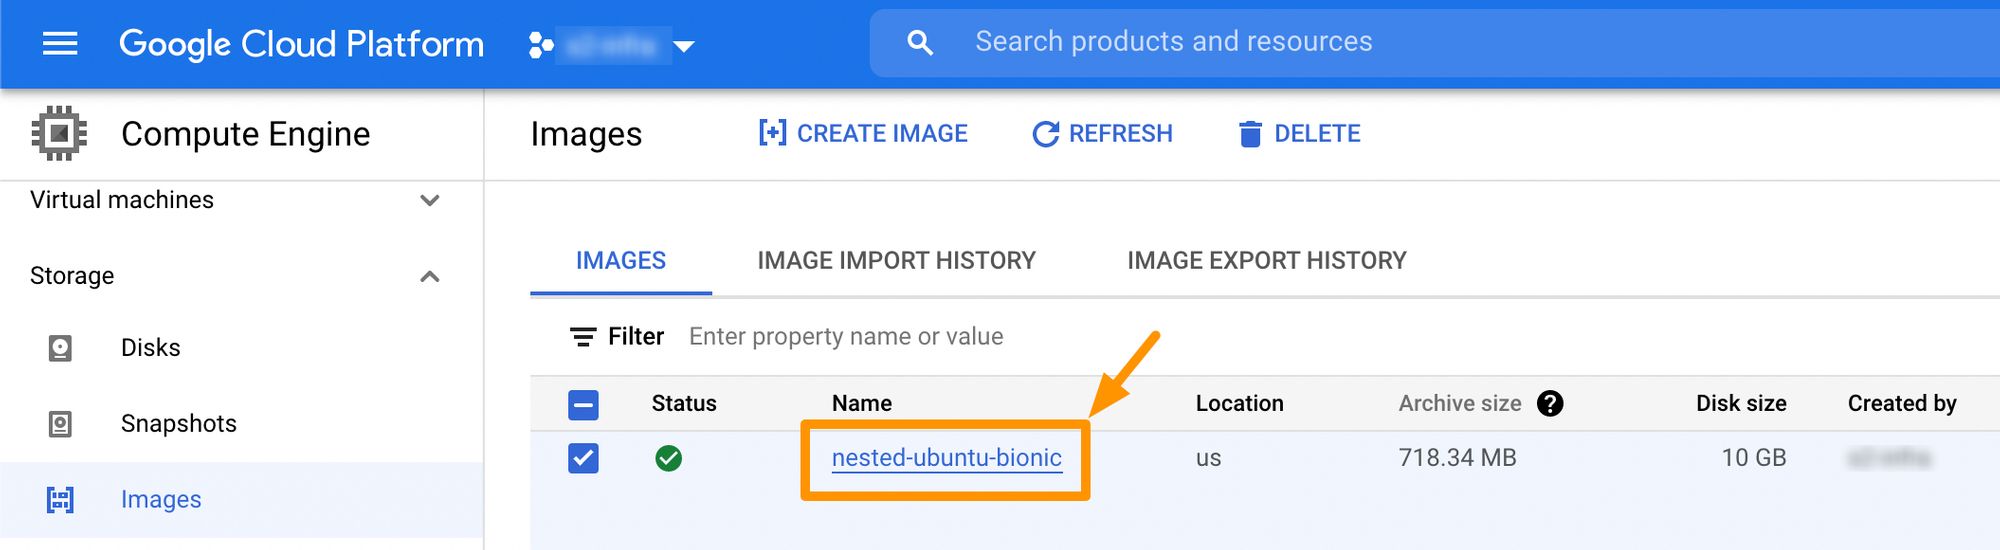
You should then be able to see the newly created image in the Compute Engine "Images" landing page as shown in the figure below.
Creating The VM
Now that we have created the custom nested image, the next step is to use this image to create and launch a new VM for EVE-NG. To do this, go to the Compute Engine "VM instances" landing page and click on the "Create Instance" button from the top menu bar, as shown below.

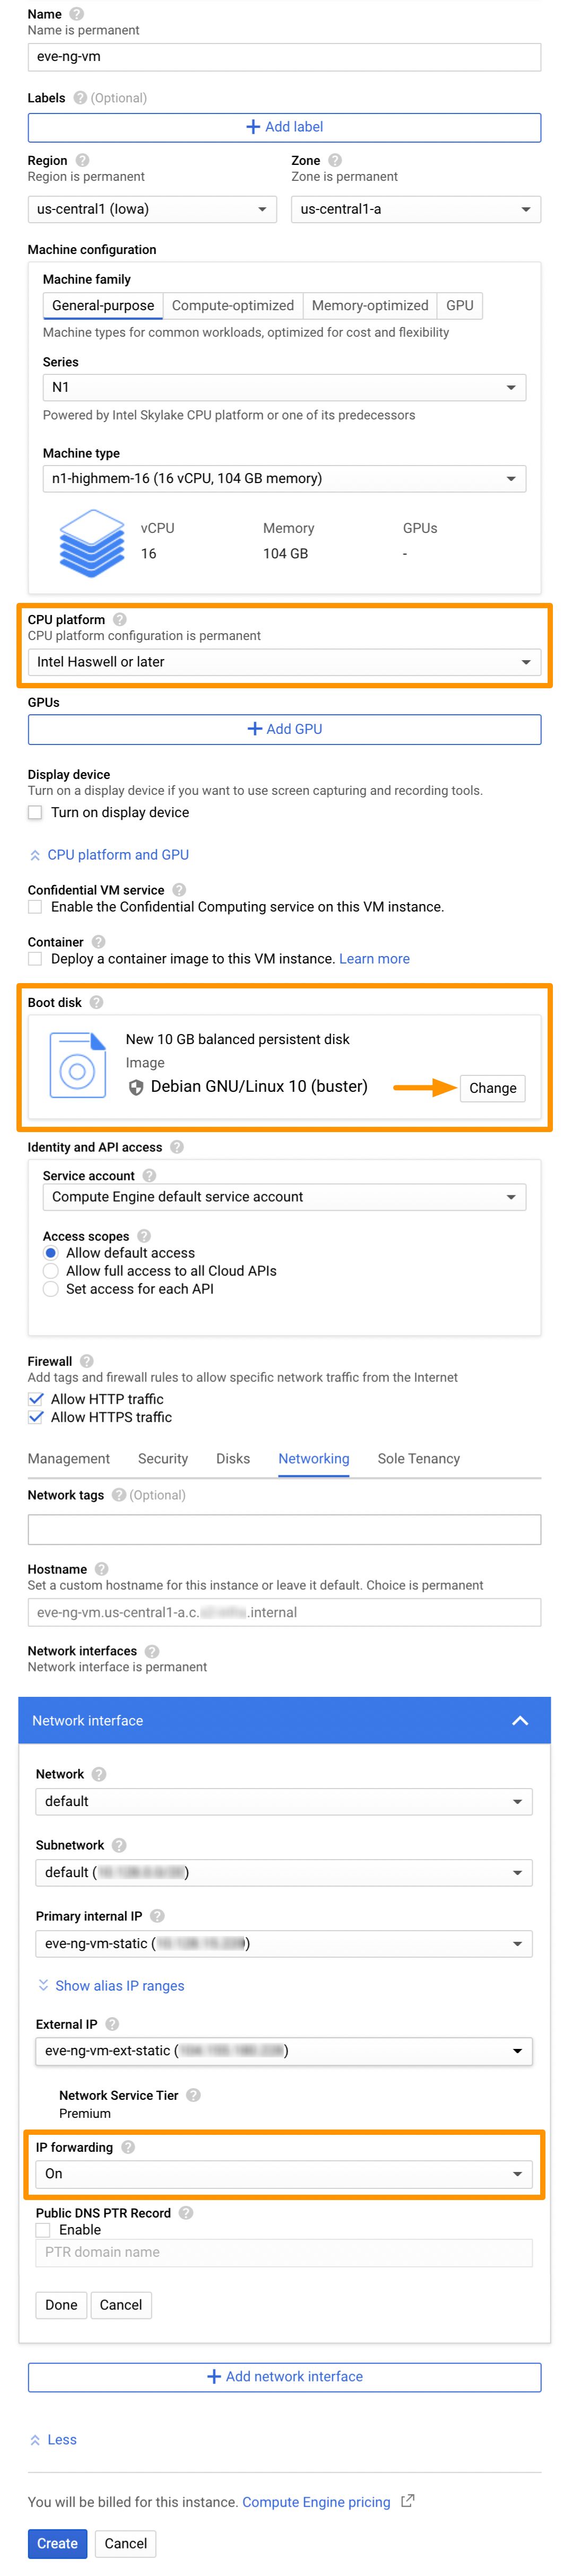
In the "Create Instance" form, enter the following configuration details as shown in the figure below, and click on the "Create" button once done.
- Name: Specify a name for the VM (e.g. "eve-ng").
- Region/Zone: The GCP region and zone where the VM will be housed (e.g. "northamerica-northeast1" / "northamerica-northeast1-a").
- Machine configuration – Series: The machine type family for the VM (eg. “N1”).
- Machine type: Select from one of the predefined machine types for the VM (e.g. "n1-standard-8"), or specify your own with a custom number of vCPU cores and memory.
- CPU Platform: In order to ensure support for nested virtualization, be sure to select "Intel Haswell or later".
- Deploy a container image to this VM instance: Be sure to leave this option unchecked.
- Firewall – Allow HTTP traffic: Select this option if using the Community version of EVE-NG.
- Firewall – Allow HTTPS traffic: Select this option if using the Pro version of EVE-NG.
- IP Forwarding: By default, a VM cannot forward a packet originated by another VM. Select “On” to enable IP Forwarding to get around this restriction.
- Boot disk: Click on the “Change” button and follow the instructions immediately following the screenshot below.
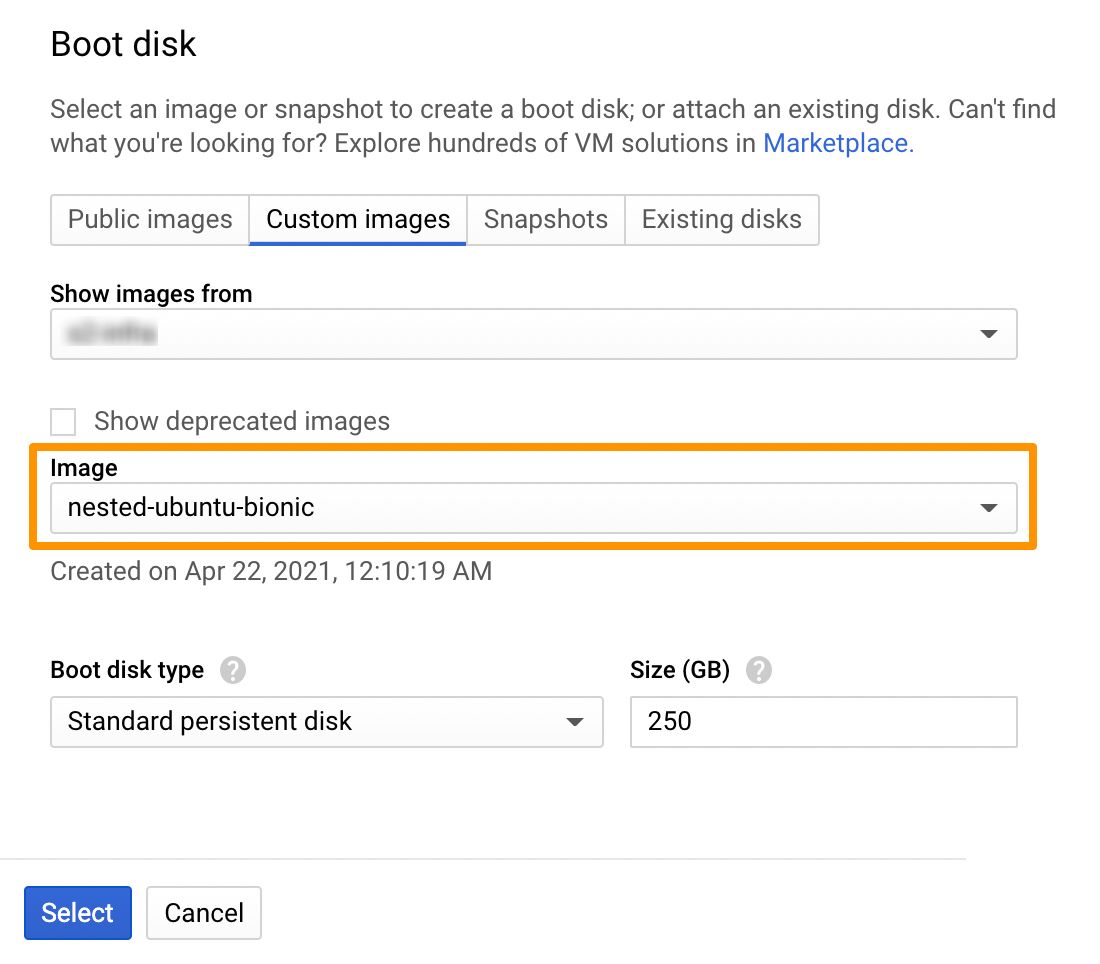
The "Boot Disk" section (highlighted in orange in the above screenshot) is where we attach the custom nested Ubuntu VM image we created earlier. Upon clicking on the "Change" button, we see the "Boot disk" popup window shown below. Click on the "Custom images" tab, and for the "Image" dropdown field, select the "nested-ubuntu-bionic" image created earlier. In addition, specify the desired size of the boot disk (e.g. 250 GB) in the "Size (GB)" field. Click on "Select" to save the changes and return back to the "Create an instance" form.
Verify The CPU Supports Nested Virtualization
As mentioned above, nested virtualization using KVM is only supported on Intel Haswell CPUs or newer. KVM requires a CPU that supports hardware virtualization (i.e. Intel VT-x or AMD-V). To quickly check if our processor supports one of these, we can run the "egrep -c ‘(vmx|svm)’ /proc/cpuinfo" command and inspect the output:
$ egrep -c '(vmx|svm)' /proc/cpuinfo
16
If the above command returns a 0, then that means your CPU does not support hardware virtualization. Otherwise, if it returns a 1 or another number, then that means hardware virtualization is supported. In the above example, the command returns "16", so we are good to go.
Another check we can run is to use the "kvm-ok" command to determine if the system can run hardware accelerated KVM VMs (i.e. possesses virtualization technology). To use this command, we first have to install the "cpu-checker" package:
$ sudo apt-get install cpu-checker
Reading package lists... Done
Building dependency tree
Reading state information... Done
The following NEW packages will be installed:
  cpu-checker msr-tools
...
-----[ CONTENT OMITTED FOR BREVITY ]-----
...
Setting up cpu-checker (0.7-0ubuntu7) ...
Processing triggers for man-db (2.8.3-2ubuntu0.1) ...
Once “cpu-checker” has been installed, we can simply run “kvm-ok”:
$ sudo kvm-ok
INFO: /dev/kvm exists
KVM acceleration can be used
If we get an output like that shown above, then we are in good shape. If, however, KVM acceleration is not supported on our system, then we will see an output like the following:
$ sudo kvm-ok
INFO: Your CPU does not support KVM extensions
KVM acceleration can NOT be used
Installing EVE-NG
Now we are ready to begin installation of EVE-NG, for which there are two deployment options available:
- EVE-NG Professional Edition
- EVE-NG Community Edition
For this blog post, we will focus on the Professional Edition, as it has a richer feature set compared to the Community Edition.
To get started with the installation, we first SSH to our newly launched VM and become root by using the "sudo -i" command. Then, we launch the script for installing EVE-NG Professional Edition (EVE-PRO):
wget -O - https://www.eve-ng.net/repo-bionic/install-eve-pro.sh | bash -i
Launching the above script produces the following voluminous output below, which has large chunks omitted for brevity:
$ sudo -i
root@eve-ng-vm:~# wget -O - https://www.eve-ng.net/repo-bionic/install-eve-pro.sh | bash -i
root@eve-ng-vm:~#
Redirecting output to ‘wget-log’.
#!/bin/sh
root@eve-ng-vm:~#
-----[ CONTENT OMITTED FOR BREVITY ]-----
root@eve-ng-vm:~# #Modify /etc/ssh/sshd_config with: PermitRootLogin yes
root@eve-ng-vm:~# sed -i -e "s/.*PermitRootLogin .*/PermitRootLogin yes/" /etc/ssh/sshd_config
root@eve-ng-vm:~# wget -O - http://www.eve-ng.net/repo-bionic/eczema@ecze.com.gpg.key | sudo apt-key add -
URL transformed to HTTPS due to an HSTS policy
--2021-04-27 18:26:52--  https://www.eve-ng.net/repo-bionic/eczema@ecze.com.gpg.key
Resolving www.eve-ng.net (www.eve-ng.net)... 51.89.118.57, 2001:41d0:701:1000::352
Connecting to www.eve-ng.net (www.eve-ng.net)|51.89.118.57|:443... connected.
HTTP request sent, awaiting response... 200 OK
Length: 1702 (1.7K) [application/pgp-keys]
Saving to: ‘STDOUT’

- 100%[==================================================================>]   1.66K  --.-KB/s    in 0s

2021-04-27 18:26:52 (77.9 MB/s) - written to stdout [1702/1702]

OK
root@eve-ng-vm:~# apt-get update
Get:1 http://security.ubuntu.com/ubuntu bionic-security InRelease [88.7 kB]
-----[ CONTENT OMITTED FOR BREVITY ]-----
root@eve-ng-vm:~# apt-get update
Hit:1 http://us-central1.gce.archive.ubuntu.com/ubuntu bionic InRelease
-----[ CONTENT OMITTED FOR BREVITY ]-----
Setting up linux-image-4.20.17.2-eve-ng-uksm-wg+ (1) ...
-----[ CONTENT OMITTED FOR BREVITY ]-----
/opt/unetlab/labs/
/opt/unetlab/labs/index
/opt/unetlab/labs/Shared/
/opt/unetlab/labs/Users/
Conversion done
Check Cluster Client certificate... done
Check Janus... Created symlink /etc/systemd/system/multi-user.target.wants/janus.service → /etc/systemd/system/janus.service.
done
Creating MySQL backup... done
-----[ CONTENT OMITTED FOR BREVITY ]-----
update-initramfs: Generating /boot/initrd.img-5.4.0-1042-gcp
root@eve-ng-vm:~# /etc/init.d/mysql restart
[ ok ] Restarting mysql (via systemctl): mysql.service.
root@eve-ng-vm:~# DEBIAN_FRONTEND=noninteractive apt-get -y install eve-ng-pro
Reading package lists... Done
Building dependency tree
Reading state information... Done
eve-ng-pro is already the newest version (4.0.1-16).
0 upgraded, 0 newly installed, 0 to remove and 3 not upgraded.
root@eve-ng-vm:~# rm -fr /var/lib/docker/aufs
root@eve-ng-vm:~# DEBIAN_FRONTEND=noninteractive apt-get -y install eve-ng-pro
Reading package lists... Done
Building dependency tree
Reading state information... Done
eve-ng-pro is already the newest version (4.0.1-16).
0 upgraded, 0 newly installed, 0 to remove and 3 not upgraded.
root@eve-ng-vm:~# #cp /lib/firmware/bnx2/*.fw /lib/firmware/4.9.40-eve-ng-uksm-2+/bnx2/
root@eve-ng-vm:~#
root@eve-ng-vm:~# # Detect cloud
root@eve-ng-vm:~#
root@eve-ng-vm:~#
root@eve-ng-vm:~# gcp_tune () {
> sed -i -e 's/NAME="ens.*/NAME="eth0"/' /etc/udev/rules.d/70-persistent-net.rules
> sed -i -e 's/ens4/eth0/' /etc/netplan/50-cloud-init.yaml
> sed -i -e 's/PasswordAuthentication.*/PasswordAuthentication yes/' /etc/ssh/sshd_config
> apt-mark hold linux-image-gcp
> mv /boot/vmlinuz-*gcp /root
-----[ CONTENT OMITTED FOR BREVITY ]-----
Sourcing file `/etc/default/grub'
Sourcing file `/etc/default/grub.d/50-cloudimg-settings.cfg'
Generating grub configuration file ...
Found linux image: /boot/vmlinuz-4.20.17.2-eve-ng-uksm-wg+
Found initrd image: /boot/initrd.img-4.20.17.2-eve-ng-uksm-wg+
-----[ CONTENT OMITTED FOR BREVITY ]-----
root@eve-ng-vm:~# exit
root@eve-ng-vm:~#
After the above installation script completes execution, we update and upgrade our new EVE-PRO installation, and reboot the system:
root@eve-ng-vm:~# apt update
Hit:1 http://us-central1.gce.archive.ubuntu.com/ubuntu bionic InRelease
Hit:2 http://us-central1.gce.archive.ubuntu.com/ubuntu bionic-updates InRelease
-----[ CONTENT OMITTED FOR BREVITY ]-----
Fetched 2909 kB in 2s (1631 kB/s)
Reading package lists... Done
Building dependency tree
Reading state information... Done
7 packages can be upgraded. Run 'apt list --upgradable' to see them.


root@eve-ng-vm:~# apt upgrade
Reading package lists... Done
Building dependency tree
Reading state information... Done
Calculating upgrade... Done
The following packages will be upgraded:
  distro-info-data openjdk-11-jdk openjdk-11-jdk-headless openjdk-11-jre openjdk-11-jre-headless python3-distupgrade
  ubuntu-release-upgrader-core
7 upgraded, 0 newly installed, 0 to remove and 0 not upgraded.
-----[ CONTENT OMITTED FOR BREVITY ]-----
Setting up distro-info-data (0.37ubuntu0.10) ...
Setting up openjdk-11-jdk-headless:amd64 (11.0.11+9-0ubuntu2~18.04) ...
Setting up python3-distupgrade (1:18.04.44) ...
Setting up openjdk-11-jre:amd64 (11.0.11+9-0ubuntu2~18.04) ...
Setting up ubuntu-release-upgrader-core (1:18.04.44) ...
Setting up openjdk-11-jdk:amd64 (11.0.11+9-0ubuntu2~18.04) ...
Processing triggers for mime-support (3.60ubuntu1) ...
Processing triggers for man-db (2.8.3-2ubuntu0.1) ...
Processing triggers for hicolor-icon-theme (0.17-2) ...


root@eve-ng-vm:~# reboot
Connection to eve-ng closed by remote host.
Connection to eve-ng closed.
Once the system is back up, login once again via SSH, and you should see the following IP setup wizard screen:
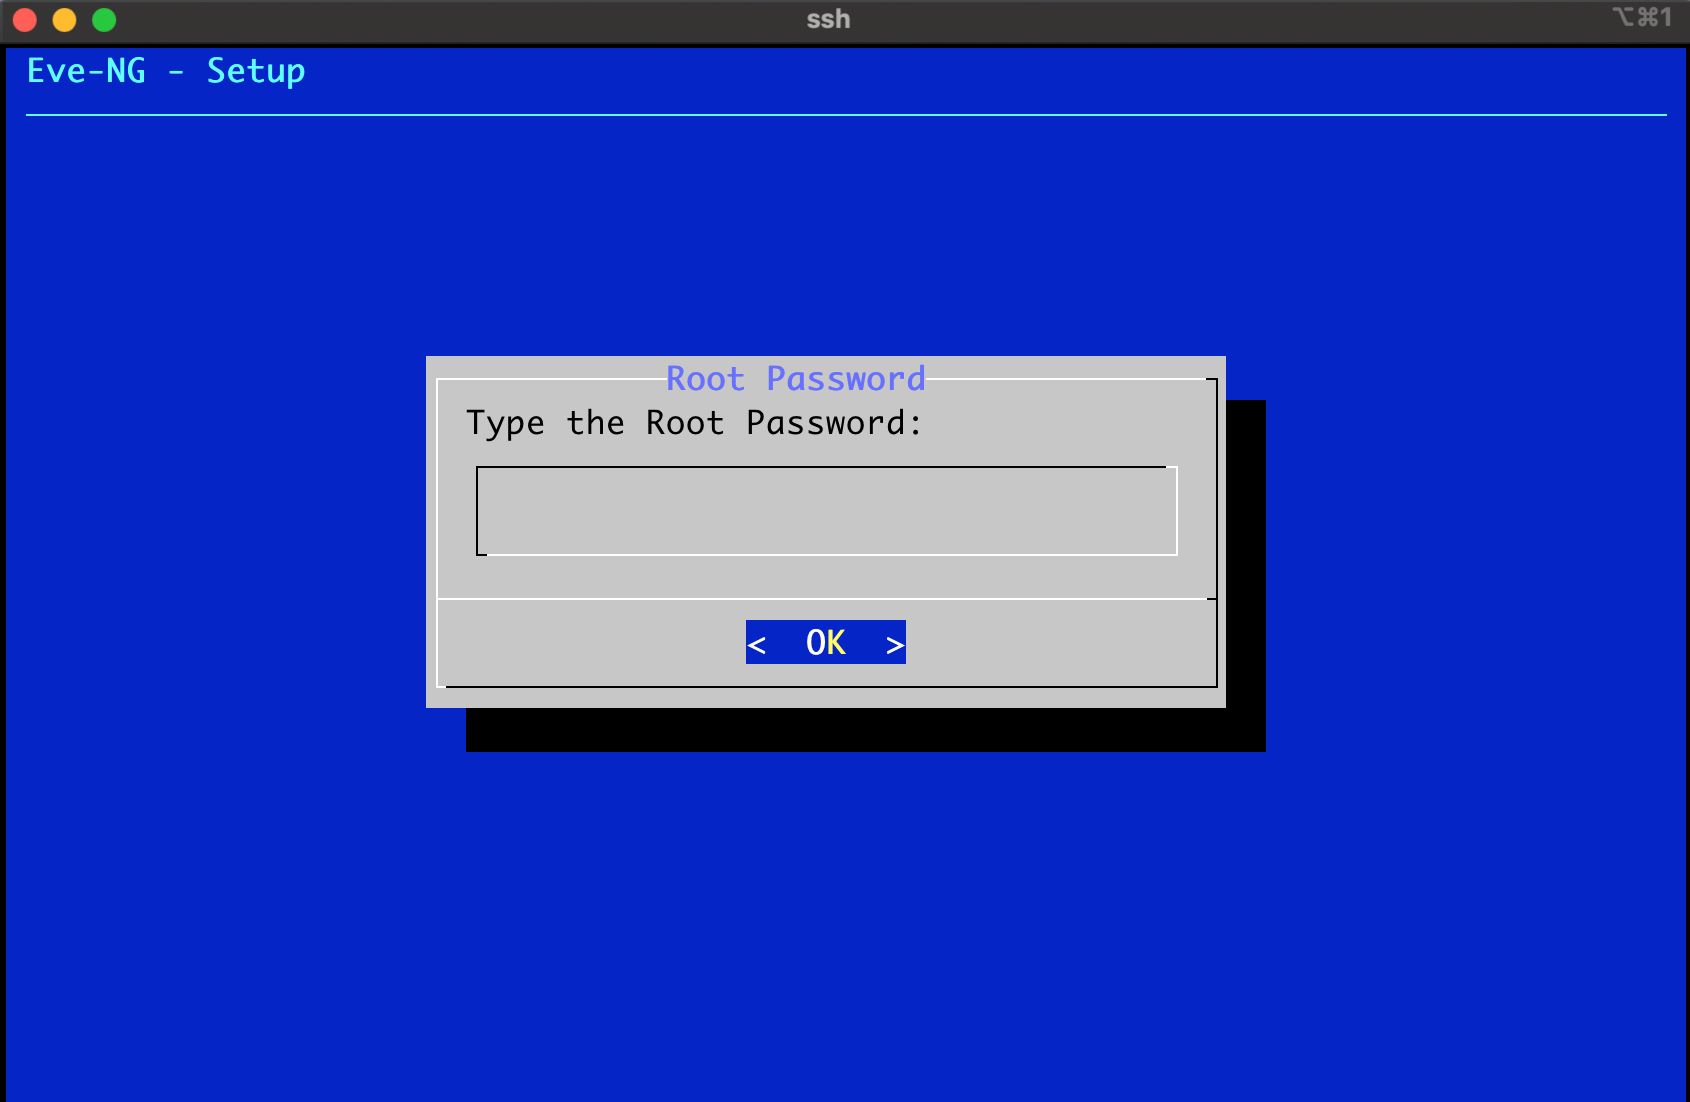
Important: Before typing anything in the screenshot above, you must first hit Ctrl+C and type "sudo -i" in order to become root (as shown below). Then press Enter to continue. You will then be returned back to the screen above, where you can then proceed to type in your new root password (and hit Enter to continue).
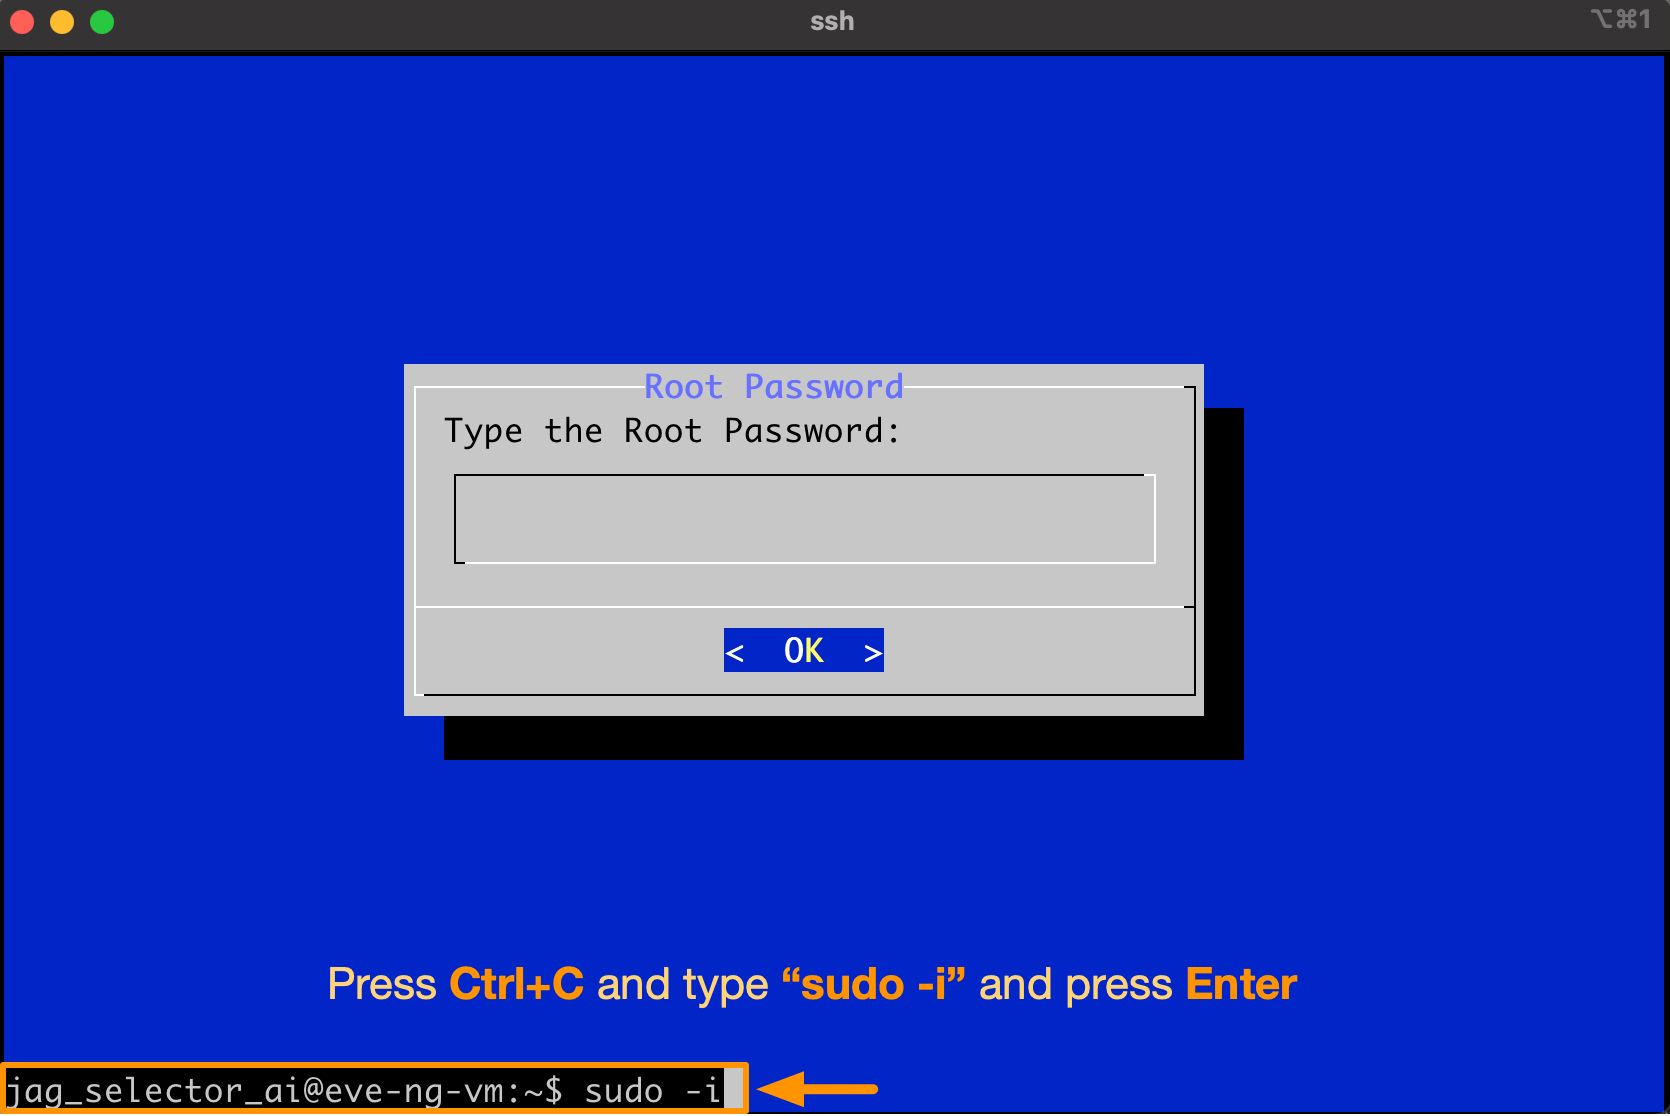
You will once again be prompted to retype your root password, as shown below. Press Enter to continue.

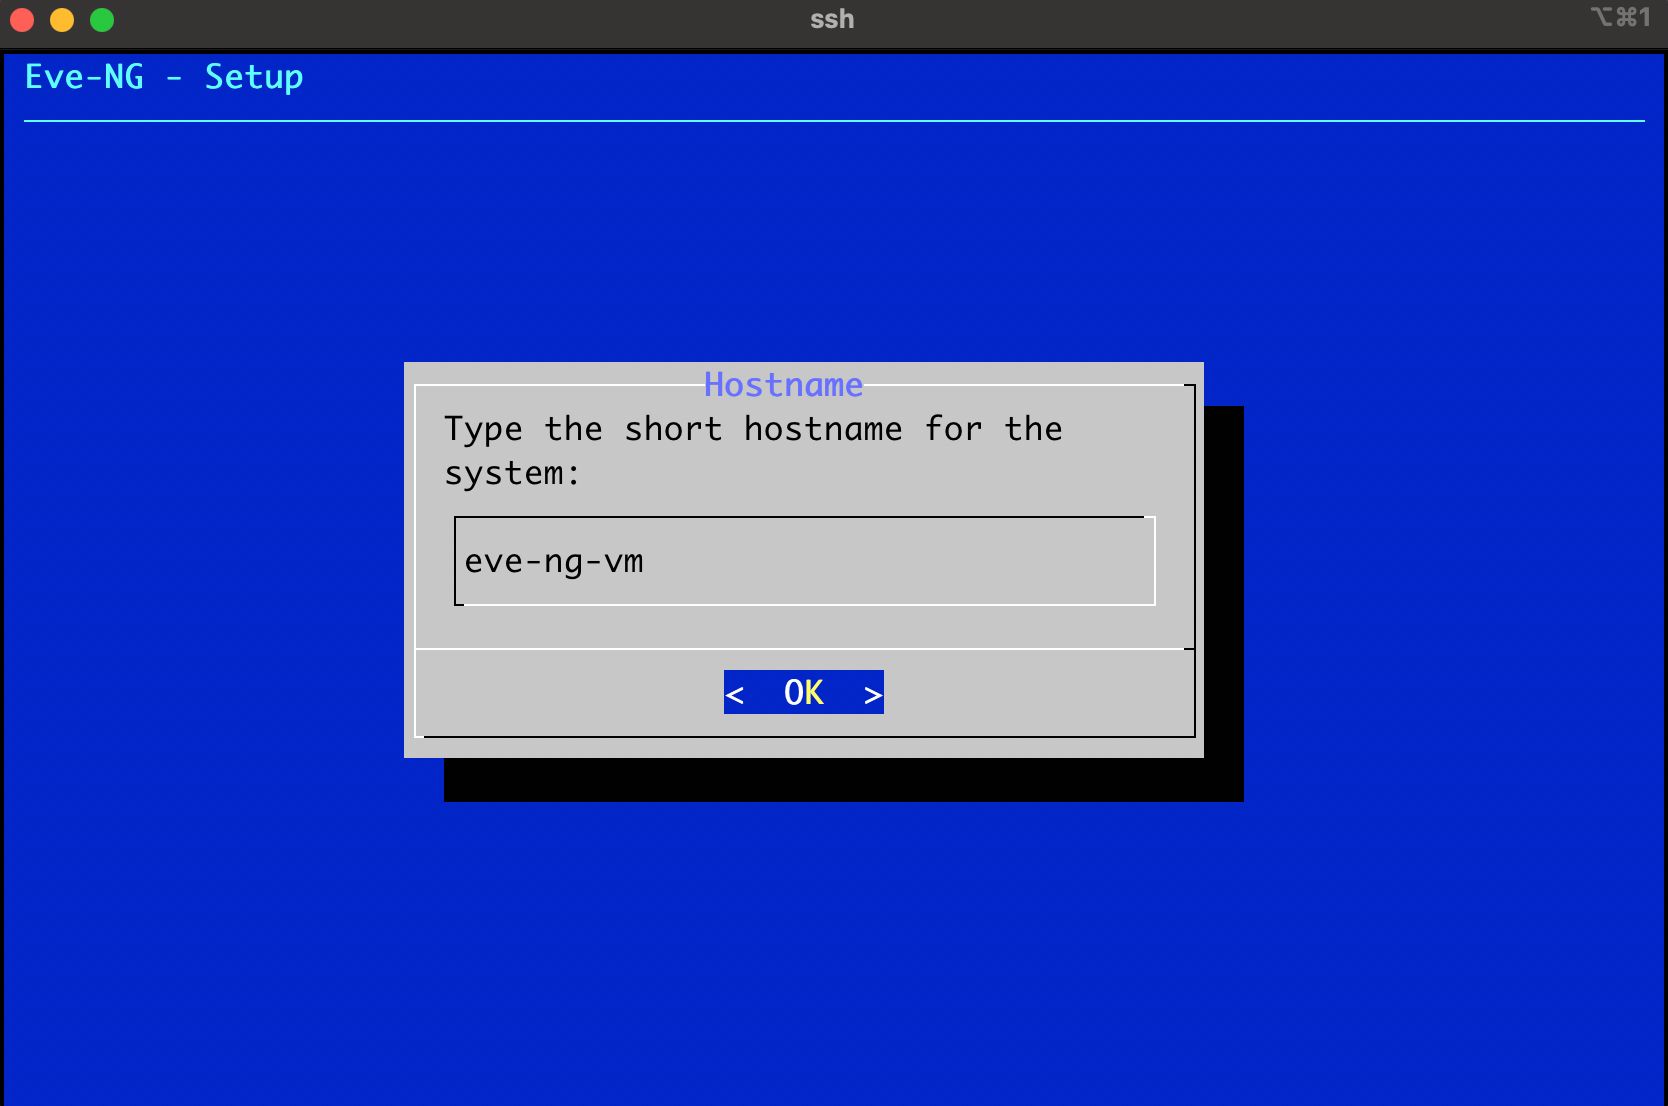
Next, you will be prompted to enter the hostname for the system, as shown below. Type it in here (eg. “eve-ng-vm”) and press Enter to continue.
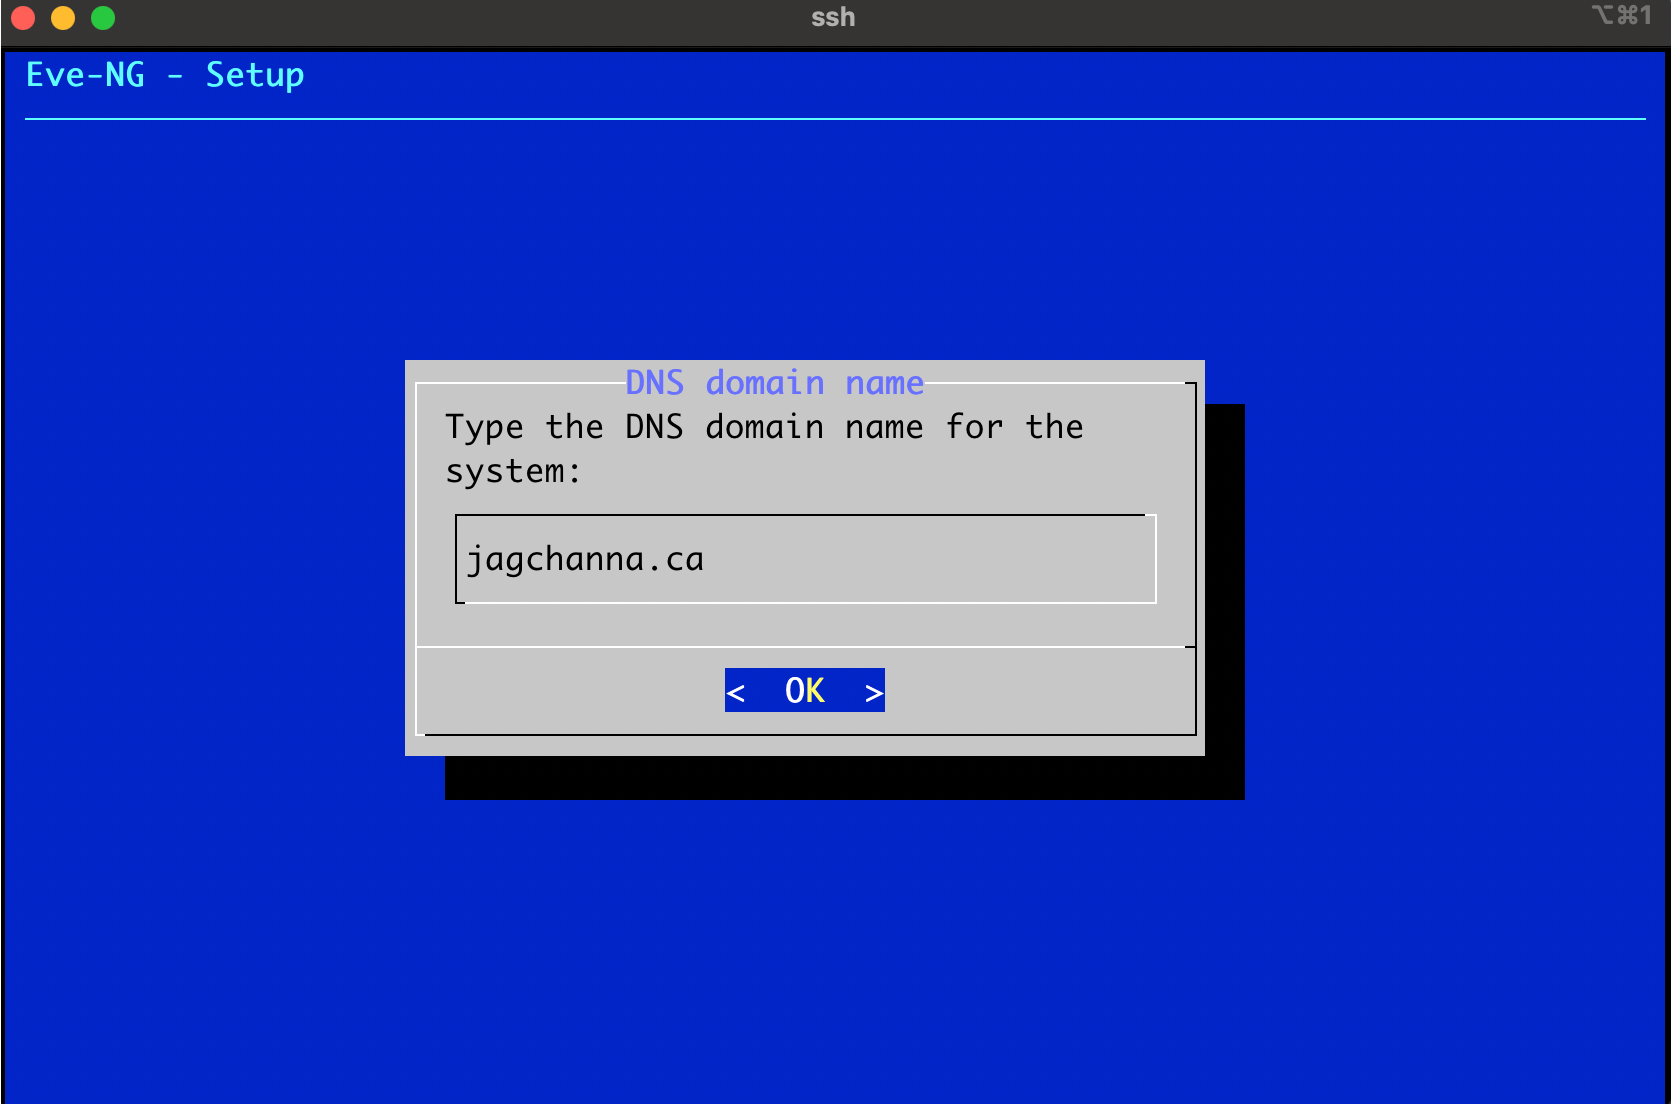
After this, you will see a screen (see below) prompting for the DNS domain name. Enter the domain name here (eg. “jagchanna.ca”) and press Enter to continue.
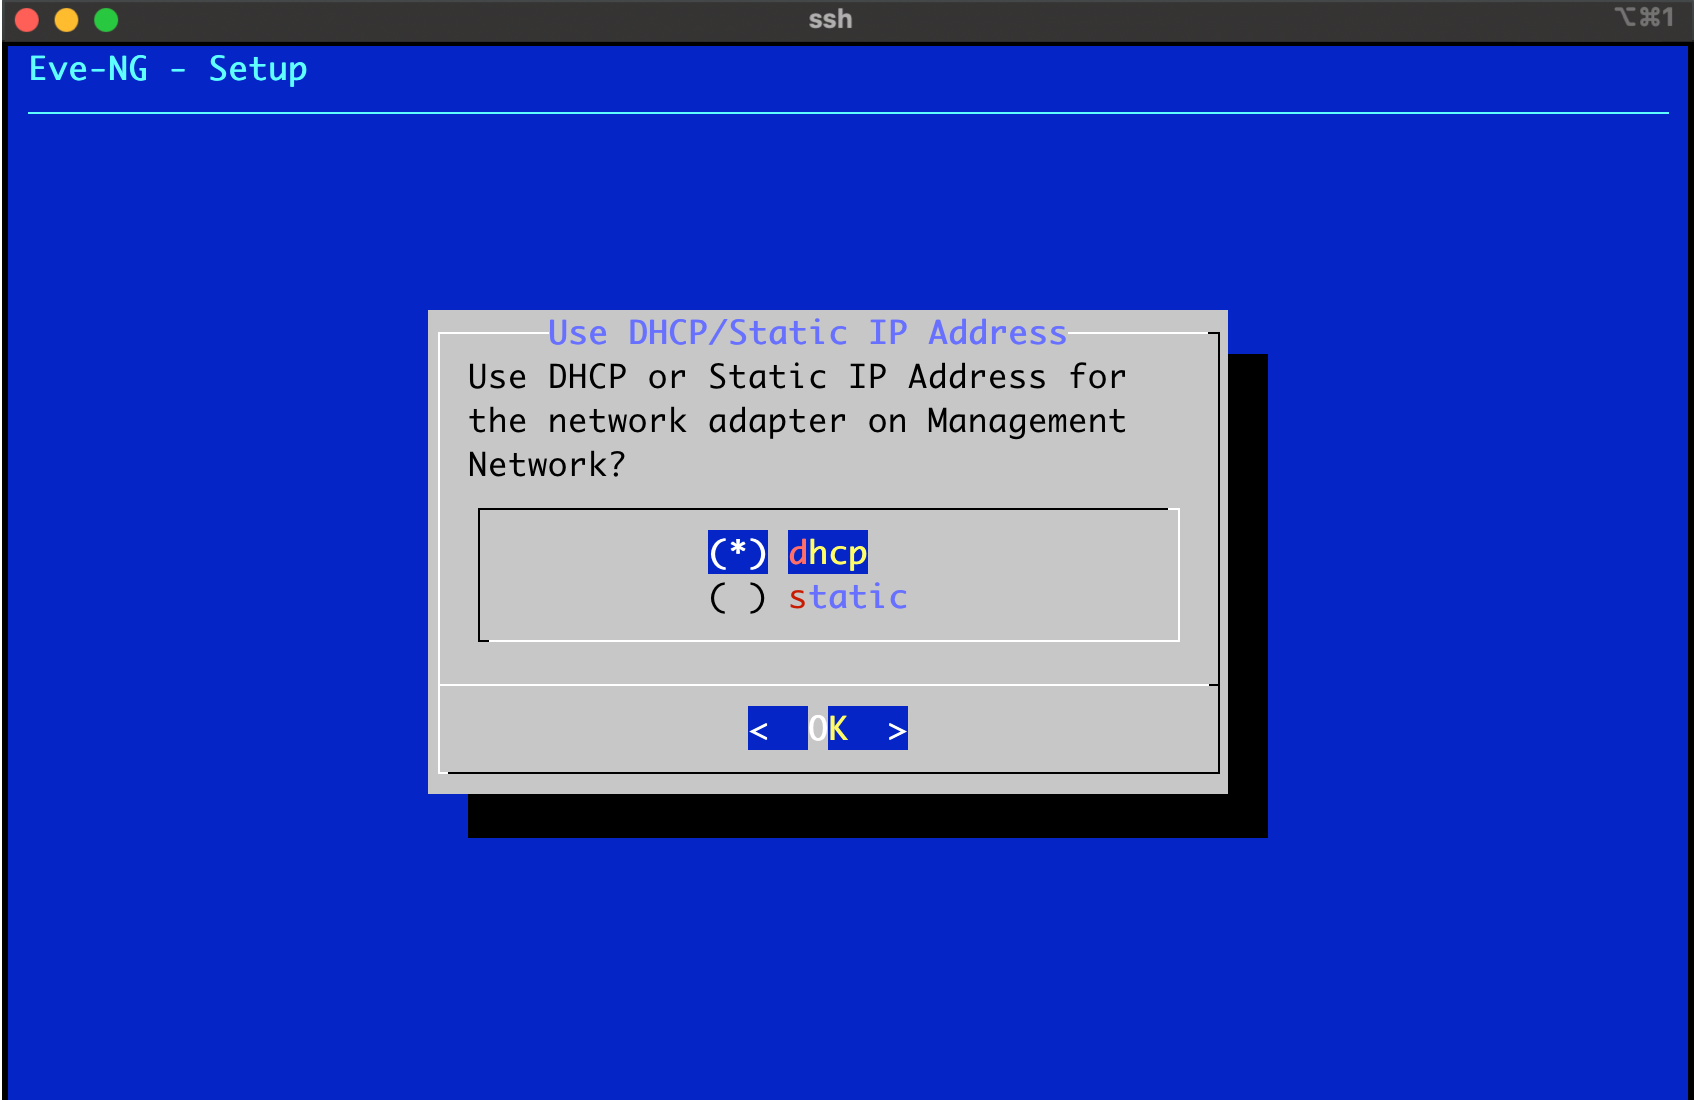
Important: In the next screen that appears (shown below), when prompted to use DHCP or Static IP Address, be sure to select DHCP and press Enter to continue.
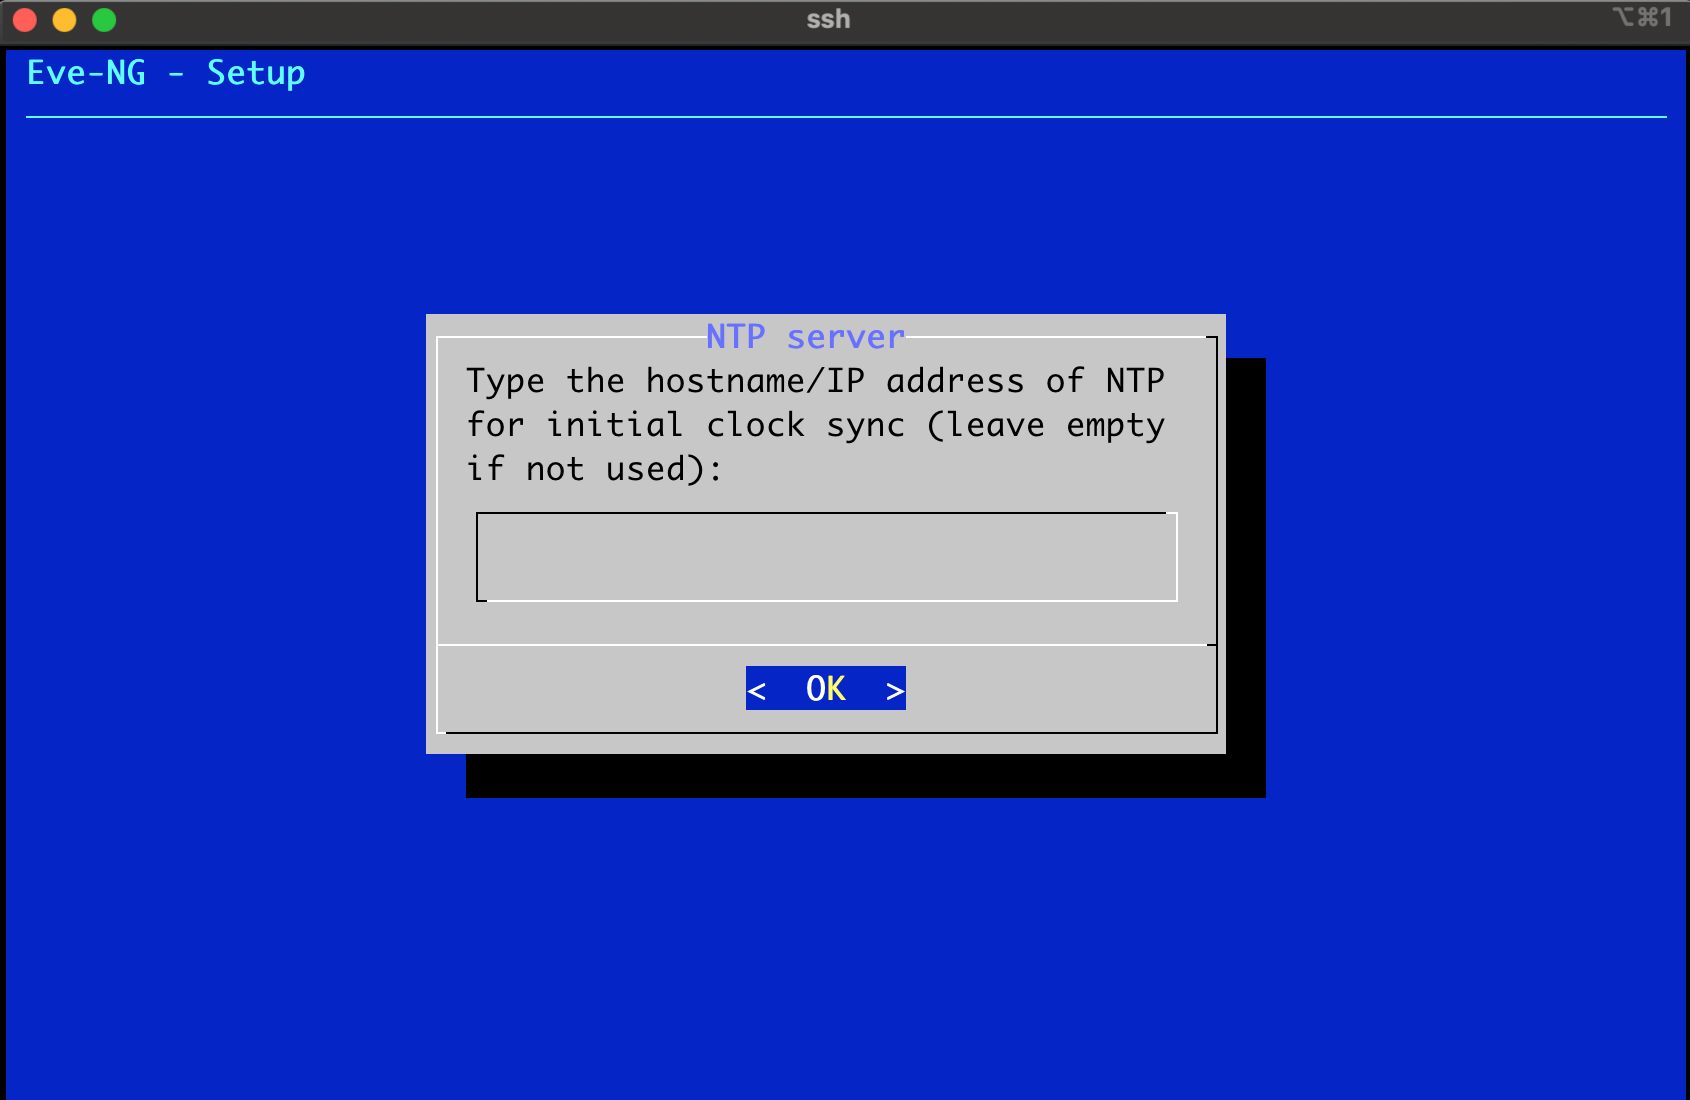
In the next screen (shown below), we are prompted to enter the hostname or IP address of the NTP server. In the example below, we leave the field empty and simply press Enter to continue.
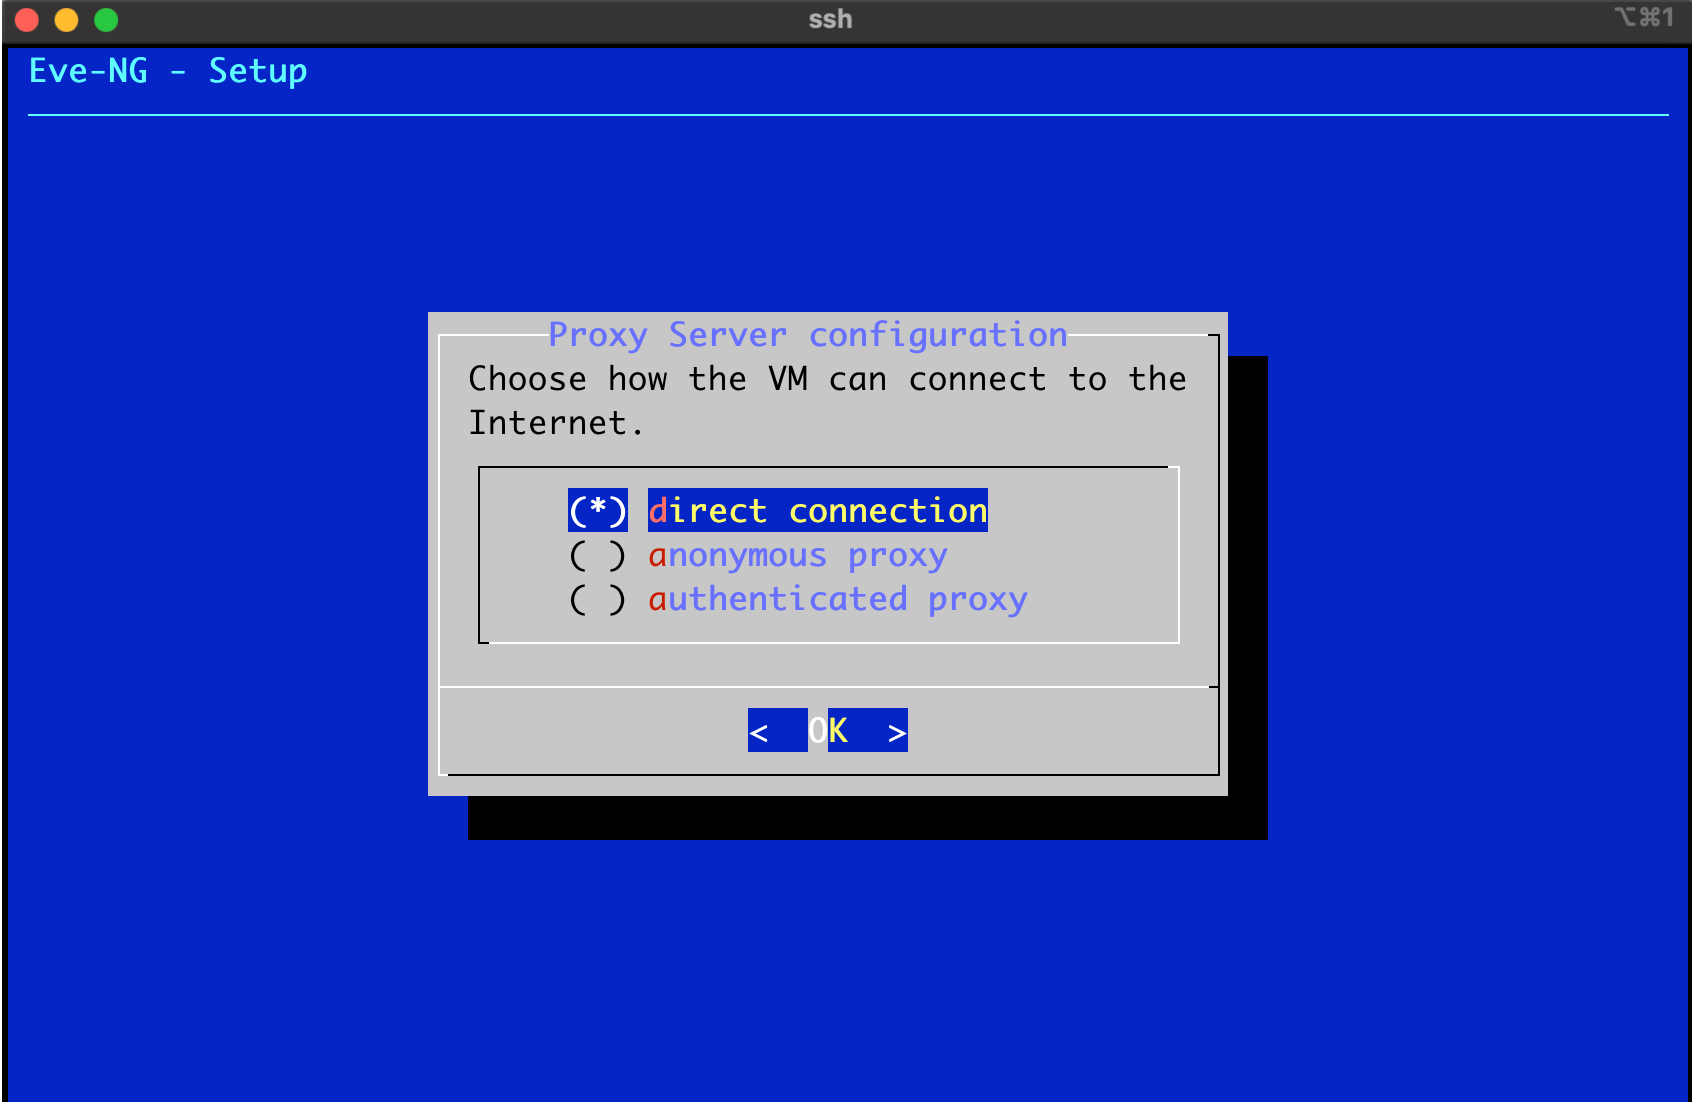
Finally, in the last screen shown below, choose how the VM will connect to the Internet. In the example below we select “direct connection” and press Enter to continue.
After the last screen above, the IP setup wizard exits and the system will reboot. Wait for the system to come back online before continuing.
Once the EVE-NG VM reboots, we have to SSH back in and complete the installation by updating EVE and installing “eve-ng-dockers”. We do this by becoming root and running the “apt update” and “apt install eve-ng-dockers” commands respectively. This is shown below.
$ sudo -i
root
root@eve-ng-vm:~# apt update
Get:1 http://us-central1.gce.archive.ubuntu.com/ubuntu bionic InRelease [242 kB]
Get:2 http://us-central1.gce.archive.ubuntu.com/ubuntu bionic-updates InRelease [88.7 kB]
-----[ CONTENT OMITTED FOR BREVITY ]-----
Reading package lists... Done
Building dependency tree
Reading state information... Done
All packages are up to date.
root@eve-ng-vm:~#


root@eve-ng-vm:~# apt install eve-ng-dockers
Reading package lists... Done
Building dependency tree
Reading state information... Done
The following NEW packages will be installed:
  eve-ng-dockers
-----[ CONTENT OMITTED FOR BREVITY ]-----
Status: Downloaded newer image for eveng/eve-gui-server-bionic:1.0
docker.io/eveng/eve-gui-server-bionic:1.0
Untagged: eveng/eve-gui-server-bionic:1.0
Untagged: eveng/eve-gui-server-bionic@sha256:764d475e3d03982c774dfaef6560f5fef0e52e0a14683b34b38fb98edc1a1123
2: Pulling from library/registry
ddad3d7c1e96: Pull complete
6eda6749503f: Pull complete
363ab70c2143: Pull complete
5b94580856e6: Pull complete
12008541203a: Pull complete
Digest: sha256:bac2d7050dc4826516650267fe7dc6627e9e11ad653daca0641437abdf18df27
Status: Downloaded newer image for registry:2
docker.io/library/registry:2
root@eve-ng-vm:~#
Logging Into & Licensing EVE-NG
And that’s it! EVE-NG should now be up and running. Simply point your browser to https://<your_vm_ip_address>, and you should see the following login screen, shown below. Note that because this is a brand new installation, you will see a message in red just below the sign-in form, indicating that the license has expired due to the setup being unlicensed. We will correct this shortly.
Note the following default login credentials (be sure to change these upon first login):
- Default Username = admin
- Default Password = eve
Login to EVE-NG using the default credentials as shown in the screenshot below.

Note that the Professional version of EVE-NG (i.e. EVE-PRO) requires a license to be purchased, the official details for which can be found here.
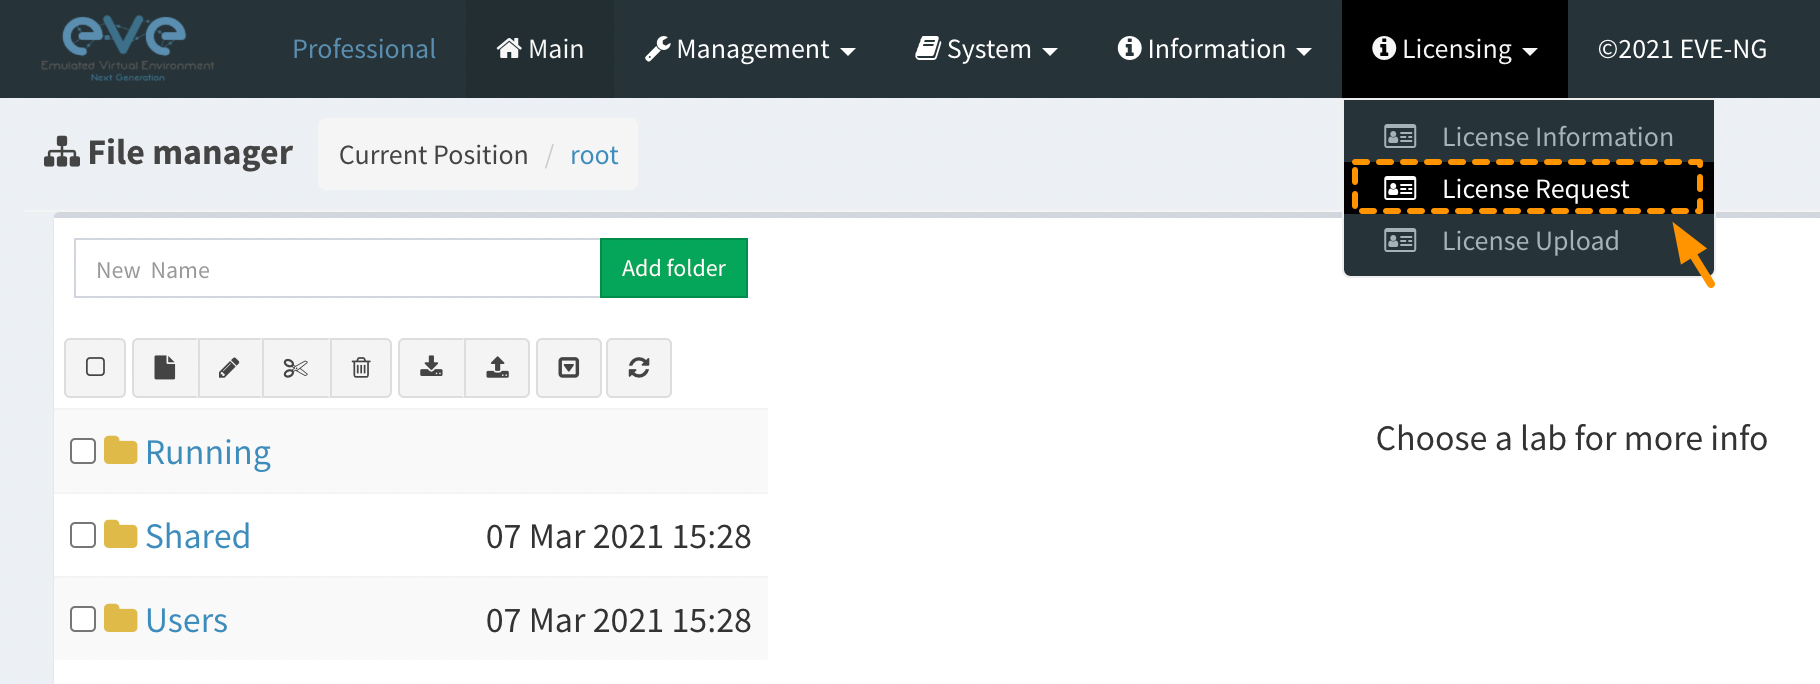
The first step to installing the license is to login to our new EVE-NG setup via the browser and initiate a license request by selecting "Licensing -> License Request" from the EVE-NG top menu bar, as highlighted in orange below.
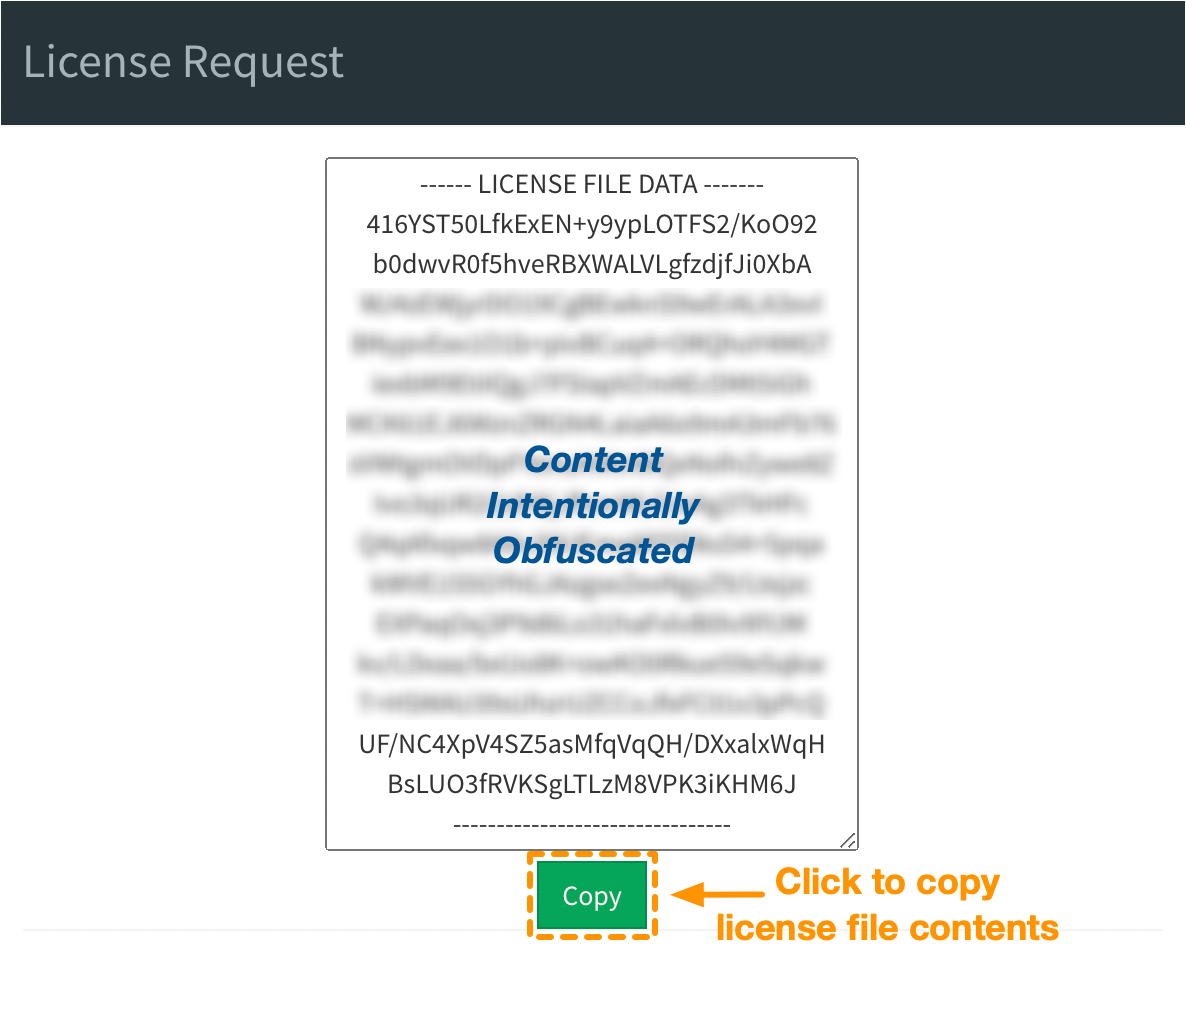
A "License Request" popup window will appear (shown below), showing the contents of the license request file data. Copy the contents of this file by clicking on the green "Copy" button in the window.
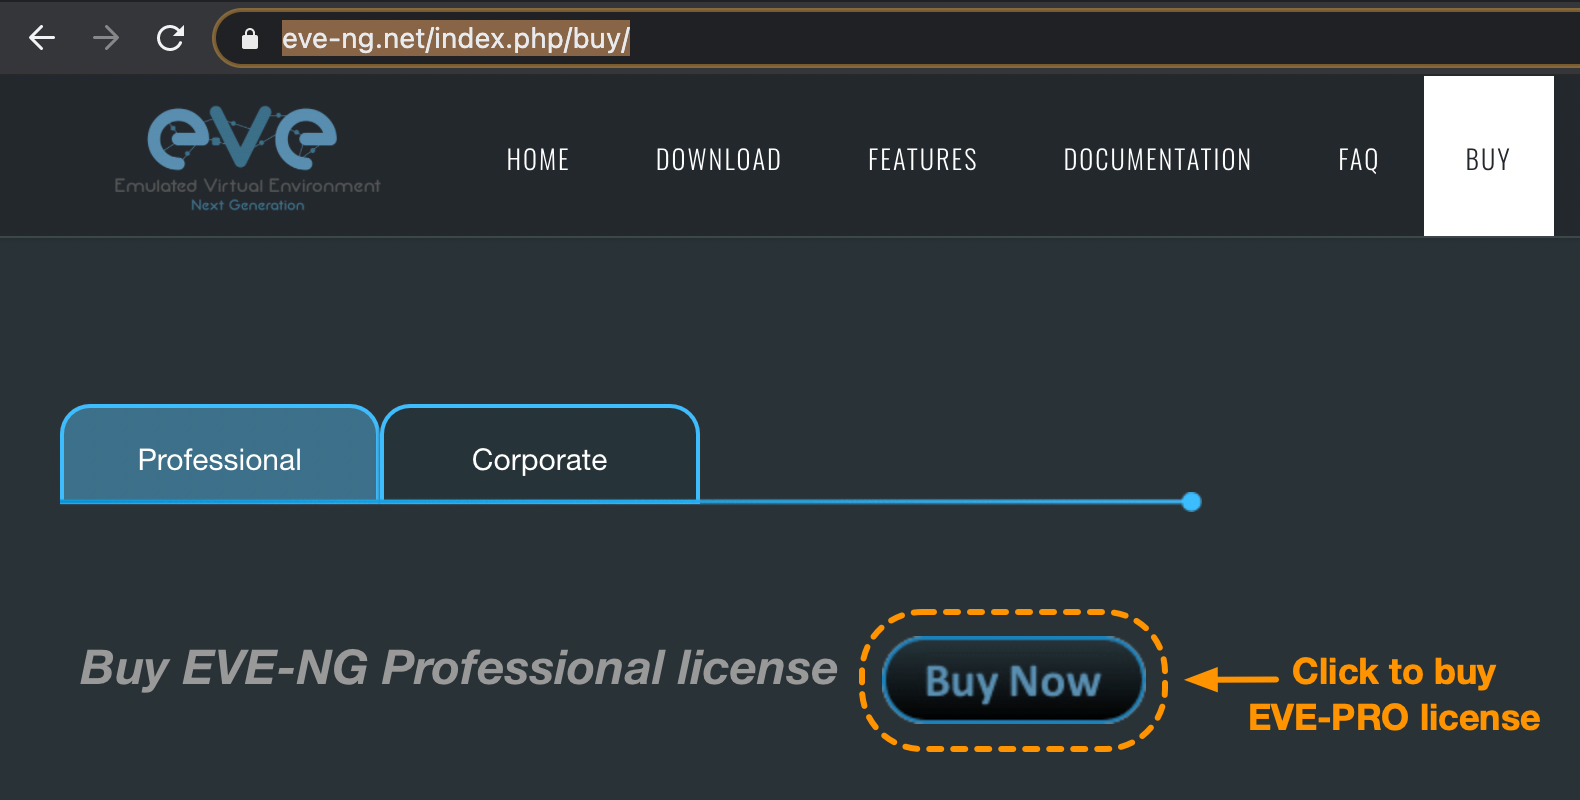
Now proceed to the EVE-NG website, and as highlighted below, click on the "Buy Now" button to kickstart the process to purchase your license.
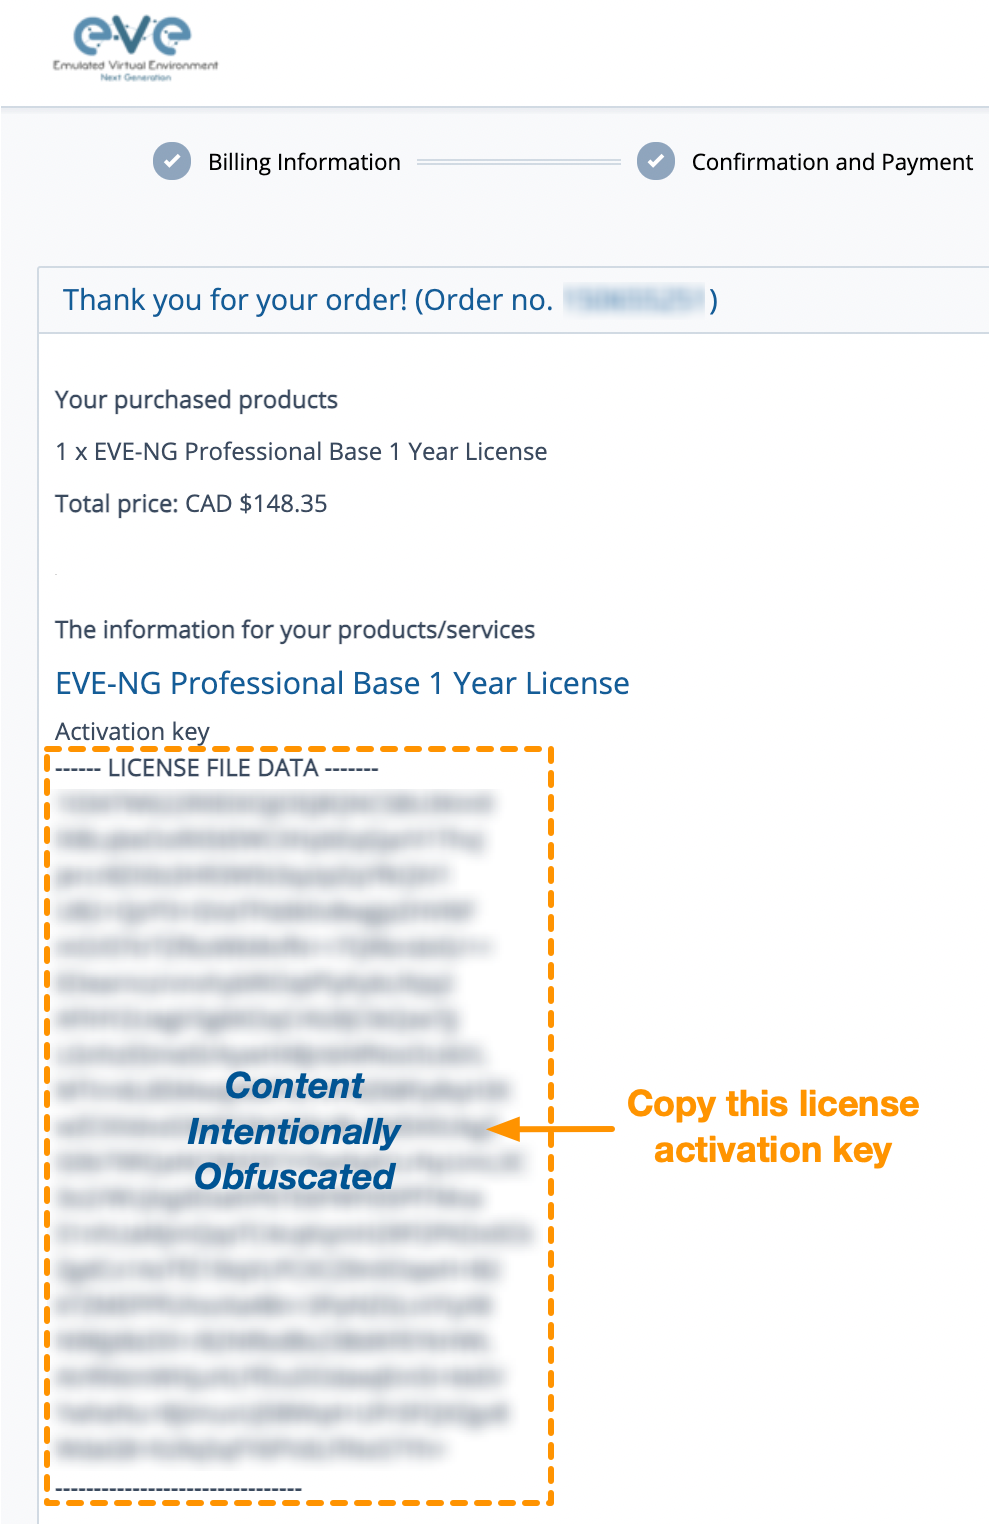
During the purchase process, when prompted, be sure to paste the license request file data that was copied earlier. Once the purchase is complete, you will see a Confirmation Page such as the one shown below. At the bottom of the page (highlighted in orange below) will be your EVE-PRO license activation key. Copy the contents of this key.
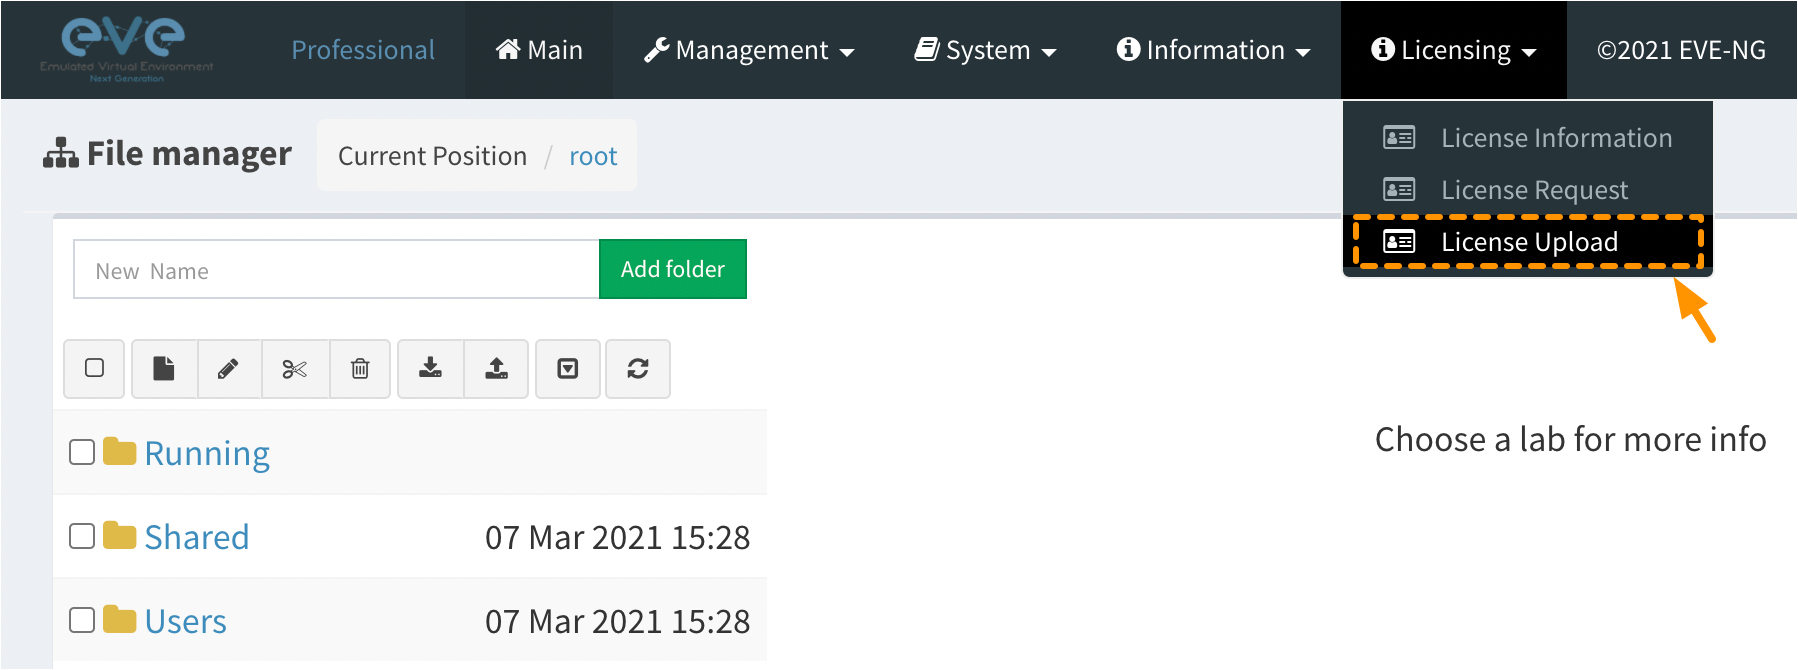
Next, we return back to our EVE-NG web console, and from the main top menu bar, select "Licensing -> License Upload" as highlighted in orange in the following screenshot.
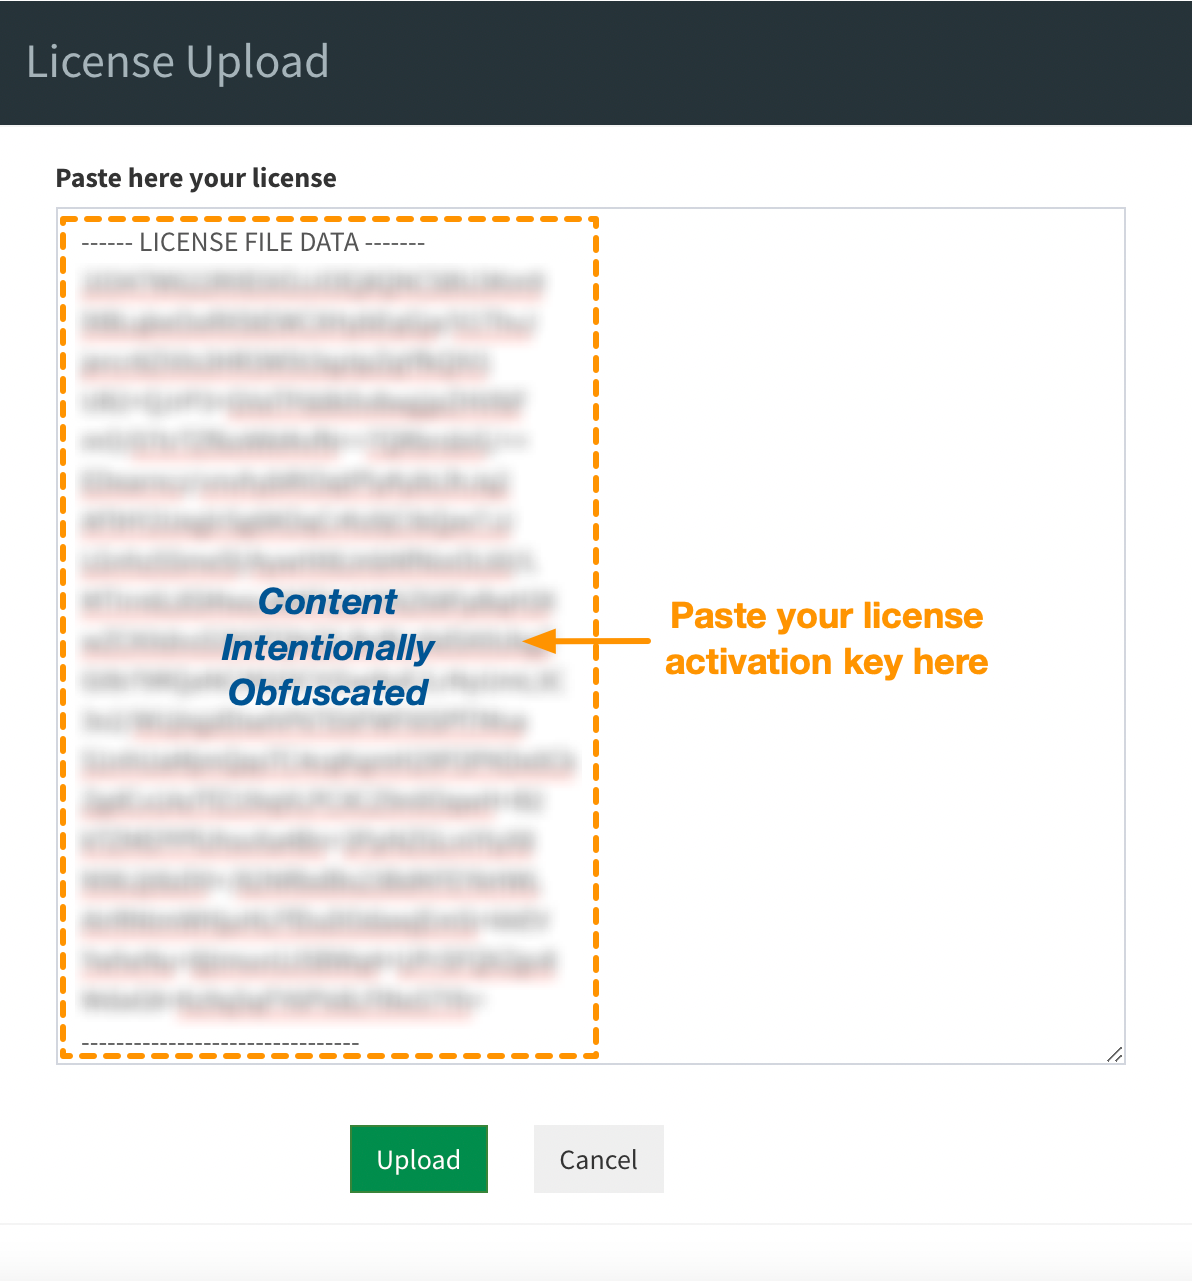
A "License Upload" popup window will appear. As shown below, paste the contents of your license activation key in the text window and click on the "Upload" button to upload and save your key.
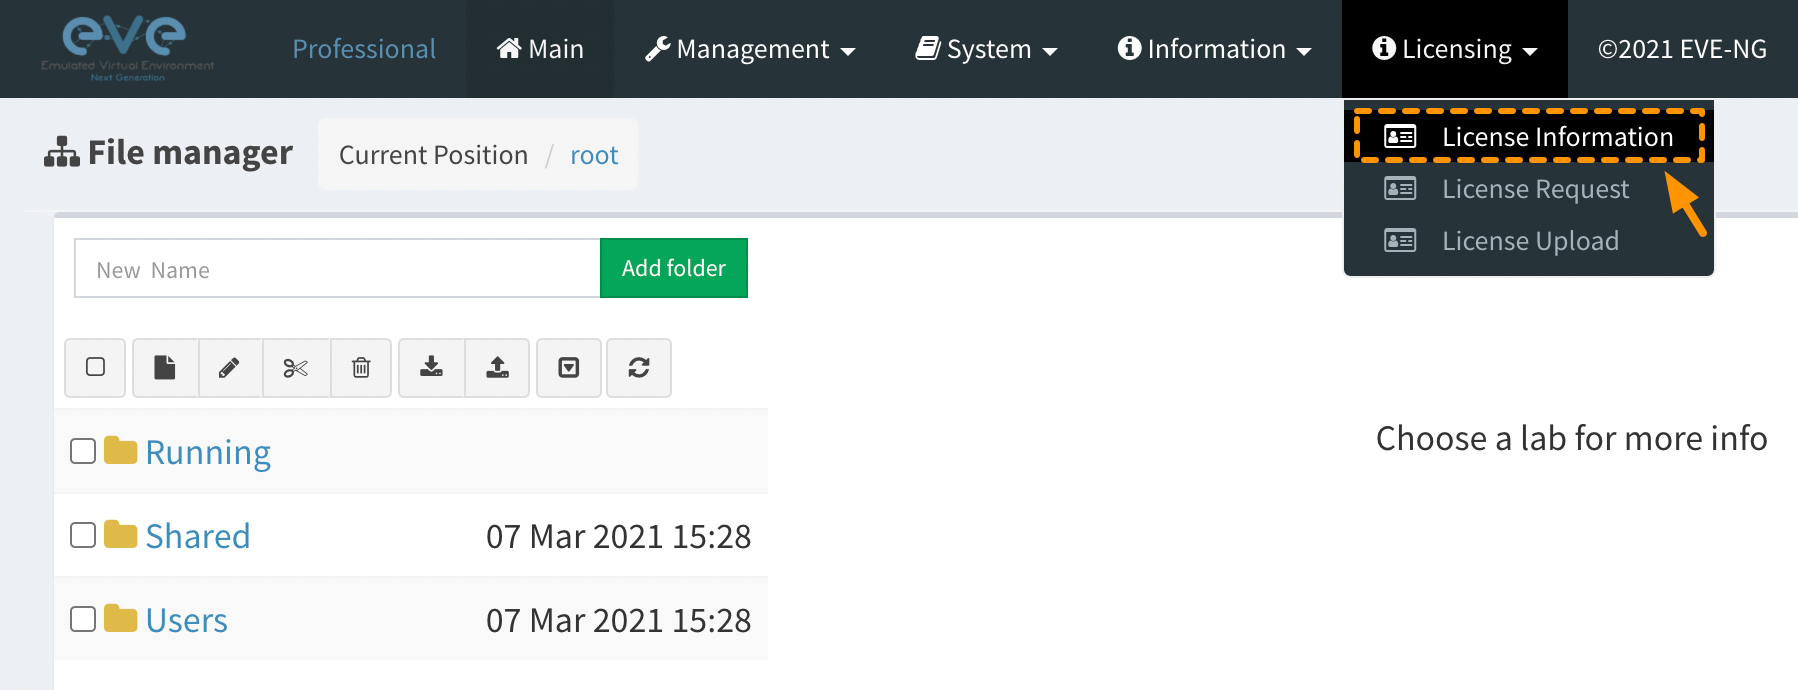
We can verify that the license was successfully activated by selecting "Licensing -> License Information" from the top menu bar, as depicted in the screenshot below.
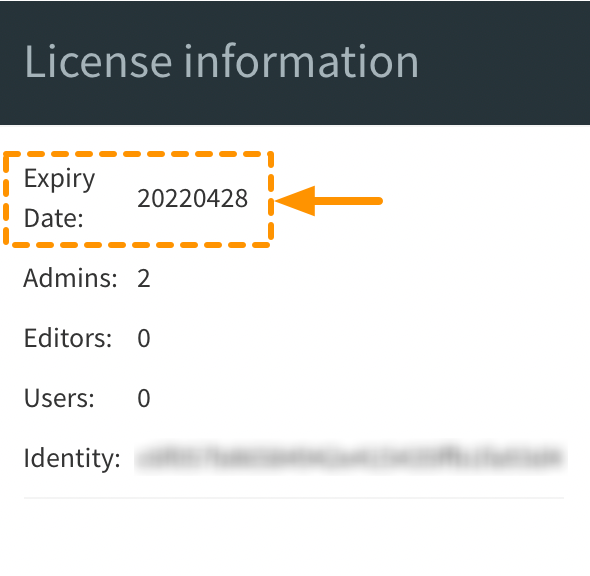
In the "License information" popup window that appears (screenshot below), verify that the Expiry Date for the license is set to 1 year from now.
At this point, our EVE-NG installation is complete and ready for spinning up new routers and network topologies! In Part 2 of this blog series, we explore how to create a simple network topology using EVE-NG, consisting of Arista vEOS and Juniper vMX routers.
-- Jag --