Deploying EVE-NG On Google Cloud Platform: Part 2
Deploying Arista vEOS and Juniper vMX to EVE-NG on Google Cloud Platform (GCP).

In Part 1 of this blog series, we covered the step-by-step procedure for installing EVE-NG (eve-ng.net) on Google Cloud Platform (GCP). In this blog post, we are going to look at how to spin up a very simple topology, consisting of an Arista vEOS and a Juniper vMX router. In Part 3 (coming soon), we will investigate how we can connect our EVE-NG topology to external VMs that reside in our GCP environment.
Downloading The Arista vEOS Image
Kudos to Arista for making vEOS-lab and cEOS-lab freely available to download and use ... customer adoption is accelerated when you make things open, accessible and less prohibitive. You can create a free account here, and use it to access the Software Download page, where you can download both vEOS (virtualized EOS) and cEOS (containerized EOS) images. In this blog post, we are going to try out version 4.26.01F of vEOS. As highlighted in the screenshot below, we need to download a couple of files:
- Aboot-veos-serial-8.0.0.iso
- vEOS64-lab-4.26.0.1F.vmdk
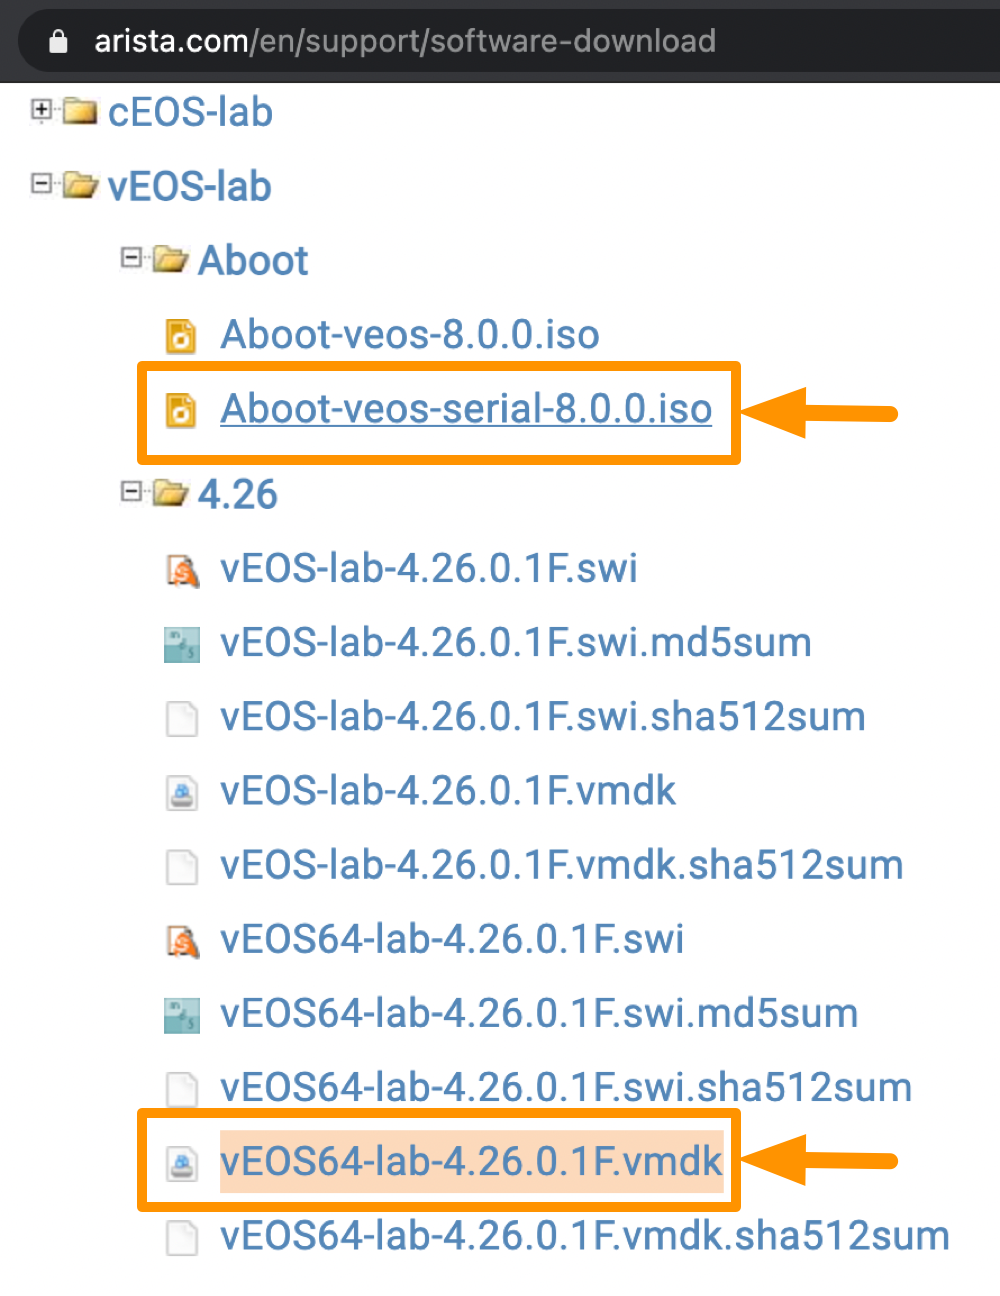
The first file ("Aboot-veos-serial-8.0.0.iso") enables the sending of console output during bootup time to the serial port. The second file ("vEOS64-lab-4.26.0.1F.vmdk") is the actual vEOS image for a 64-bit system.
NOTE: If you are unsure whether your system is 32-bit or 64-bit, you can run the "uname -m" command. If the output shows "x86_64" then you are running 64-bit. If it shows something like "i386" or "i686" then you are running 32-bit.
Once you have obtained the above two files, you need to upload them to your home directory on your EVE-NG machine, as shown in the screenshot below. Note: also shown below is a Juniper vMX image file ("vmx-bundle-18.4R3.3.tgz"), which was obtained separately.

Staging The Image Files On EVE-NG
Before we can create topologies in EVE-NG using our virtual router image files, we first need to stage them properly on the EVE-NG server. Note that EVE-NG is fairly prescriptive about this, in terms of the format and location of the image files, as well as the naming conventions used for these files and the folders where they are housed. There is an EVE-NG webpage on QEMU Image Naming which lists the naming conventions for all supported vendors. Sifting through this long list, Table 1 below summarizes the pertinent info for both Arista vEOS and Juniper vMX (note that for Juniper we need to consider both the Control Plane (vMX-VCP) and the Forwarding Plane (vMX-VFP).

NOTE: EVE-NG requires that all image folders be located in directory /opt/unetlab/addons/qemu/. The image folder name must begin using the convention outlined in the first column of Table 1 above. After the "-", the folder name should include the name and version of the image.
To illustrate this, let's apply these conventions to correctly stage our Arista vEOS and Juniper vMX images.
Staging Arista vEOS Image Files
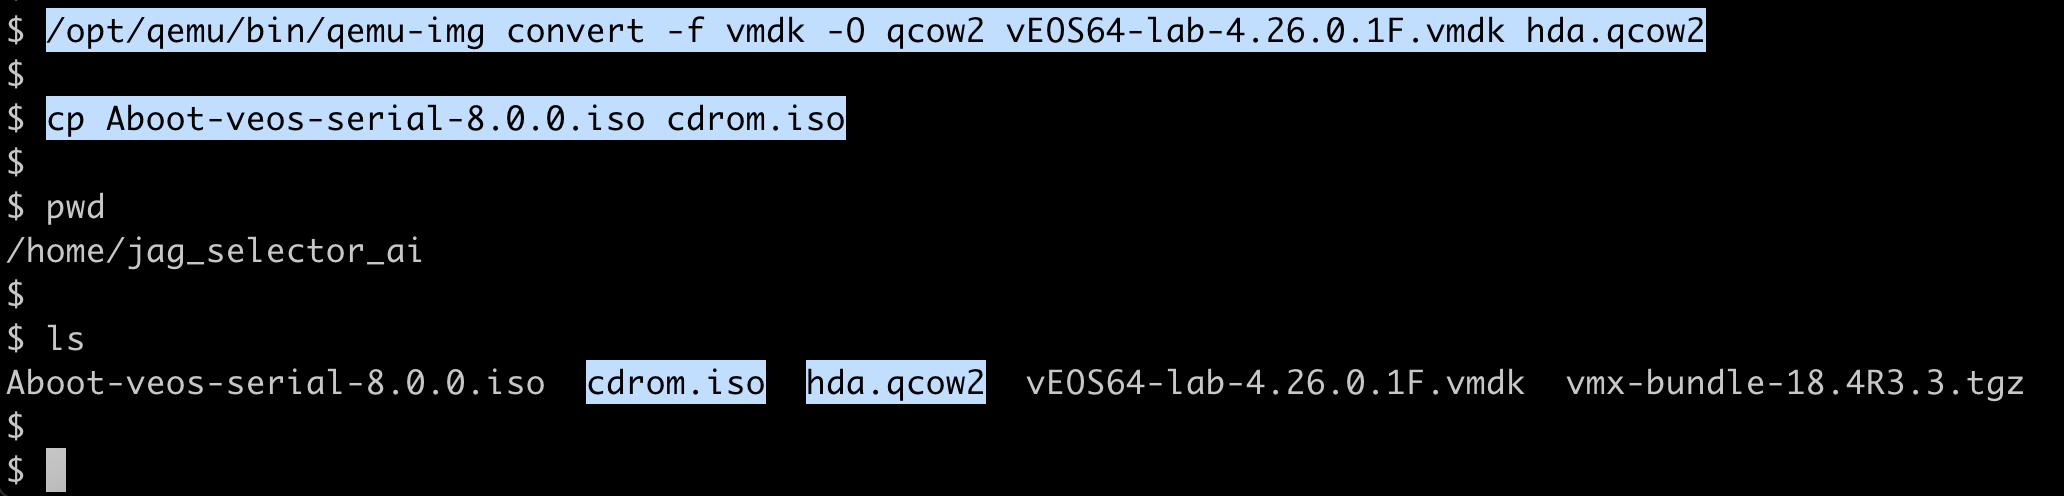
Let's begin with staging the Arista vEOS image files. First, note that the 64-bit Arista image file is in VMDK format, which is meant for use with VMware and VirtualBox. We need to convert this VMDK image into "QCOW2" format that is compatible with KVM. To do this, we can use the "qemu-img convert" utility to convert between the two formats. Note that according to Table 1 above, the QCOW2 file needs to be named as "hda.qcow2", so we use the following command to convert the image:
/opt/qemu/bin/qemu-img convert -f vmdk -O qcow2 vEOS64-lab-4.24.0F.vmdk hda.qcow2
Also, according to Table 1, the "Aboot-veos-serial-8.0.0.iso" file needs to be renamed to "cdrom.iso", using the following command:
sudo cp Aboot-veos-serial-8.0.0.iso cdrom.iso
At this point, our home directory looks as highlighted in the screenshot below, where we now have the new "hda.qcow2" and "cdrom.iso" image files alongside the original uploaded files.
Next, we create the image folder under "/opt/unetlab/addons/qemu" according to the naming convention outlined above. For our Arista vEOS 4.26.01F image, we will name the folder "veos-4.26.01F" using the following command:
sudo mkdir -p /opt/unetlab/addons/qemu/veos-4.26.01F
We can now move our renamed image files to this newly created image folder:
sudo mv hda.qcow2 /opt/unetlab/addons/qemu/veos-4.26.01F/
sudo mv cdrom.iso /opt/unetlab/addons/qemu/veos-4.26.01F/
Finally, run the following command to fix permissions:
sudo /opt/unetlab/wrappers/unl_wrapper -a fixpermissions
Staging Juniper vMX Image Files
Now let's stage the Juniper vMX image files. Note that the vMX consists of two separate components or VMs: one for the virtual forwarding plane (VFP) and one for the virtual control plane (VCP). The VFP runs the virtual Trio forwarding plane software and the VCP runs Junos OS. Note that despite running separately, the VCP and VFP logically function as a single device.
The first thing we need to do is unzip the vMX image archive in your home directory, as shown below:
tar -xvf vmx-bundle-18.4R3.3.tgz
Next, "cd" to the "vmx/images" subdirectory and list the contents; you should see an output similar to the screenshot below:
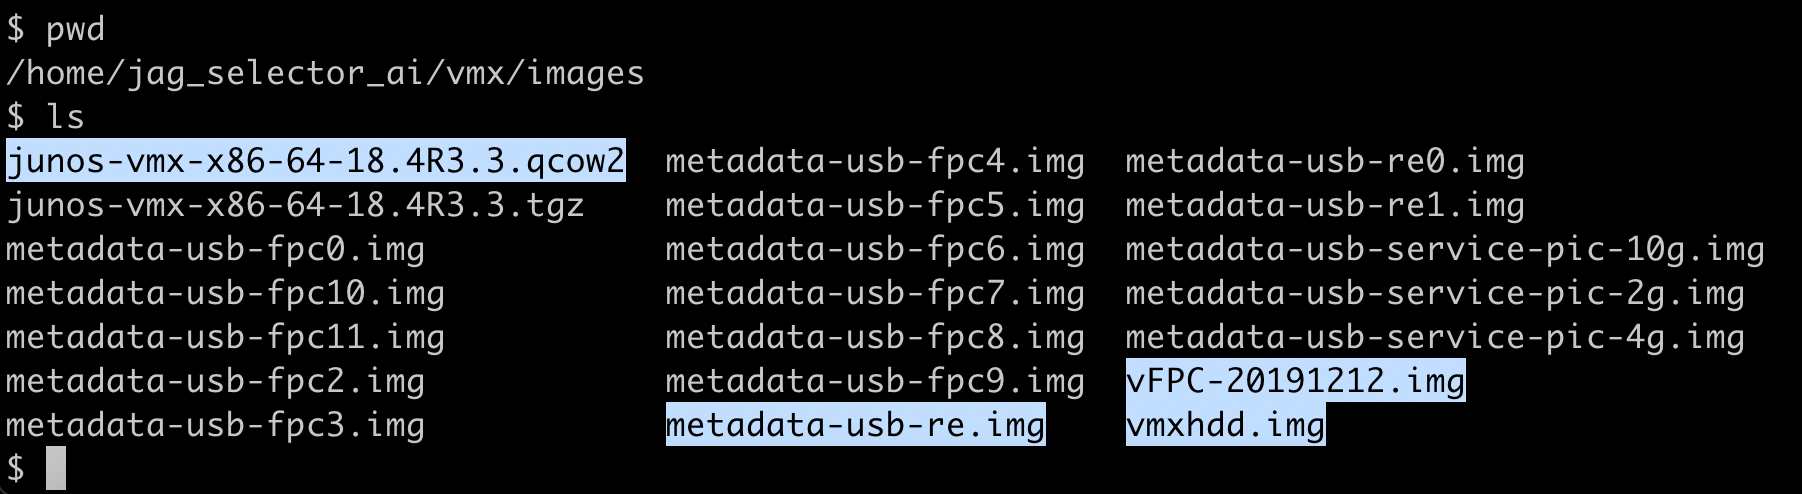
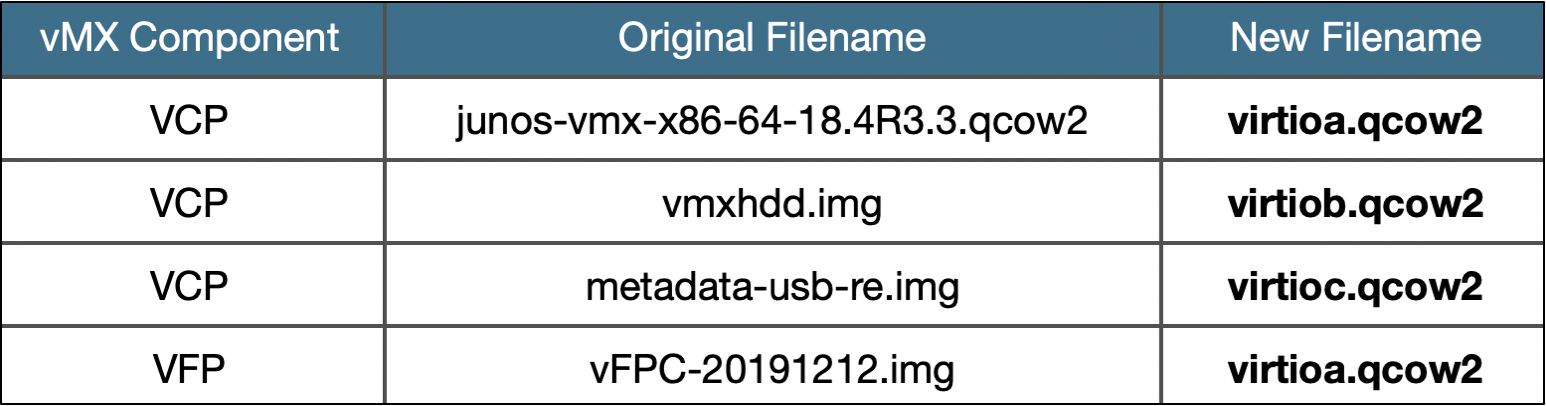
There are four files highlighted in the screenshot above which need to be renamed in order to comply with the EVE-NG naming conventions outlined in Table 1. Table 2 below summarizes the changes that need to be made for these files. Note that the first 3 entries are VCP-specific image files, while the last entry is a VFP-specific image file.
In addition, as per Table 1 above, the VPC-specific files need to go in one particular directory (whose name starts with "vmxvcp-"), and the VFP-specific files need to go into a different directory (whose name begins with "vmxvfp-"). Both of these image directories need to reside under "/opt/unetlab/addons/qemu/", similar to the Arista vEOS image folder.
Let's first create these directories. We will name our VCP directory "vmxvcp-18.4R3.3-VCP" and our VFP directory as "vmxvfp-18.4R3.3-VFP", using the commands shown below:
sudo mkdir /opt/unetlab/addons/qemu/vmxvcp-18.4R3.3-VCP
sudo mkdir /opt/unetlab/addons/qemu/vmxvfp-18.4R3.3-VFP
The screenshot below shows the newly created directories under "/opt/unetlab/addons/qemu":

With the directories created, let's now rename our four VCP/VFP image files and move them to their appropriate folders under "/opt/unetlab/addons/qemu". The commands to do this are shown below:
sudo cp junos-vmx-x86-64-18.4R3.3.qcow2 /opt/unetlab/addons/qemu/vmxvcp-18.4R3.3-VCP/virtioa.qcow2
sudo cp vmxhdd.img /opt/unetlab/addons/qemu/vmxvcp-18.4R3.3-VCP/virtiob.qcow2
sudo cp metadata-usb-re.img /opt/unetlab/addons/qemu/vmxvcp-18.4R3.3-VCP/virtioc.qcow2
sudo cp vFPC-20191212.img /opt/unetlab/addons/qemu/vmxvfp-18.4R3.3-VFP/virtioa.qcow2
Lastly, as we did for Arista, don't forget to run the following command to fix permissions:
sudo /opt/unetlab/wrappers/unl_wrapper -a fixpermissions
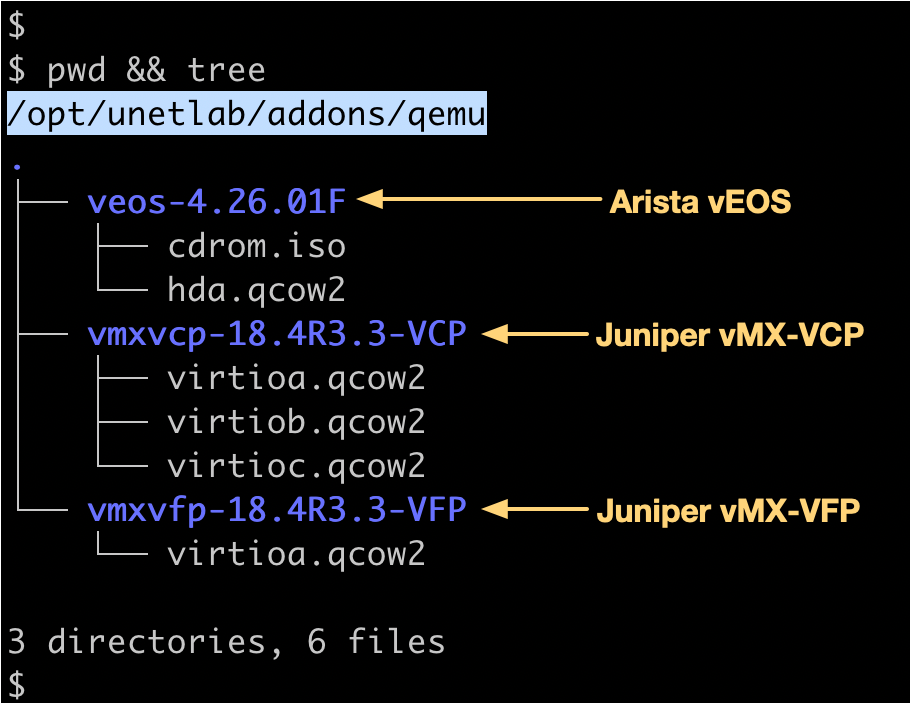
And that's it for staging! At this point, your "/opt/unetlabs/addons/qemu" directory should look like this:
Spinning Up A Topology Using The EVE-NG GUI
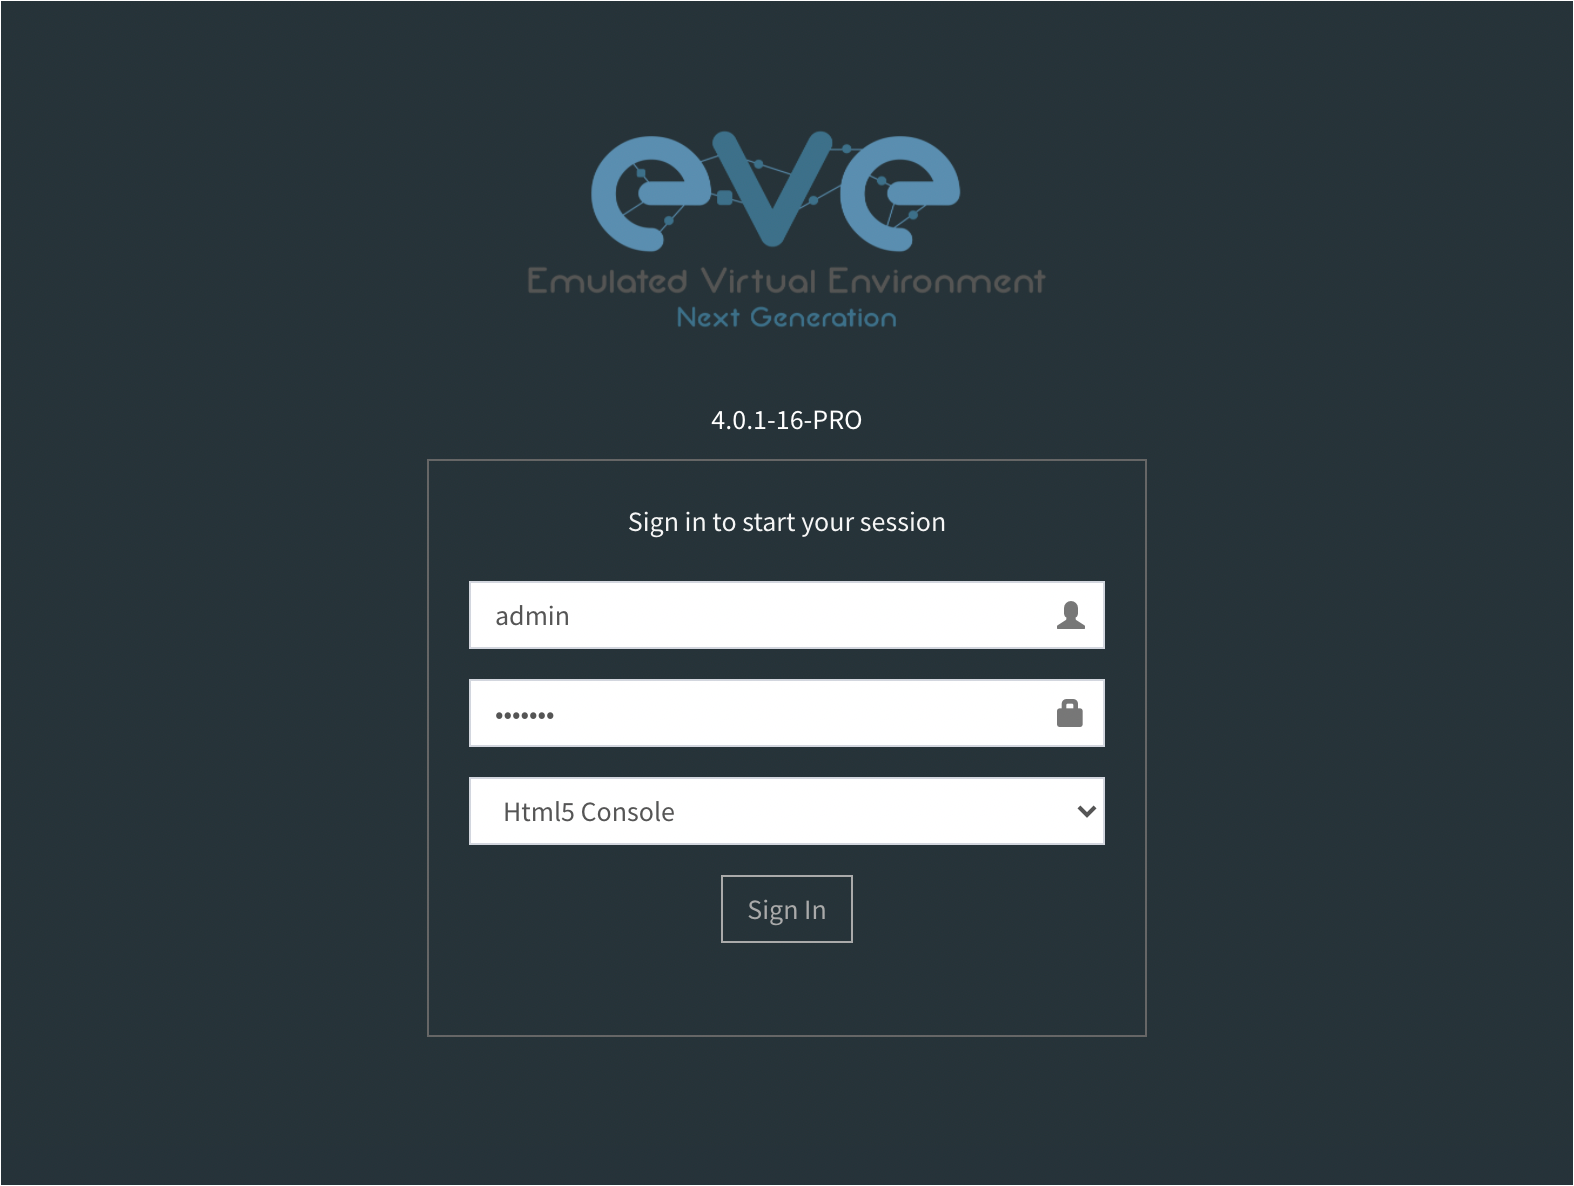
Now that the staging of the image files on the EVE-NG server is complete, we are ready to spin up our simple dual-vendor topology using the EVE-NG GUI. Point your browser to https://<your_eve-ng_ip_address>, and you should see the following login screen, shown below. Login to the app using your credentials.
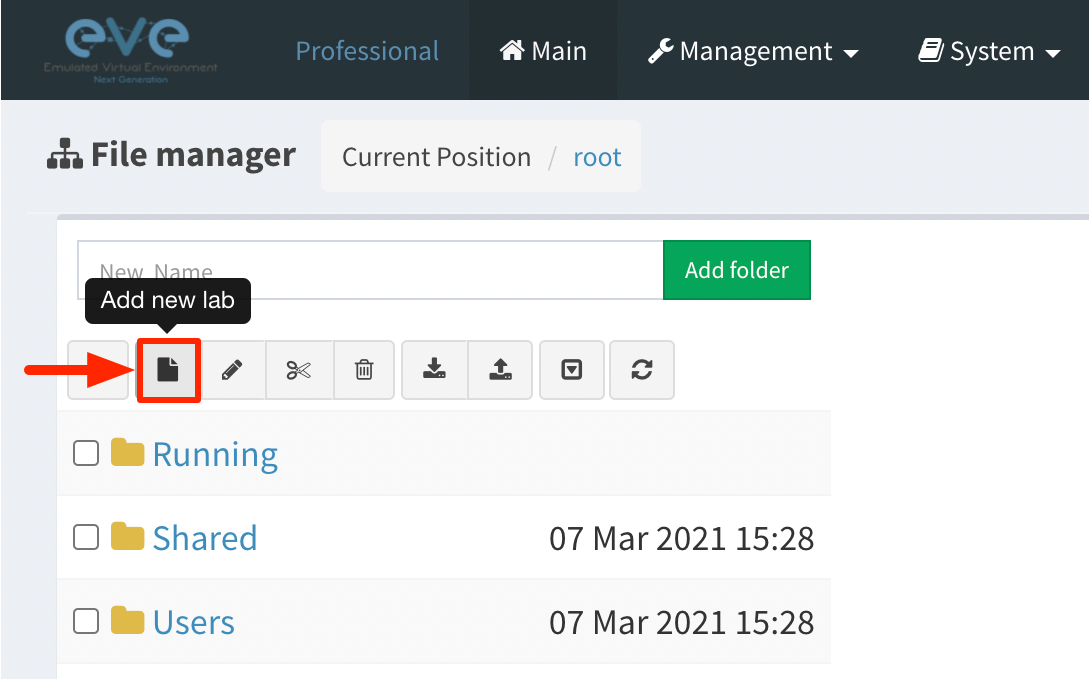
From the main "File manager" landing page, click on the "Add new lab" icon as shown in the screenshot below.
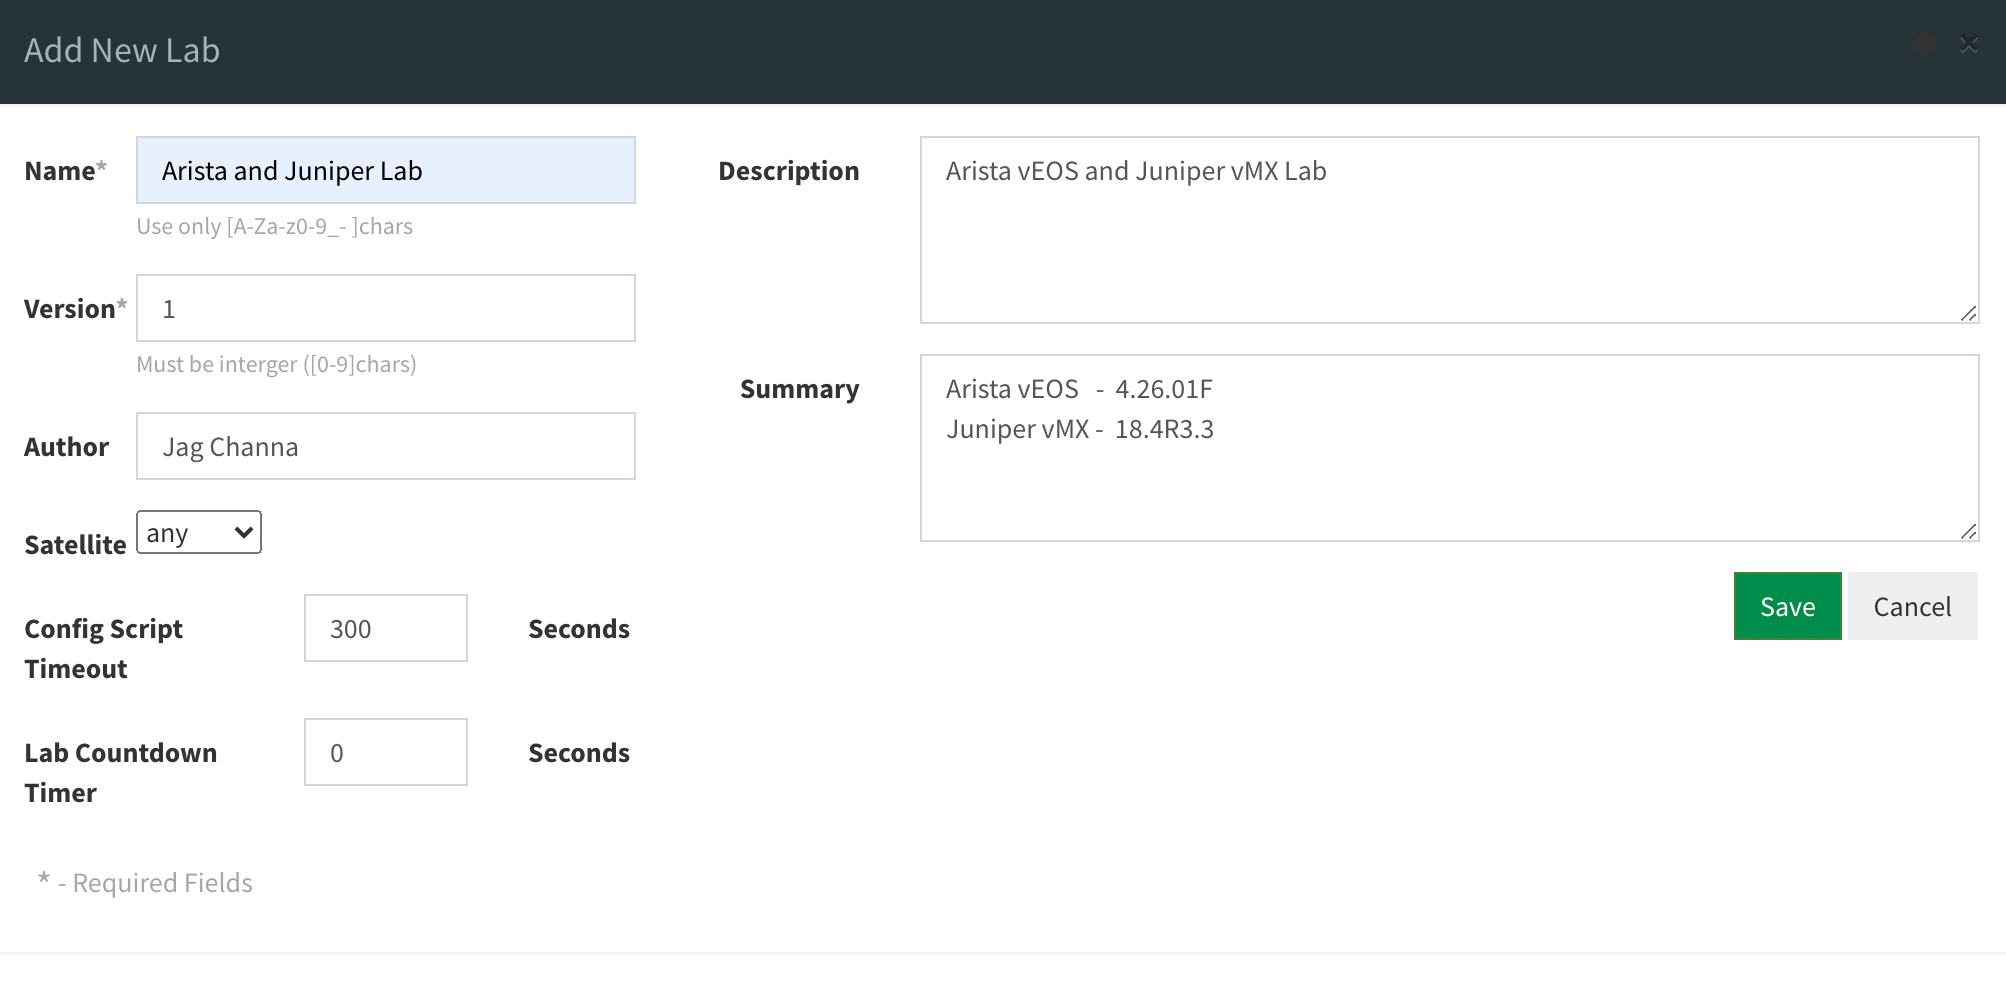
The "Add New Lab" popup window appears, as shown below. Fill in the various fields for Name, Version, Author, Description and Summary, and click on "Save" to continue.
The user is then taken directly to the Topology Designer for the lab just created. The Topology Designer is a Visio-like canvas where you can drag and drop newly instantiated virtual routers, link them together to create network topologies and launch them.
Launching The Arista vEOS
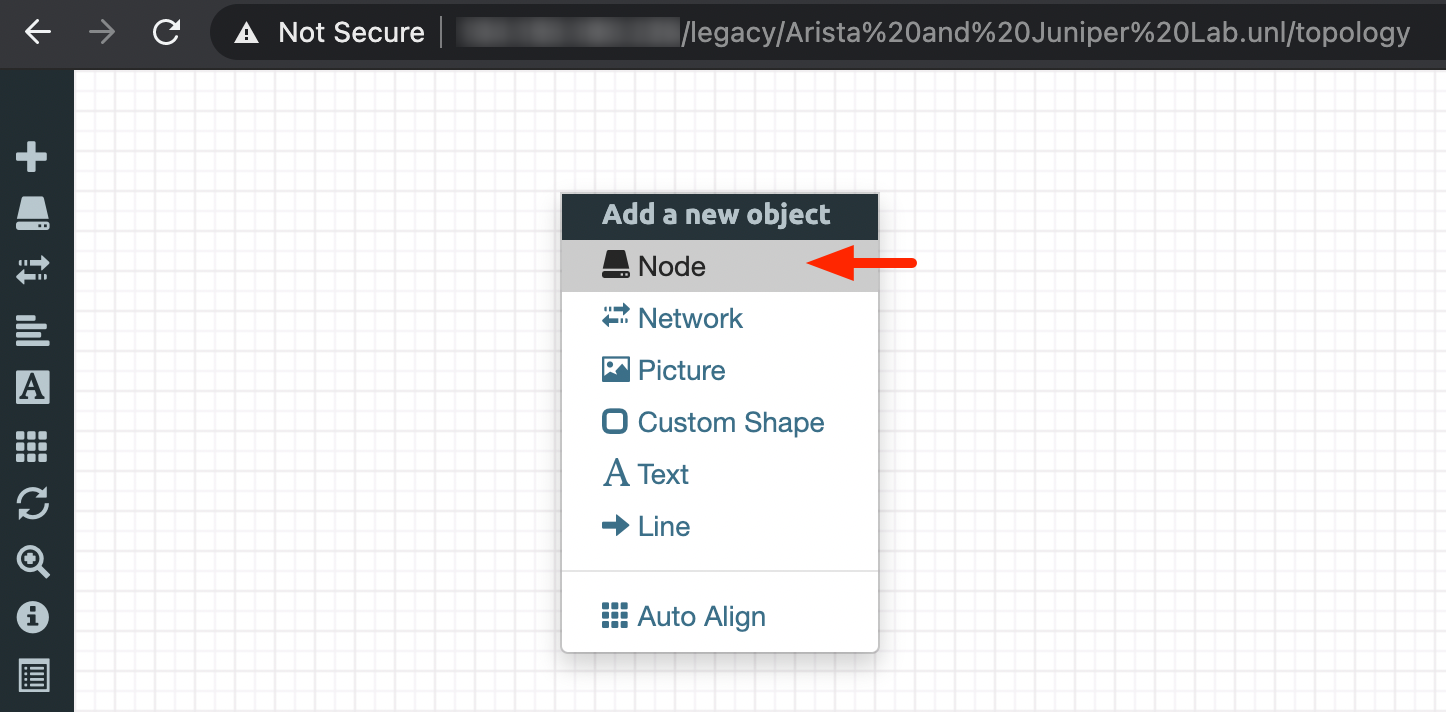
Let's get started with spinning up a new Arista vEOS device. To do this, right-click anywhere in the canvas, and in the "Add a new object" context-menu that appears, select "Node", as shown in the screenshot below.
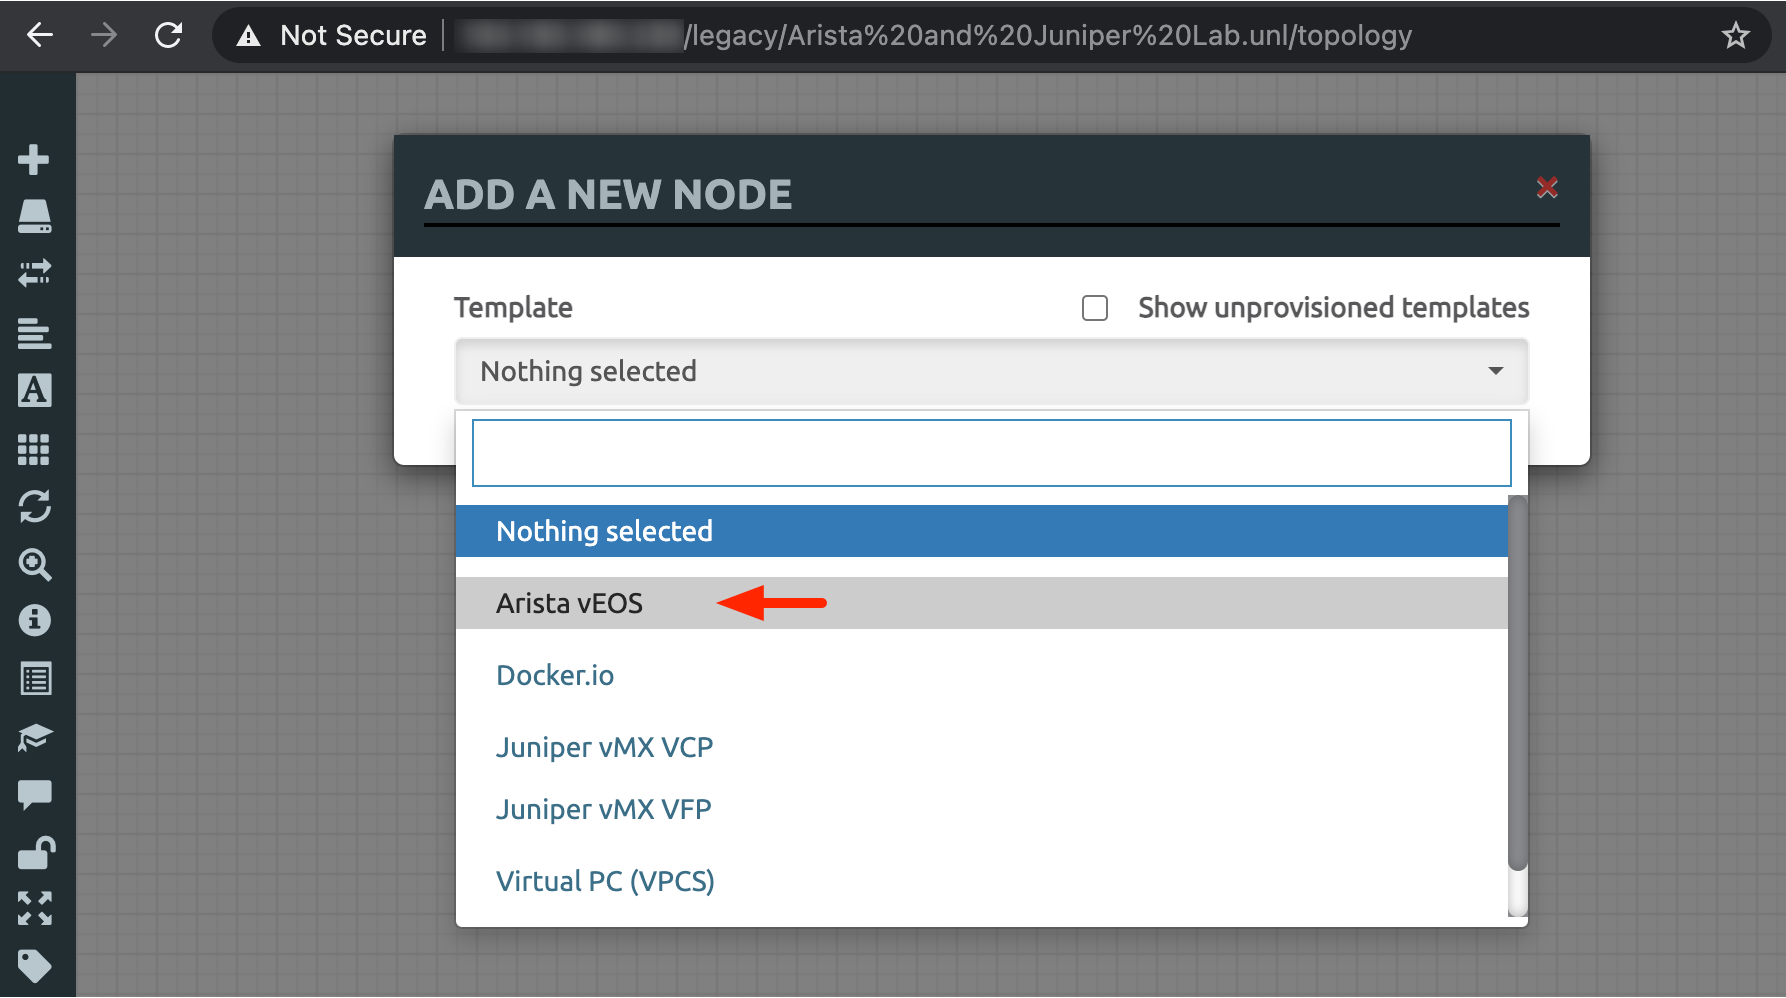
In the "Add A New Node" popup window that appears (shown below), select "Arista vEOS" from the "Template" field dropdown menu.
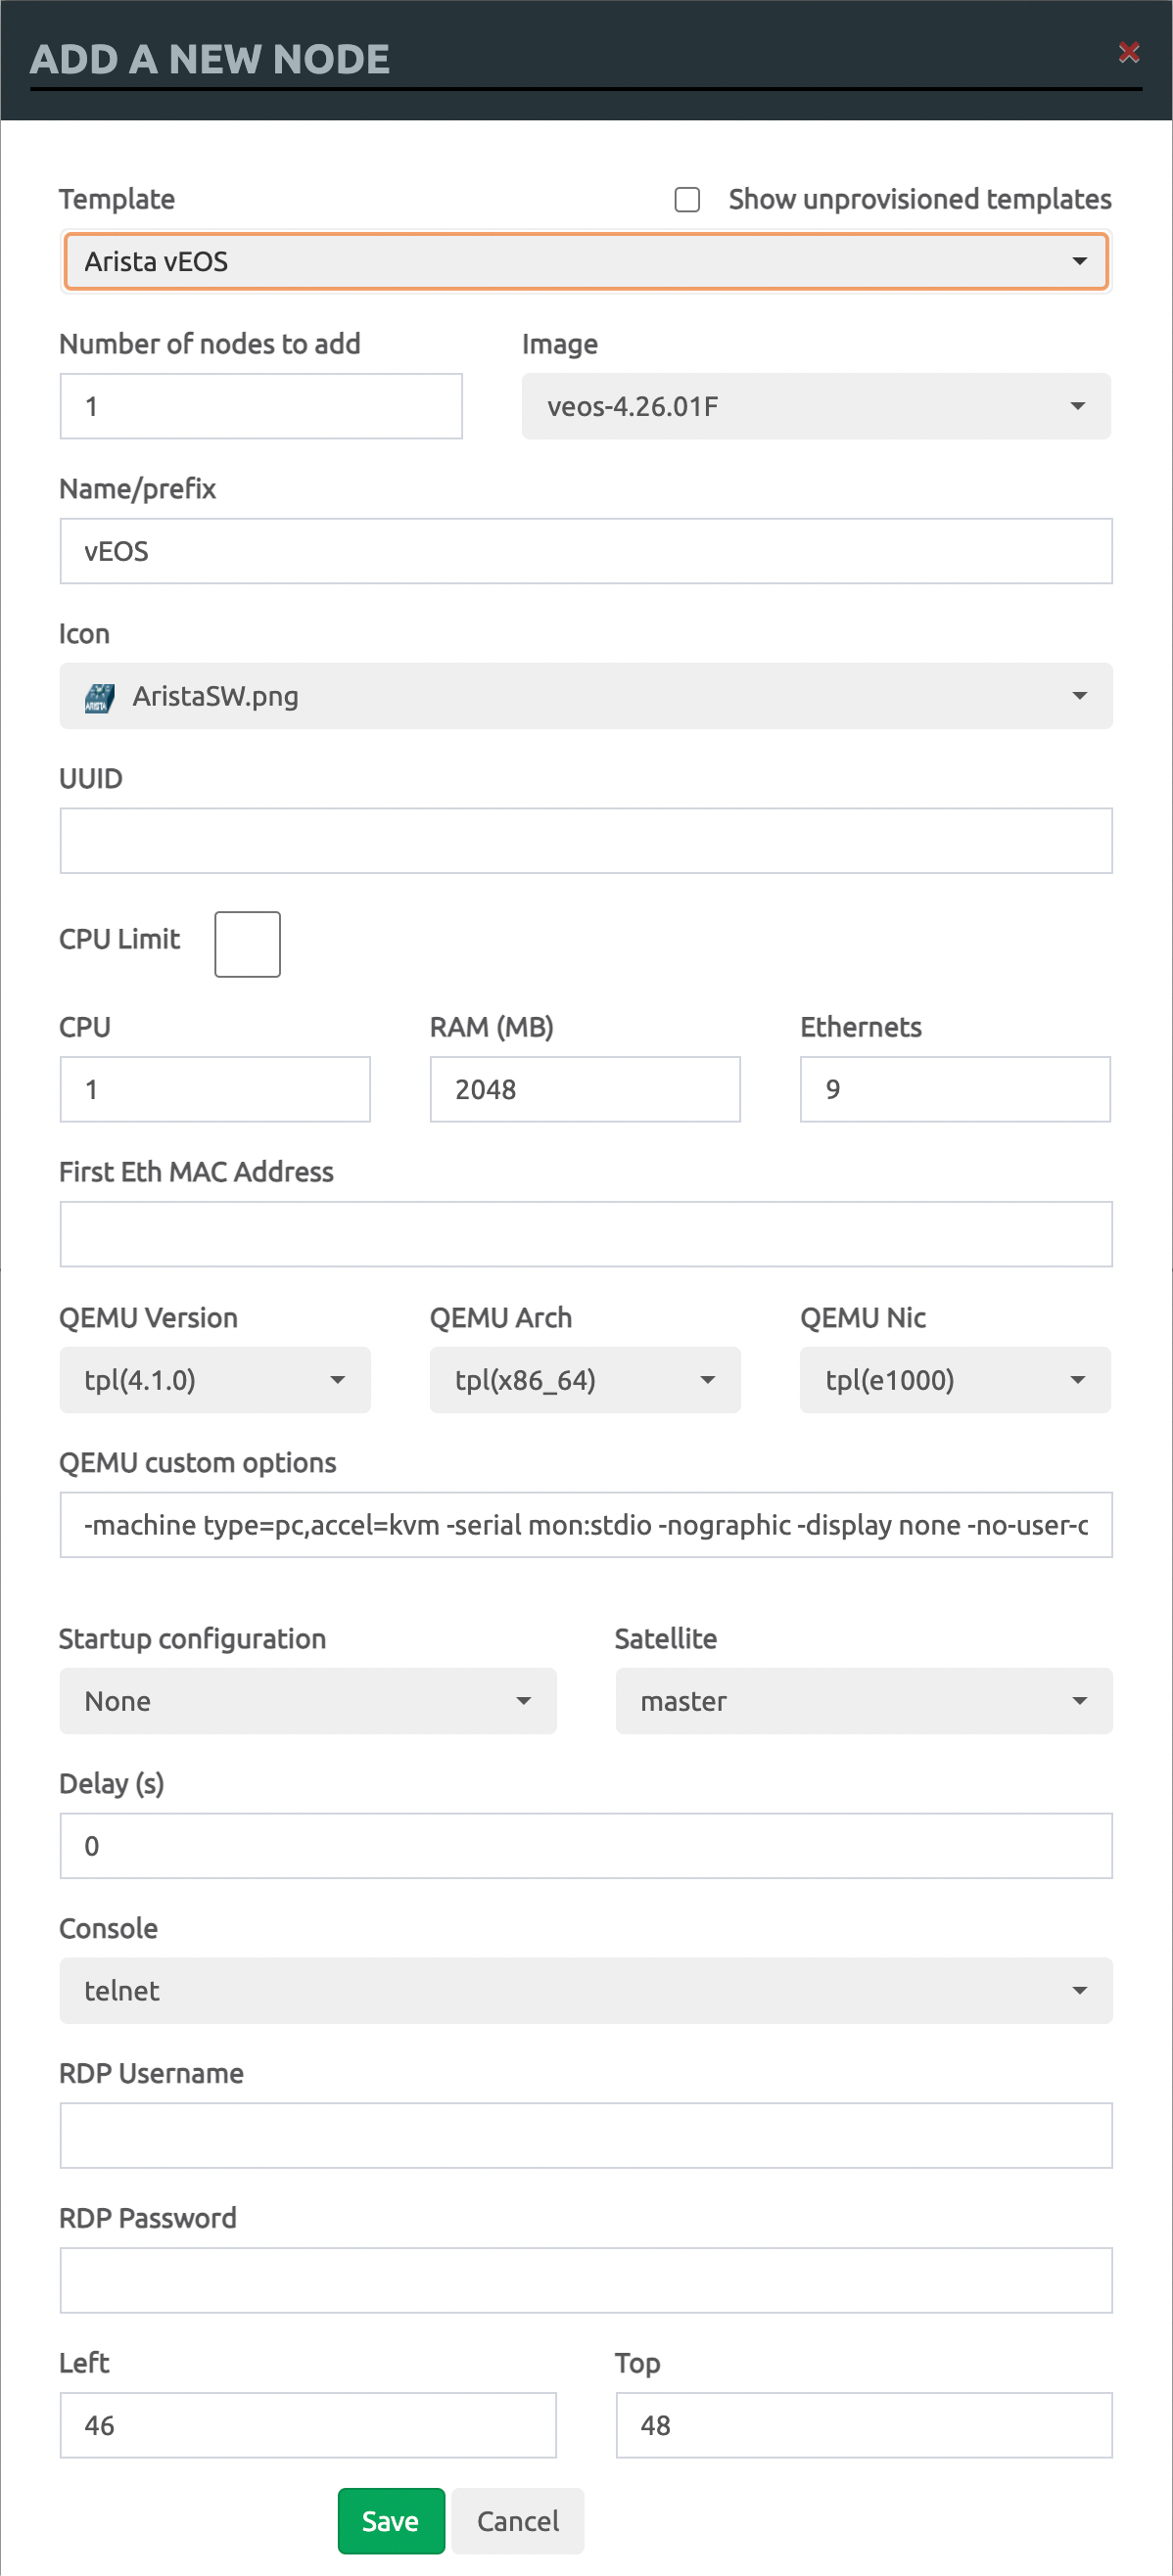
The contents of the "Add A New Node" popup window changes according to the selected Template. The contents of this provisioning wizard can be largely left intact, unless you wish to modify certain parameters, such as the router name, or the number of CPUs, the amount of memory to allocate, or the number of Ethernet ports to assign. Click on "Save" to continue.
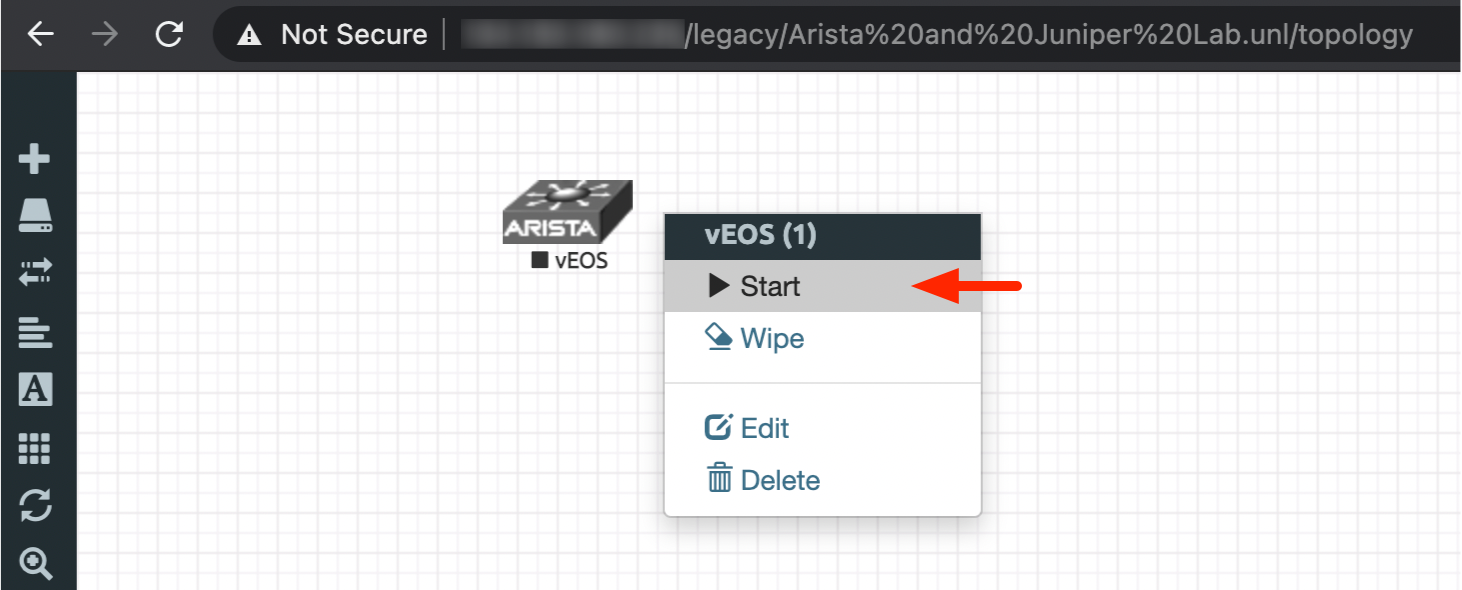
You will see the Arista vEOS router icon displayed in the main Topology Designer canvas window. The icon will be shown as grey in colour because it has not been started yet. To start the router, right-click on it and select "Start" in the context-menu that appears, as shown in the screenshot below. Once started, the router icon will change colour from grey to blue.
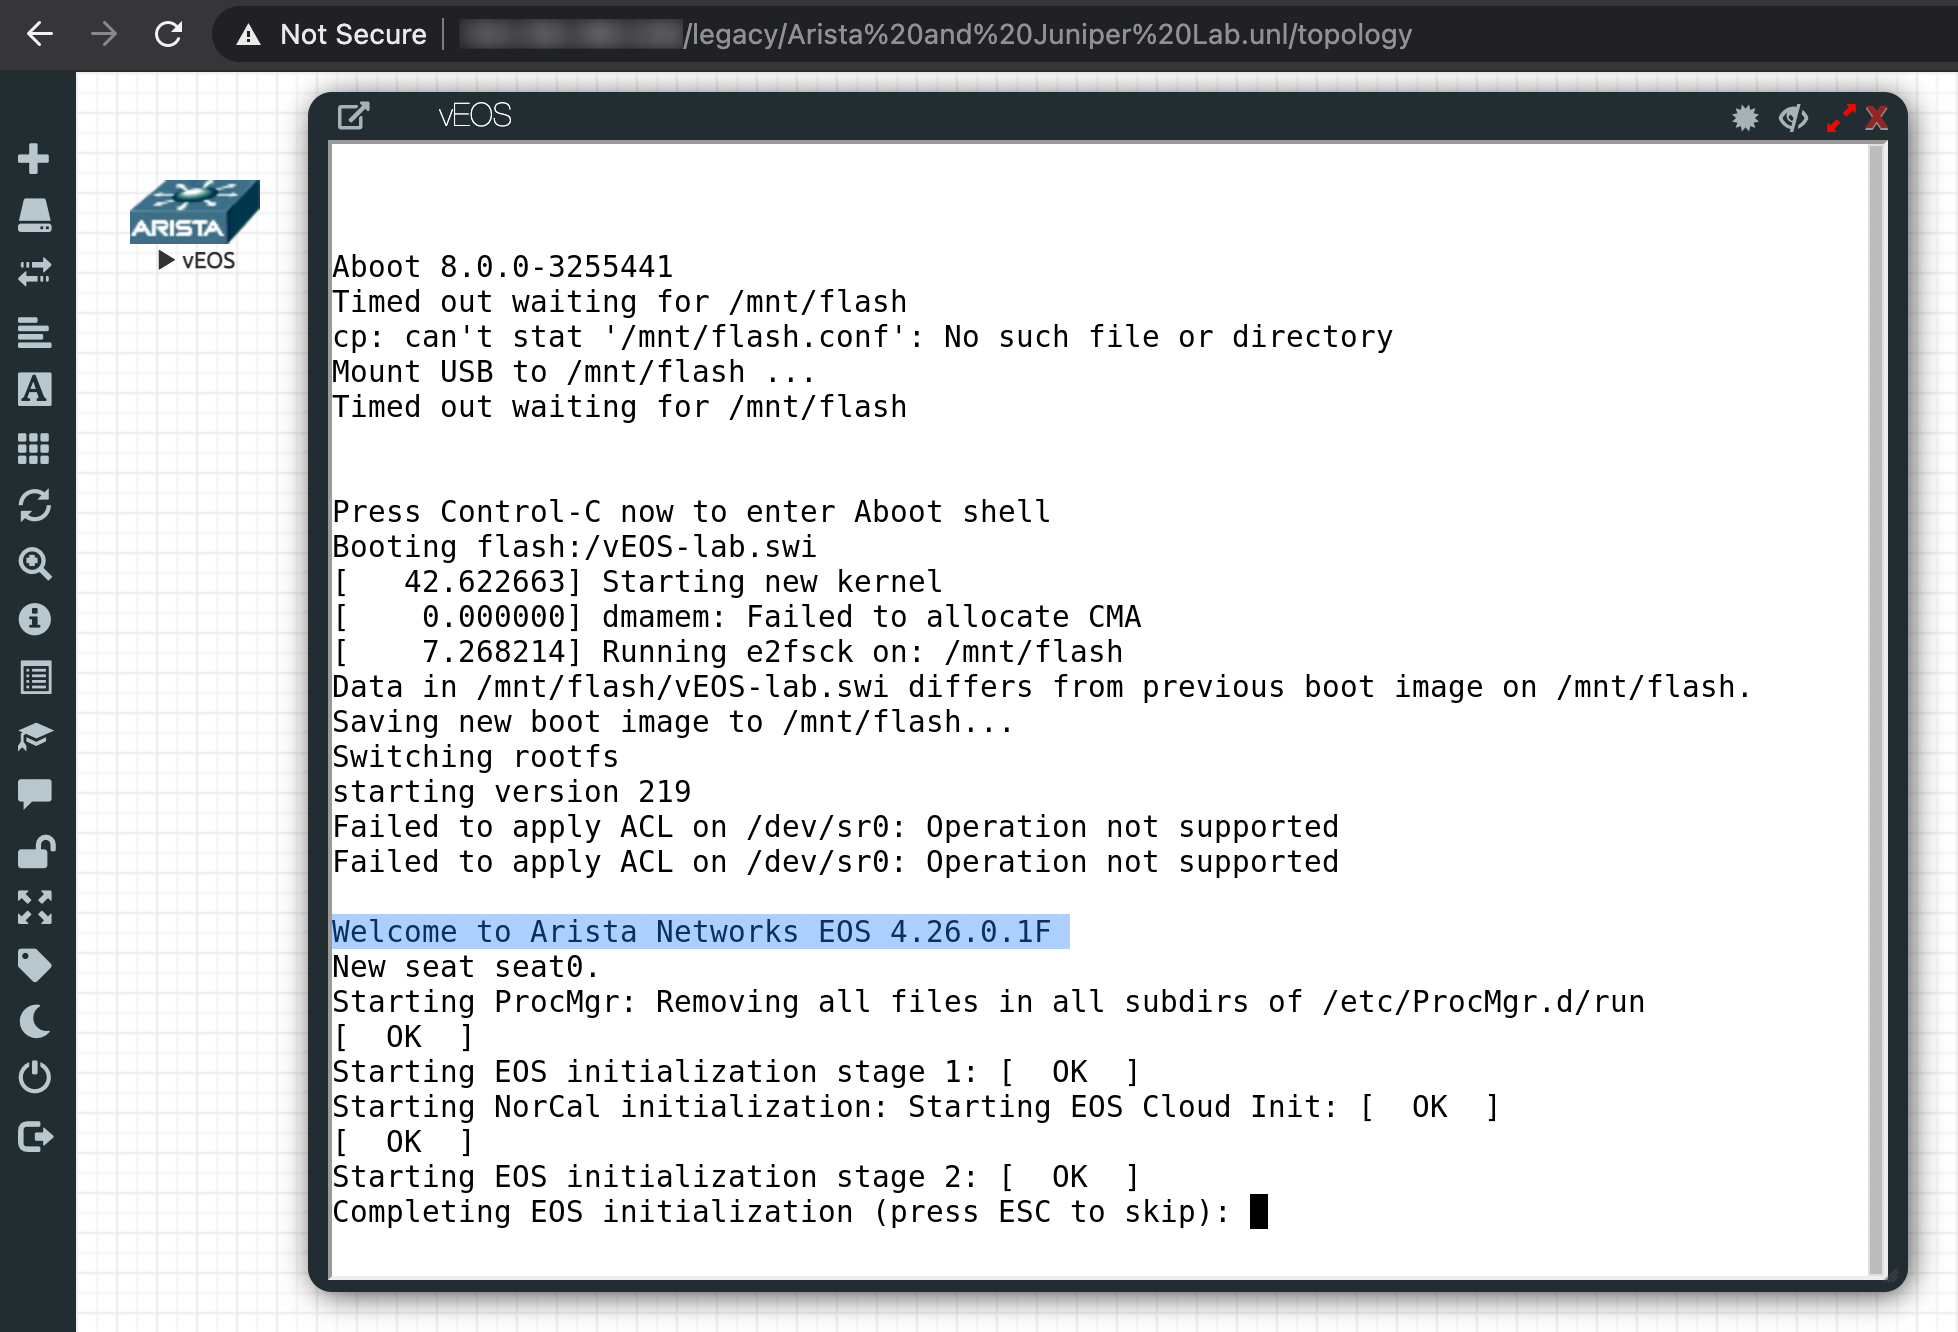
To view the console logs as the router boots up, click once on the router icon, and a popup window will appear, which will provide the terminal server console access to the device. This is shown in the screenshot below. The router will have finished booting up once the "login:" prompt appears (use "admin" as the default username, without any password).
Launching The Juniper vMX
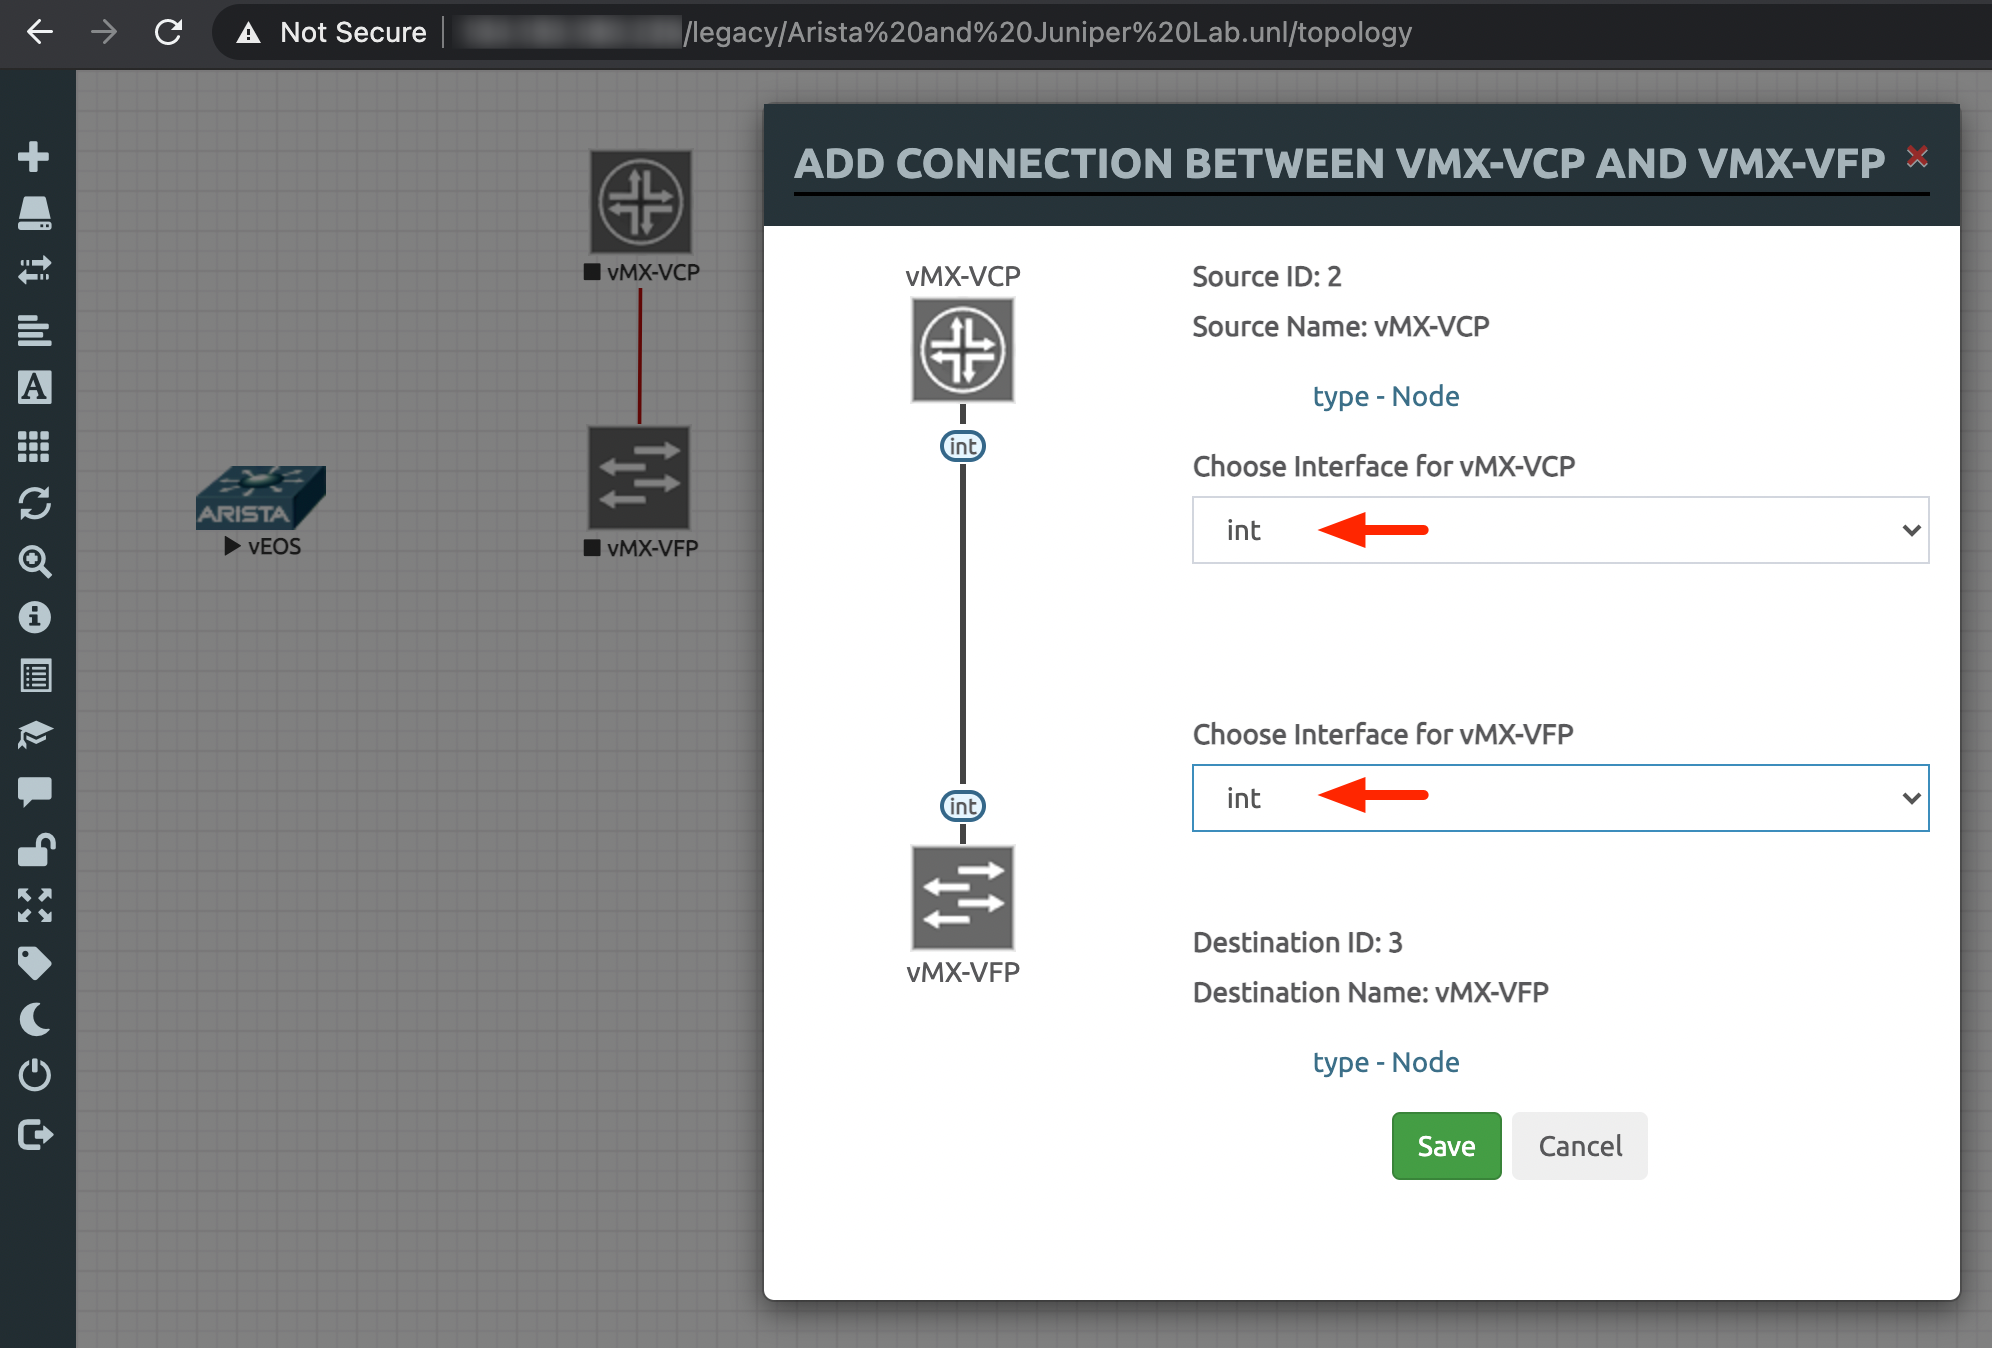
As mentioned above, the Juniper vMX is different from the Arista vEOS, in that there are two components to consider: the Virtual Control Plane (VCP) and the Virtual Forwarding Plane (VFP). In similar fashion to what was done for the Arista vEOS, add a node for "Juniper vMX VCP" and another node for "Juniper vMX VFP" onto the Topology Designer canvas. What is key here is to establish a communication link between the VCP and VFP via an internal bridge. As shown in the screenshot below, draw a line between the VCP and VFP, and a new "Add Connection Between vMX-VCP and vMX-VFP" popup window will automatically appear. Important: for both the VCP and VFP, select "int" as the Interface. Click on "Save" to continue.
Finally, to start the vMX, select both the VCP and VFP, right-click on the selected group, and in the context-menu that appears, select "Start Selected". This is shown in the screenshot below.

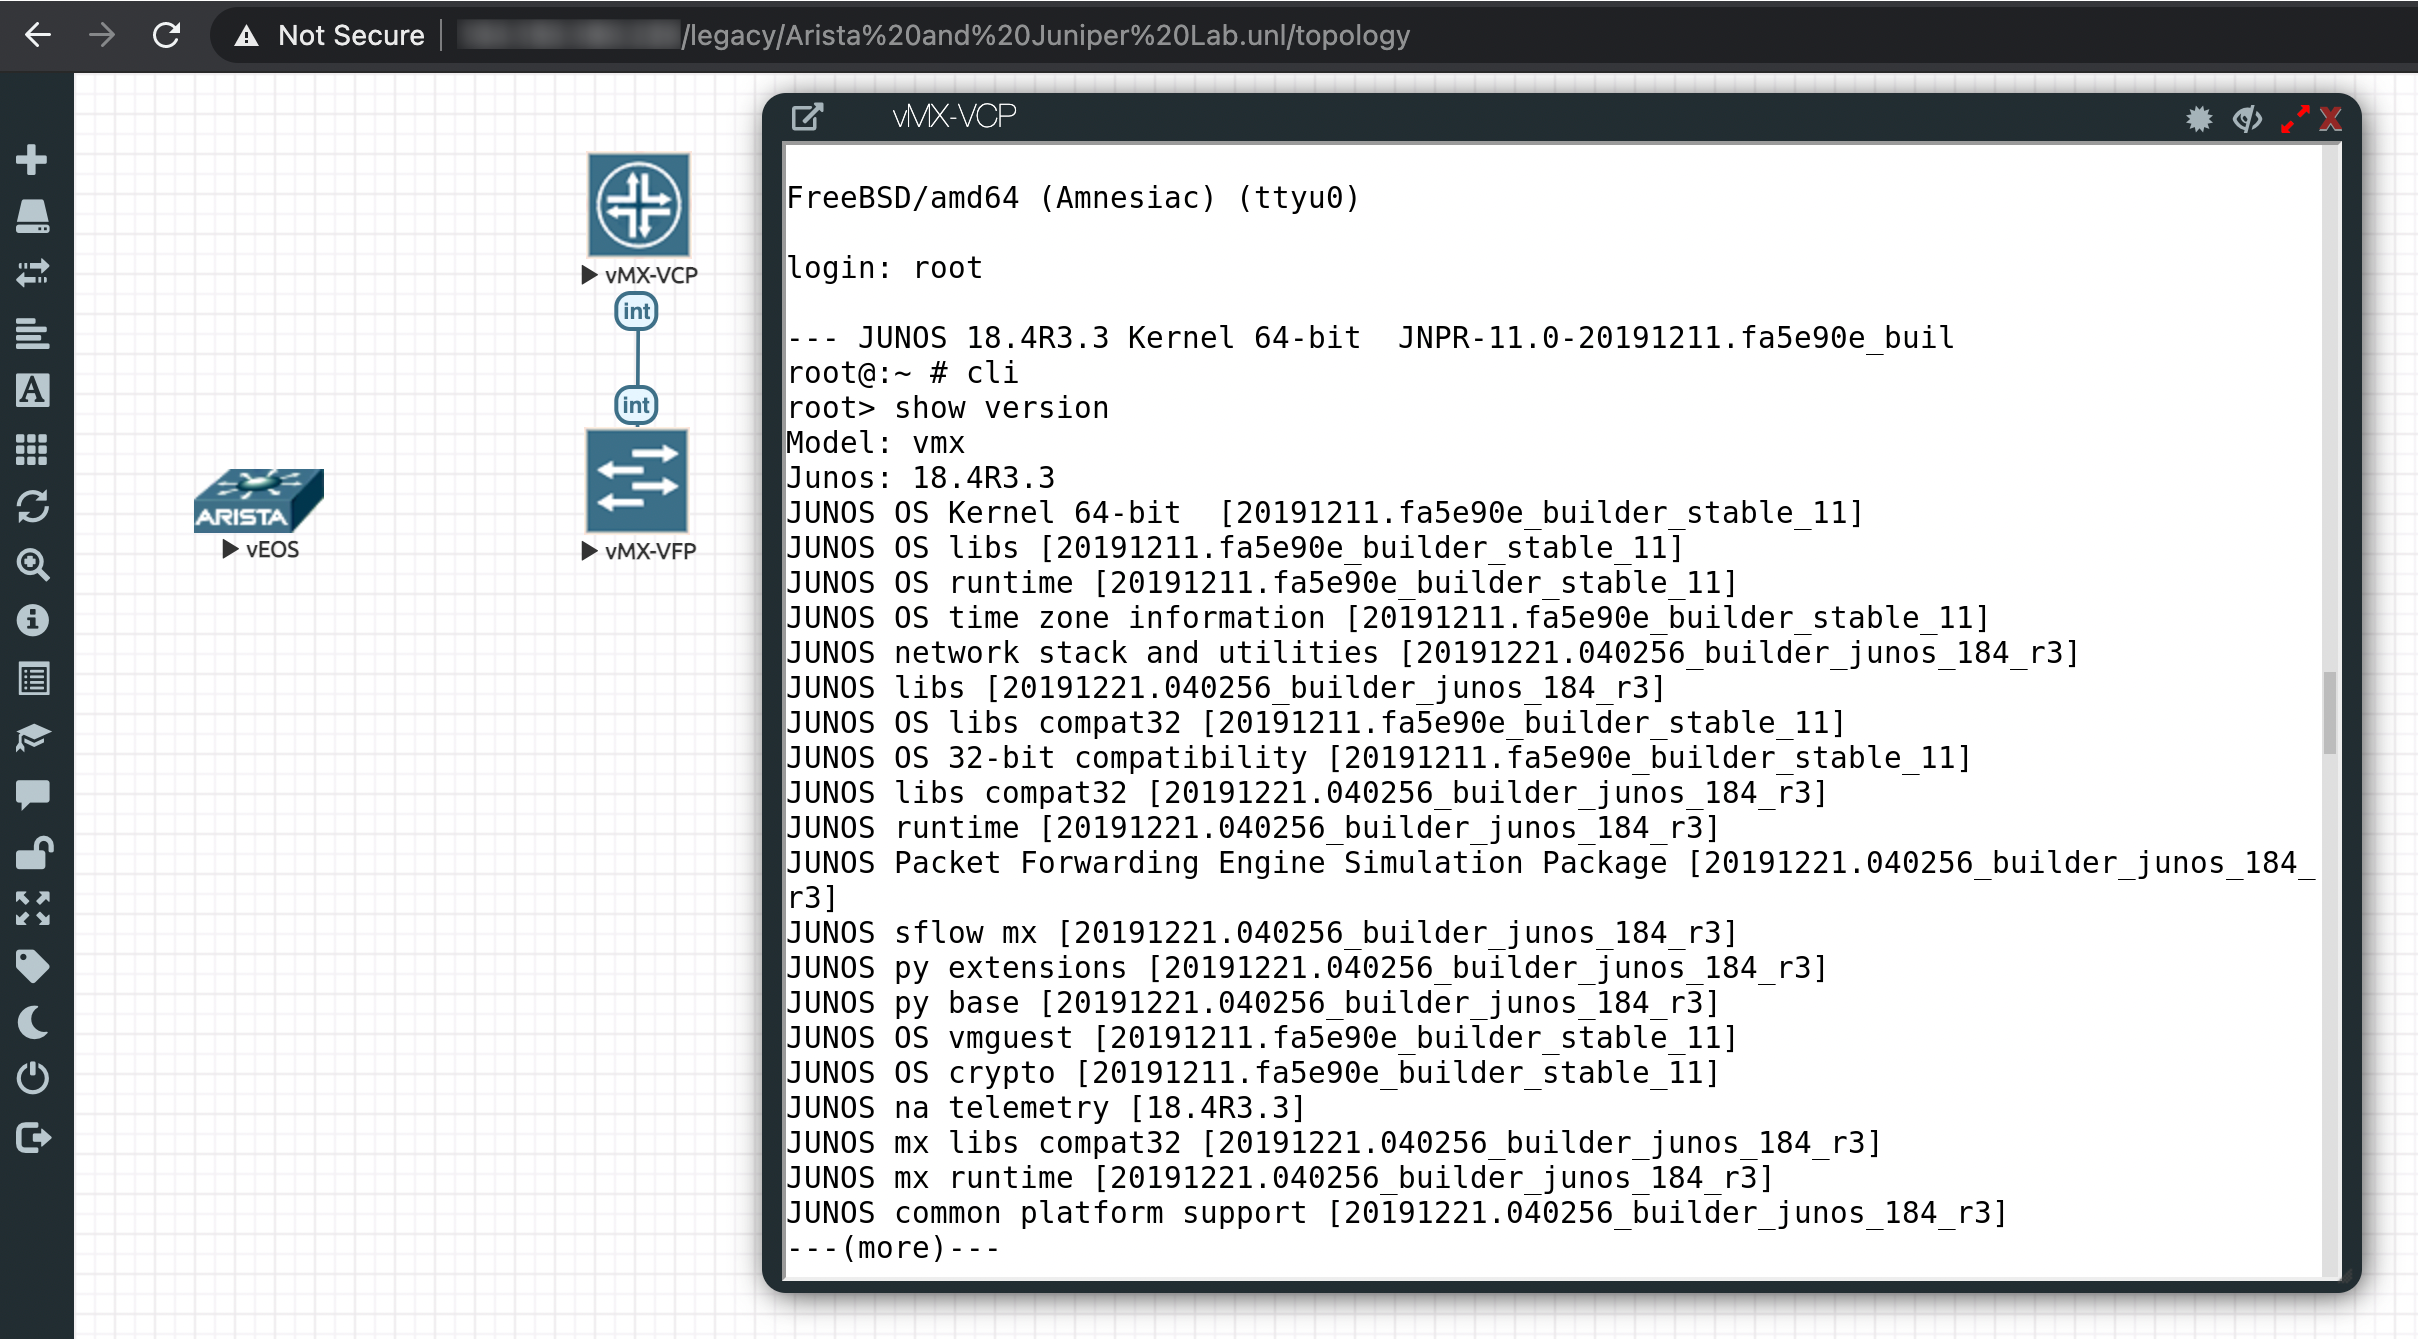
To view the console logs as the router boots up, click once on the icon for the vMX-VCP, and a popup window will appear, which will provide terminal server console access to the device. This is shown in the screenshot below. The router will have finished booting up once the "login:" prompt appears (use "root" as the default username, without any password).
Note: with the Juniper vMX, all CLI configurations are performed on the VCP, and all porting and connections are done on the VFP. The exception is the management interface "fxp0" or "em0", which must be connected on the VCP.
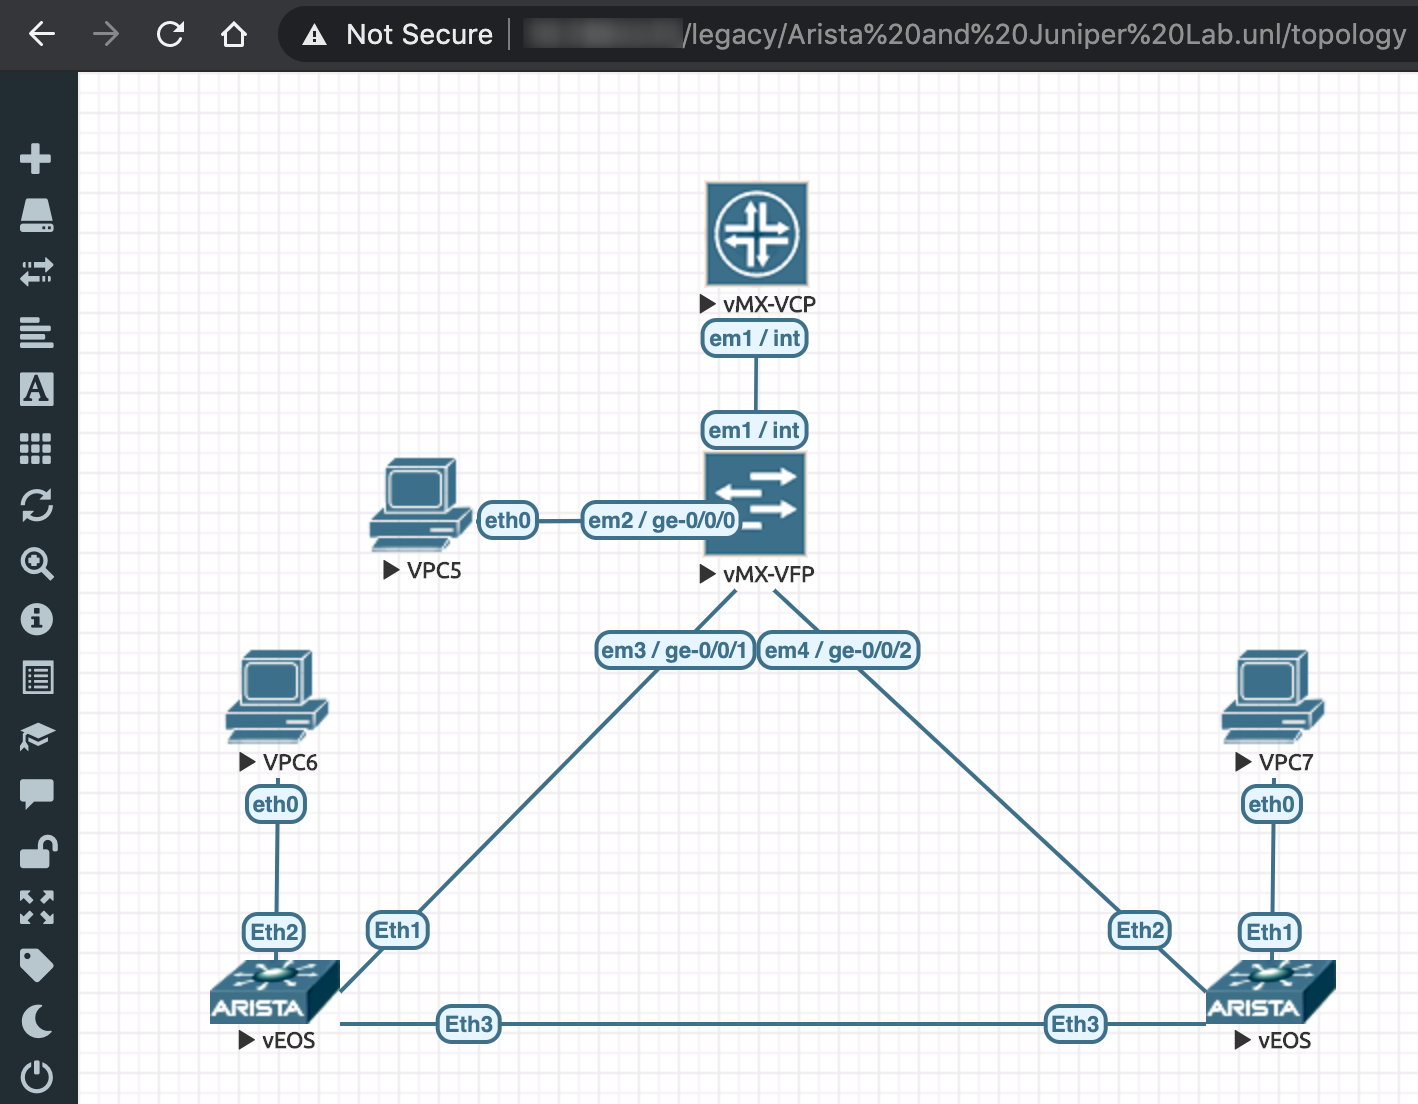
Now that we are able to instantiate Arista vEOS and Juniper vMX routers individually, we can stitch multiple such nodes together to create a larger network topology, as desired, such as the simple setup shown in the screenshot below.
In the next blog post, Part 3 (coming soon!), we will explore how we can connect our EVE-NG topology to external VMs that reside in our GCP environment.
-- Jag --